
When you ask someone why they want to own a Mac, they’ll often say because they’ve heard Apple’s computers are more user-friendly and secure than PCs.
While the user-friendliness will come down to your own personal preference, macOS is a very secure operating system. Apple puts a lot of focus on user privacy and security in every new release of its desktop OS. While the tech giant provides us with several great settings to help protect our Macs, it’s up to us to make sure we audit and enable them.
It’s important to remember that every security improvement comes at the cost of user convenience. With this in mind, not every setting may make sense for your personal use case. However, one thing is true for everyone — ensure to save your passwords somewhere safe, like in a password manager and backup your Mac to protect your data.
Every security tip in the world won’t help you if you can’t access your Mac.
Below are 15 ways to help make your Mac more secure:
1. Use a strong password
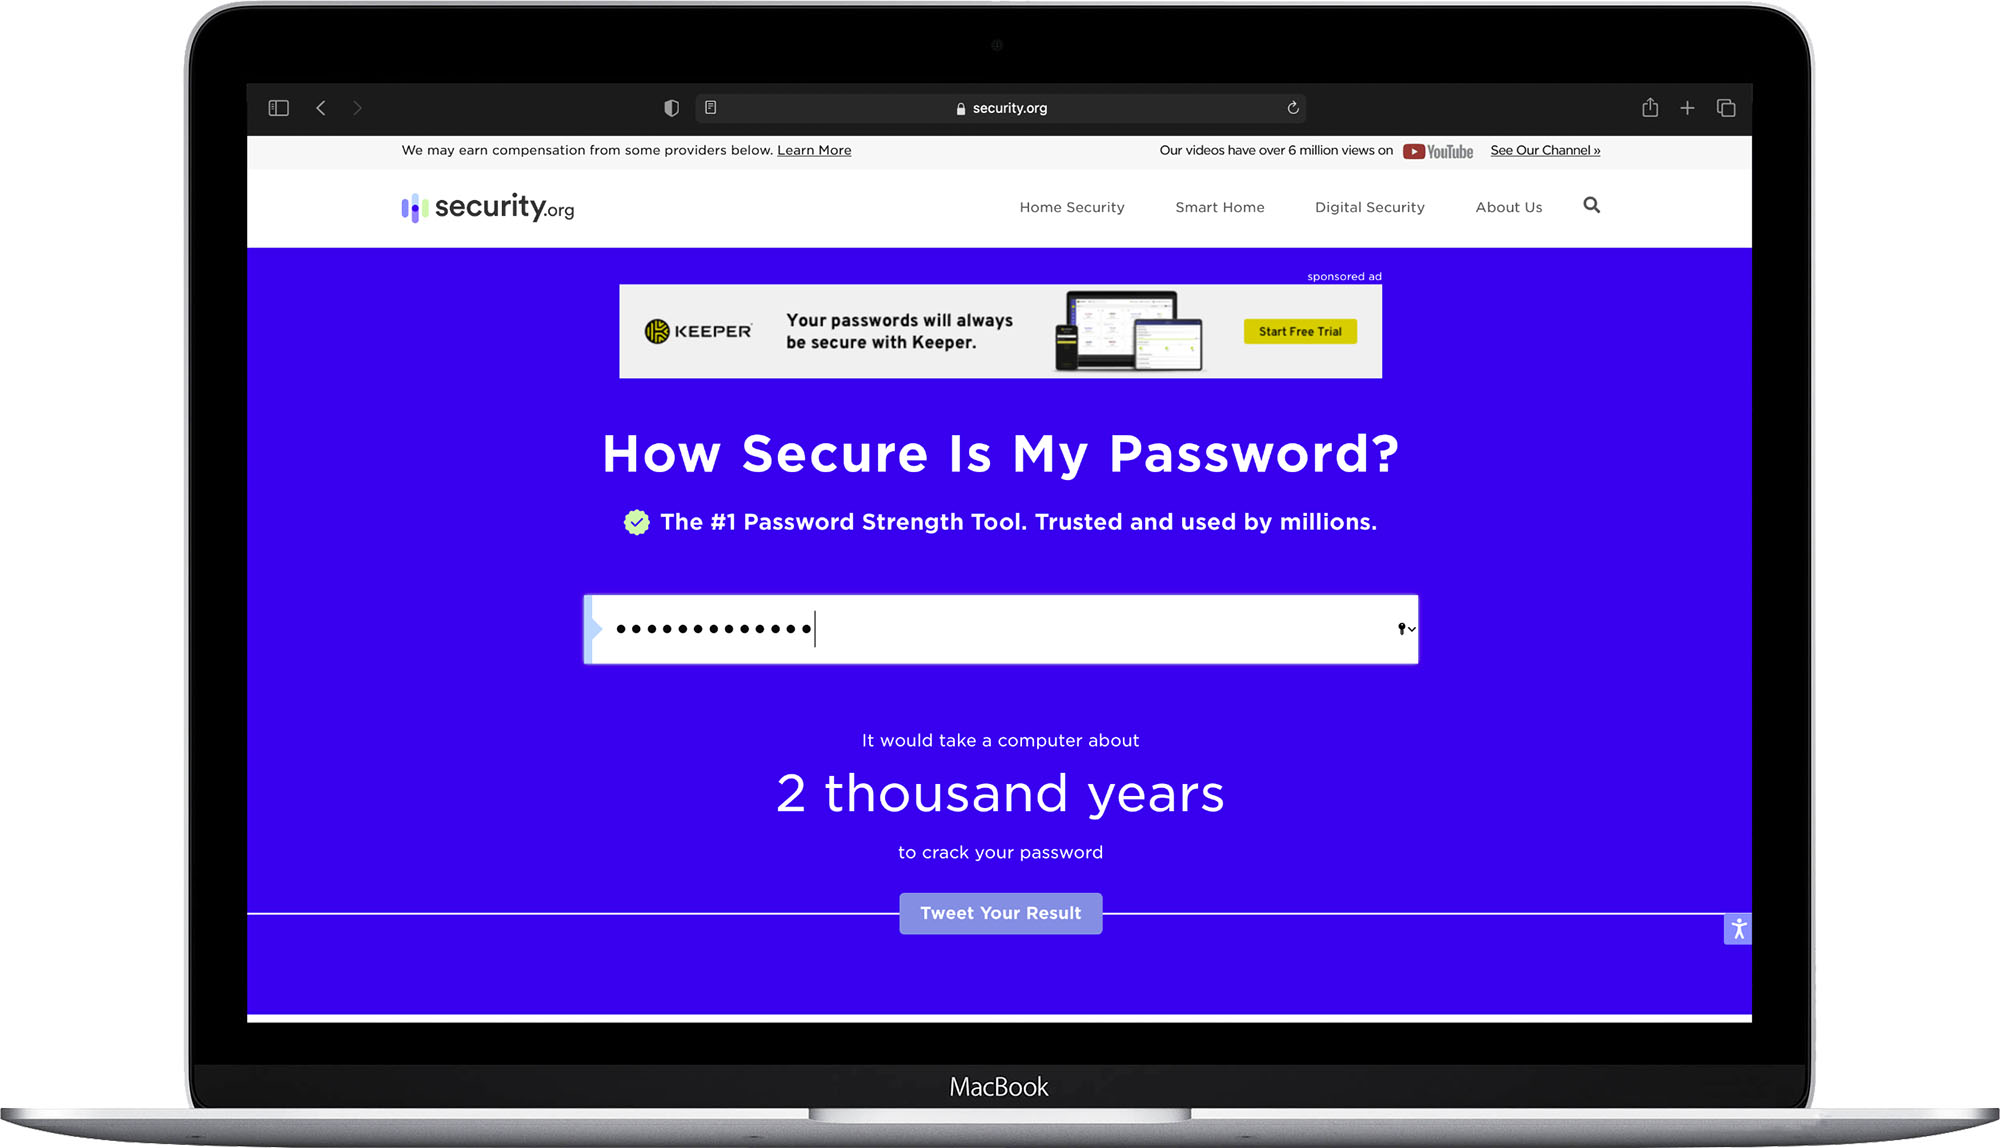
A strong password is the first line of defence when it comes to ensuring your Mac is secure. Many of us likely already use passwords on all of our devices, but we may not necessarily use strong ones. The best passwords are long and complex. I recommend changing your password to something that is an easily memorable sentence. Something like “i love my dog” would take 2 thousand years to crack. Consider changing it to “I l0ve my dog$,” which would take 4 billion years to crack. I recommend using a password strength checker like security.org to see if your password is strong enough to protect your devices.
To change your password on your Mac:
- 1. Launch System Preferences
2. Click Security & Privacy
3. Click the General tab
4. Click Change Password…
5. Type in your old password
6. Type in your new strong password
7. Retype your new password under Verify
8. You can enter in a password hint, but I recommended skipping this
9. Click Change Password
2. Require password immediately after sleep
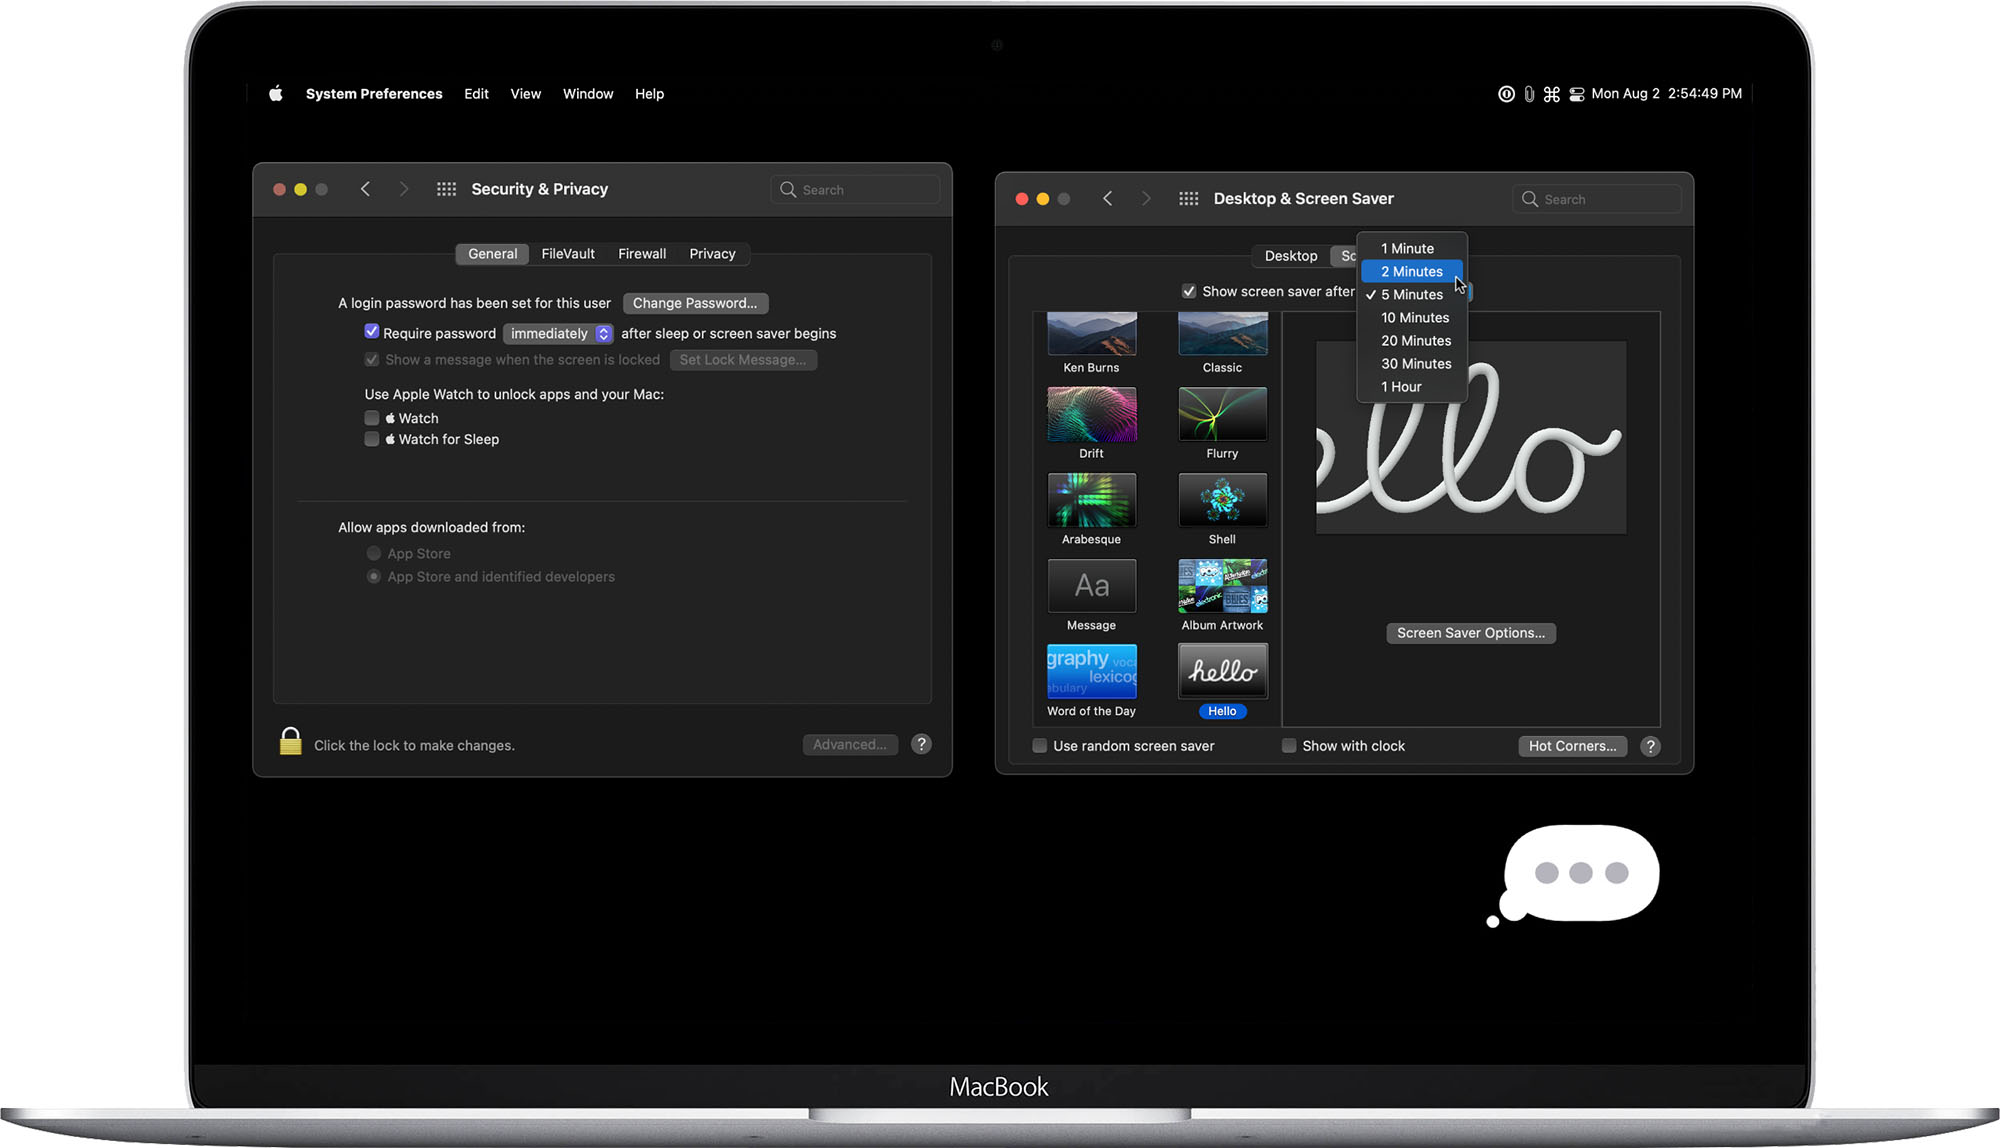
What use is a strong password if it doesn’t get enabled? Every time I walk away from my Mac, I press control+command+Q to lock it. The Center for Internet Security recommends setting a screensaver to start after two minutes of inactivity if you forget to manually lock your computer. Manually locking your Mac and setting a screen saver will minimize the threat of someone accessing your Mac when you step away from it.
To set your password to be required immediately after sleep or screen saver begins:
- 1. Launch System Preferences
2. Click Security & Privacy
3. Click the General tab
4. Check off Require password after sleep or screen saver begins
5. Select immediately from the drop-down
To set a screensaver:
- 1. Launch System Preferences
2. Click Desktop & Screen Saver
3. Click the Screen Saver tab
4. Check off Show screen saver after
3. Disable password hints
Password hints are recommended by Apple and are an excellent way for you to remember your password. Unfortunately, they also serve as a perfect tool to help someone guess your password too. The Center for Internet Security actually recommends organizations turn off password hints as a way to help prevent someone from potentially guessing your password.
To disable password hints:
- 1. Launch System Preferences
2. Click Users & Groups
3. Click Login Options
4. Click the lock icon
5. Enter your password
6. Click Unlock
7. Uncheck Show password hints
4. Require an administrator password to access system-wide preferences
If you share a Mac with family or friends, this setting will help ensure that only you and other administrators can make setting changes that impact all users. But, of course, standard users will still be able to make customizations for their individual profiles.
To require an administrator password to access system-wide preferences:
- 1. Launch System Preferences
2. Click Security & Privacy
3. Click the General tab
4. Click the lock icon
5. Enter your password
6. Click Unlock
7. Click Advanced… in the lower right-hand corner
8. Check off Require an administrator password to access system-wide preferences
9. Click OK
5. Disable guest user
Guest user is a way for someone to temporarily use your Mac without having direct access to your account. If FileVault is disabled, a guest user can access apps, temporarily save files, and browse the web almost identically to a regular user.
If FileVault is enabled, a guest user is only able to browse the internet using Safari. We will talk about how to encrypt your Mac using FileVault in tip 8. It’s recommended that unless you have a use for a guest account, disable it to limit someone having unauthorized access to your Mac.
To disable guest user:
- 1. Launch System Preferences
2. Click Users & Groups
3. Click Login Options
4. Click the lock icon
5. Enter your password
6. Click Unlock
7. Click Guest User
8. Uncheck Allow guests to log in to this computer
6. Find My Mac

‘Find My Mac’ is one of the best anti-theft features you can enable. If your Mac ever gets stolen, Find My Mac will allow you to see its last known location, lock it with a passcode, mark it as lost, and display a custom message. In addition, if your Mac has a T2 or an M1 chip, it supports Activation Lock. If your Mac ever gets erased, Activation Lock would require the last Apple ID and password associated with it to be entered before the Mac can be used again.
In addition, some Macs support Apple’s Find My network feature. Turning on Find My network allows your Mac to emit encrypted low-powered Bluetooth signals to other Apple devices to report its approximate location. For Find My Mac to work, you must enable Find My under location services and Find My Mac in your iCloud settings.
To enable Find My in location services:
- 1. Launch System Preferences
2. Click Security & Privacy
3. Click the Privacy tab
4. Click the lock icon in the lower left-hand corner
5. Enter your password
6. Click Unlock
7. Click Location Services
8. Check off Enable Location Services
9. Check off Find My
To enable Find My Mac:
- 1. Launch System Preferences
2. Click Apple ID
3. Click iCloud
4. Check off Find My Mac
5. Click Options
6. Turn On Find My Mac and Find My network
7. Click Done
7. Firewall
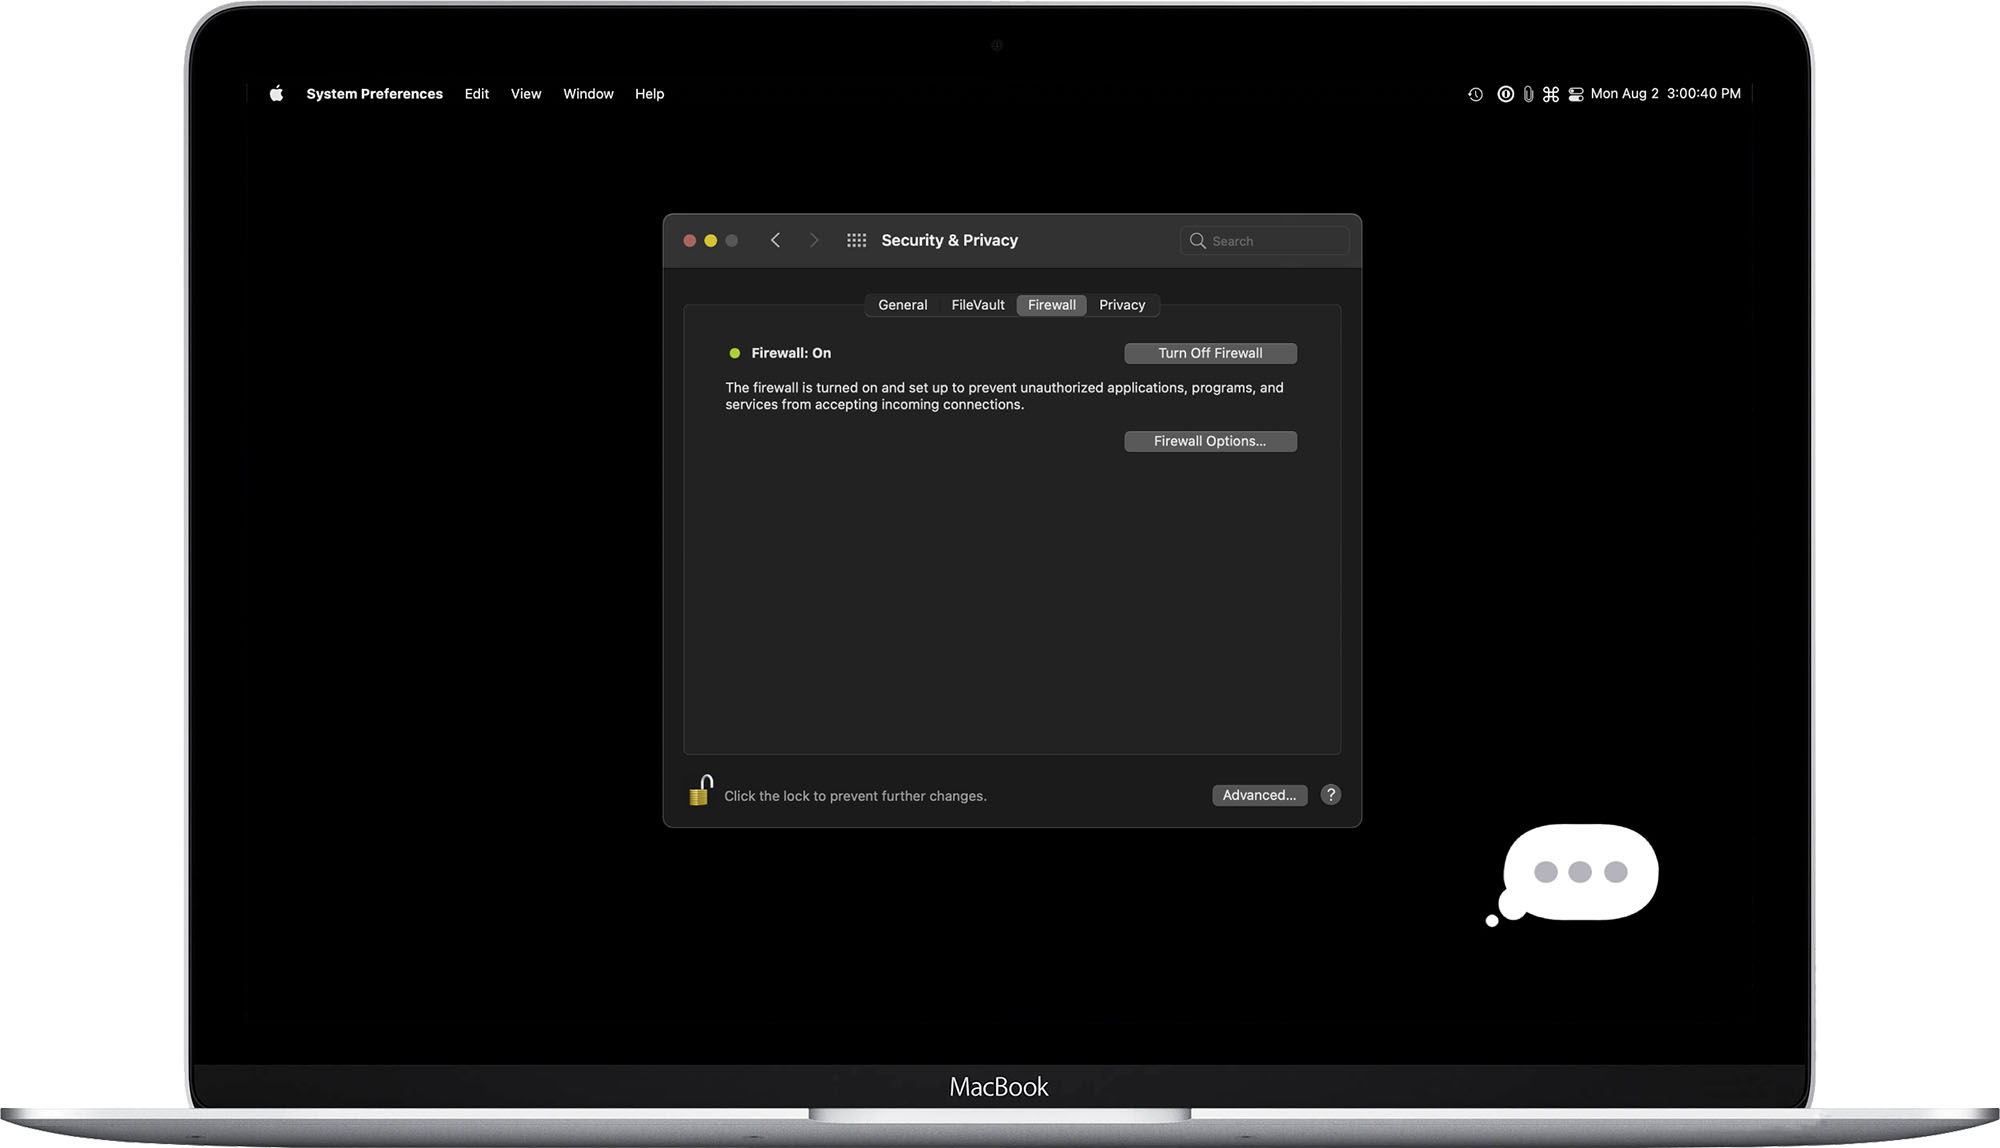
macOS has an included firewall feature built by Apple to help prevent unauthorized apps, programs, and services from accepting incoming internet connections. This setting helps minimize the threat of unauthorized access to your Mac while connected to the internet.
To enable Firewall:
- 1. Launch System Preferences
2. Click Security & Privacy
3. Click the Firewall tab
4. Click Turn On Firewall
Apple has created a brief support article to explore the additional firewalls settings in macOS.
8. FileVault
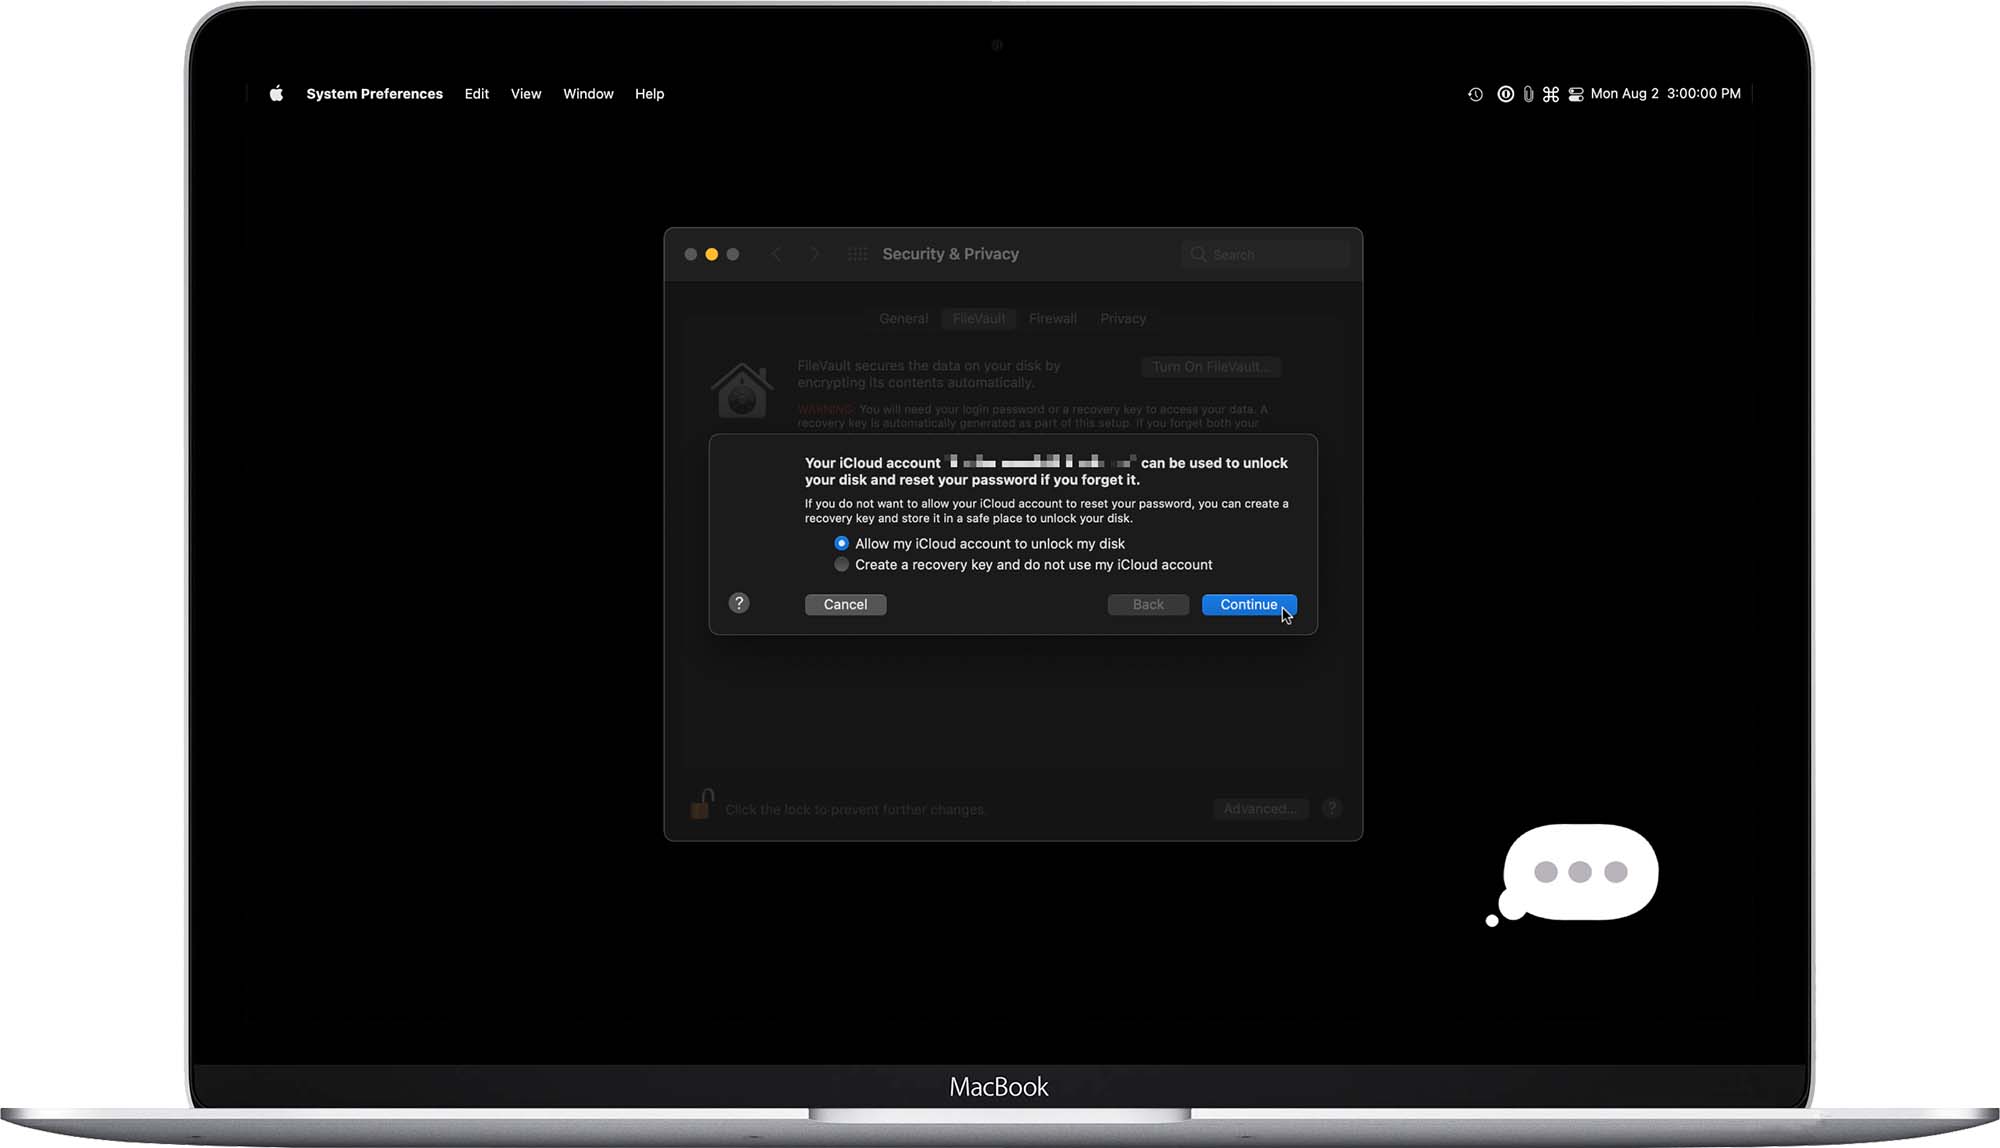
While Find My Mac is the best anti-theft deterrent on your Mac, FileVault is the best way to protect personal data. FileVault encrypts your Mac’s drive to make it unreadable without your password. When you enable FileVault, macOS gives you two recovery options in a worst-case scenario where you forget your Mac’s password. You can permit your iCloud account to act as a recovery method or have a recovery key. A recovery key will be a long string of text which you’d need to store in a password manager or another safe place. I recommend using the iCloud option, but the recovery key is the better choice if you’re going for maximum security.
To enable FileVault:
- 1. Launch System Preferences
2. Click Security & Privacy
3. Click the FileVault tab
4. Click on the lock icon in the lower left-hand corner
5. Enter in your Mac’s password
6. Click Unlock
7. Click Turn On FileVault…
8. Select either ‘Allow my iCloud account to unlock my disk’ or ‘Create a recovery key and do not use my iCloud account’
9. Click Continue
9. Disable Sharing
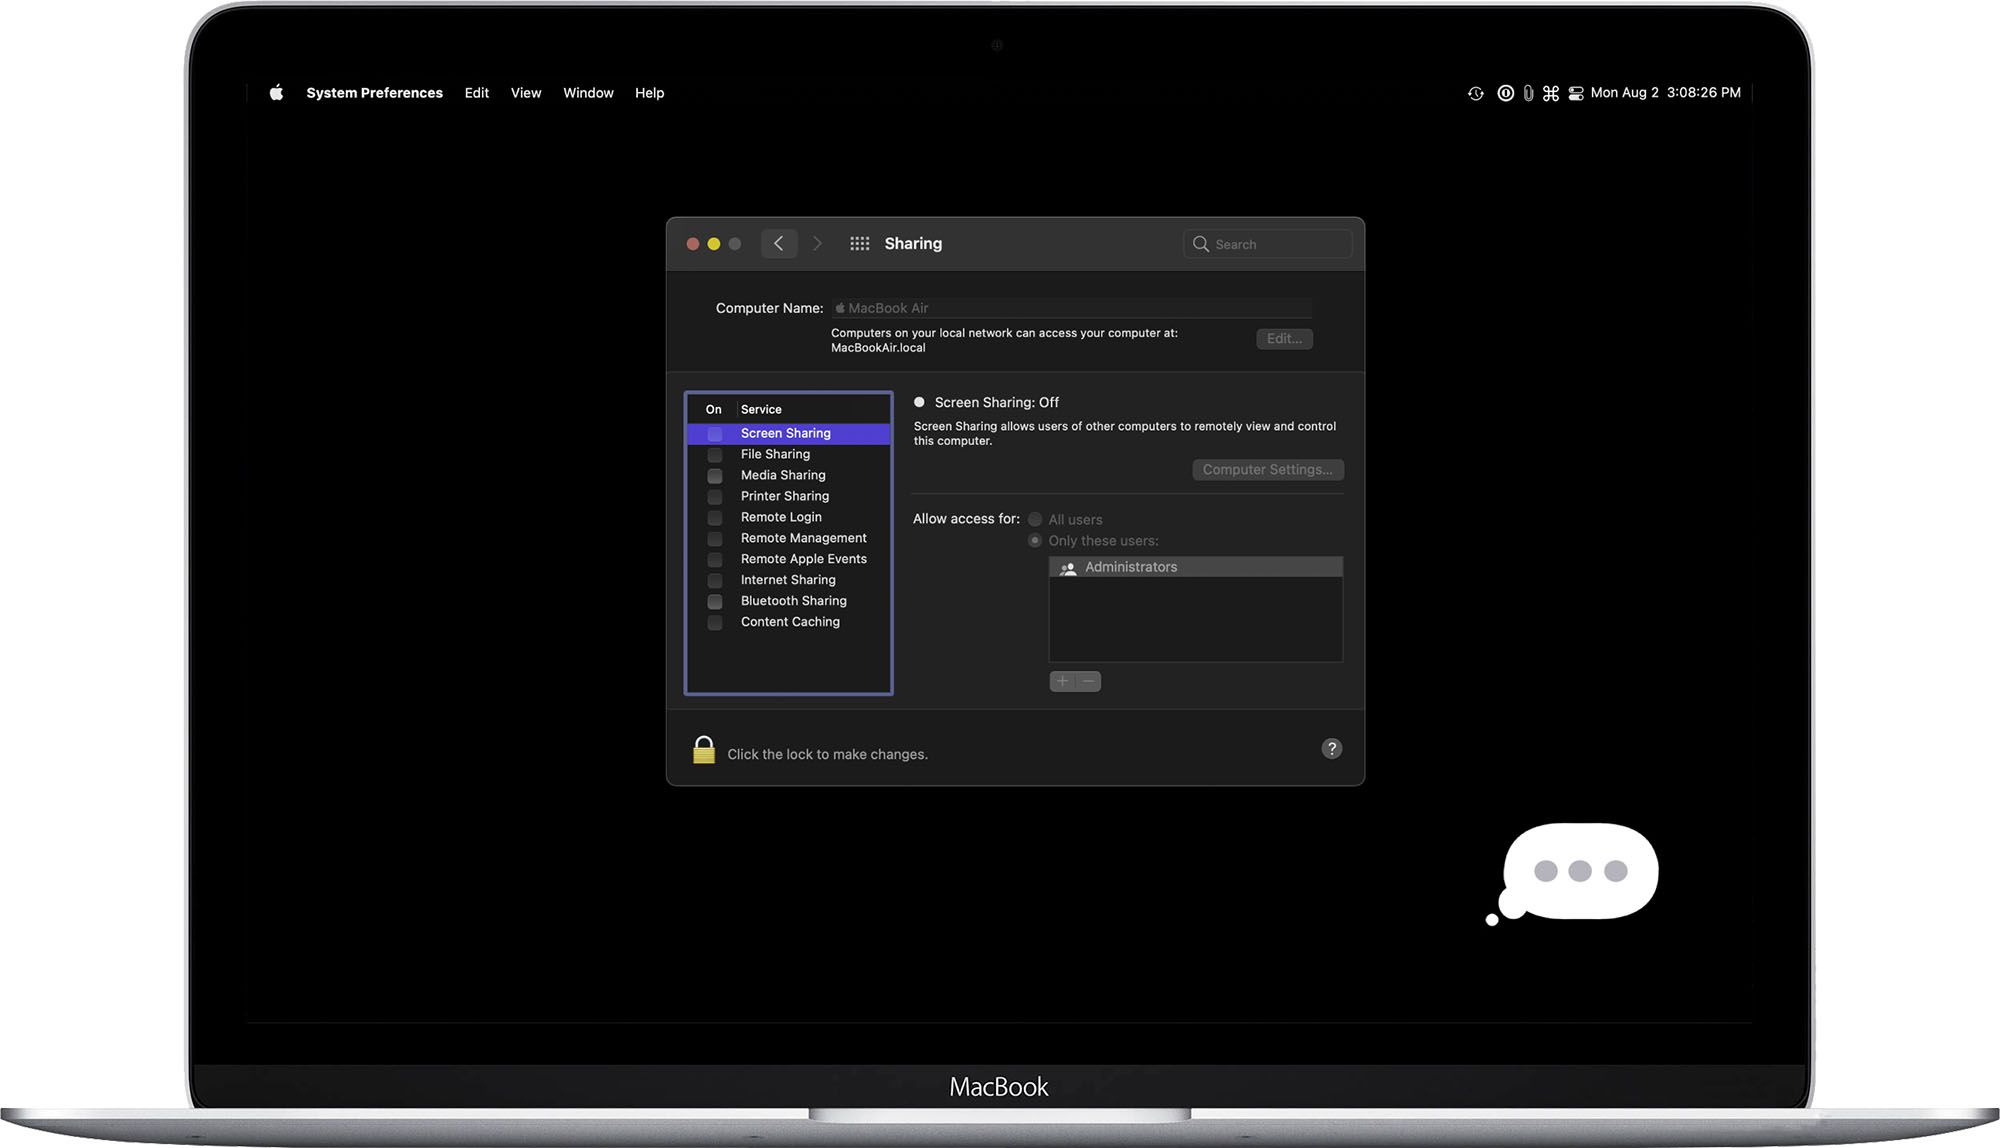
macOS has several sharing features, including screen, file, media, and printer sharing. All of these sharing features allow another device to connect over a network and access something specific. Unless you have a particular use for one of the sharing settings, I recommend turning them all off. In the sharing pane of system preferences, you’ll find: ‘Screen Sharing,’ ‘File Sharing,’ ‘Media Sharing,’ ‘Printer Sharing,’ ‘Remote Login,’ ‘Remote Management,’ ‘Remote Apple Events,’ ‘Internet Sharing,’ ‘Bluetooth Sharing’ and ‘Content Caching.’
To disable sharing:
- 1. Launch System Preferences
2. Click Sharing
3. Uncheck everything you don’t actively use
10. Review your Privacy Preferences
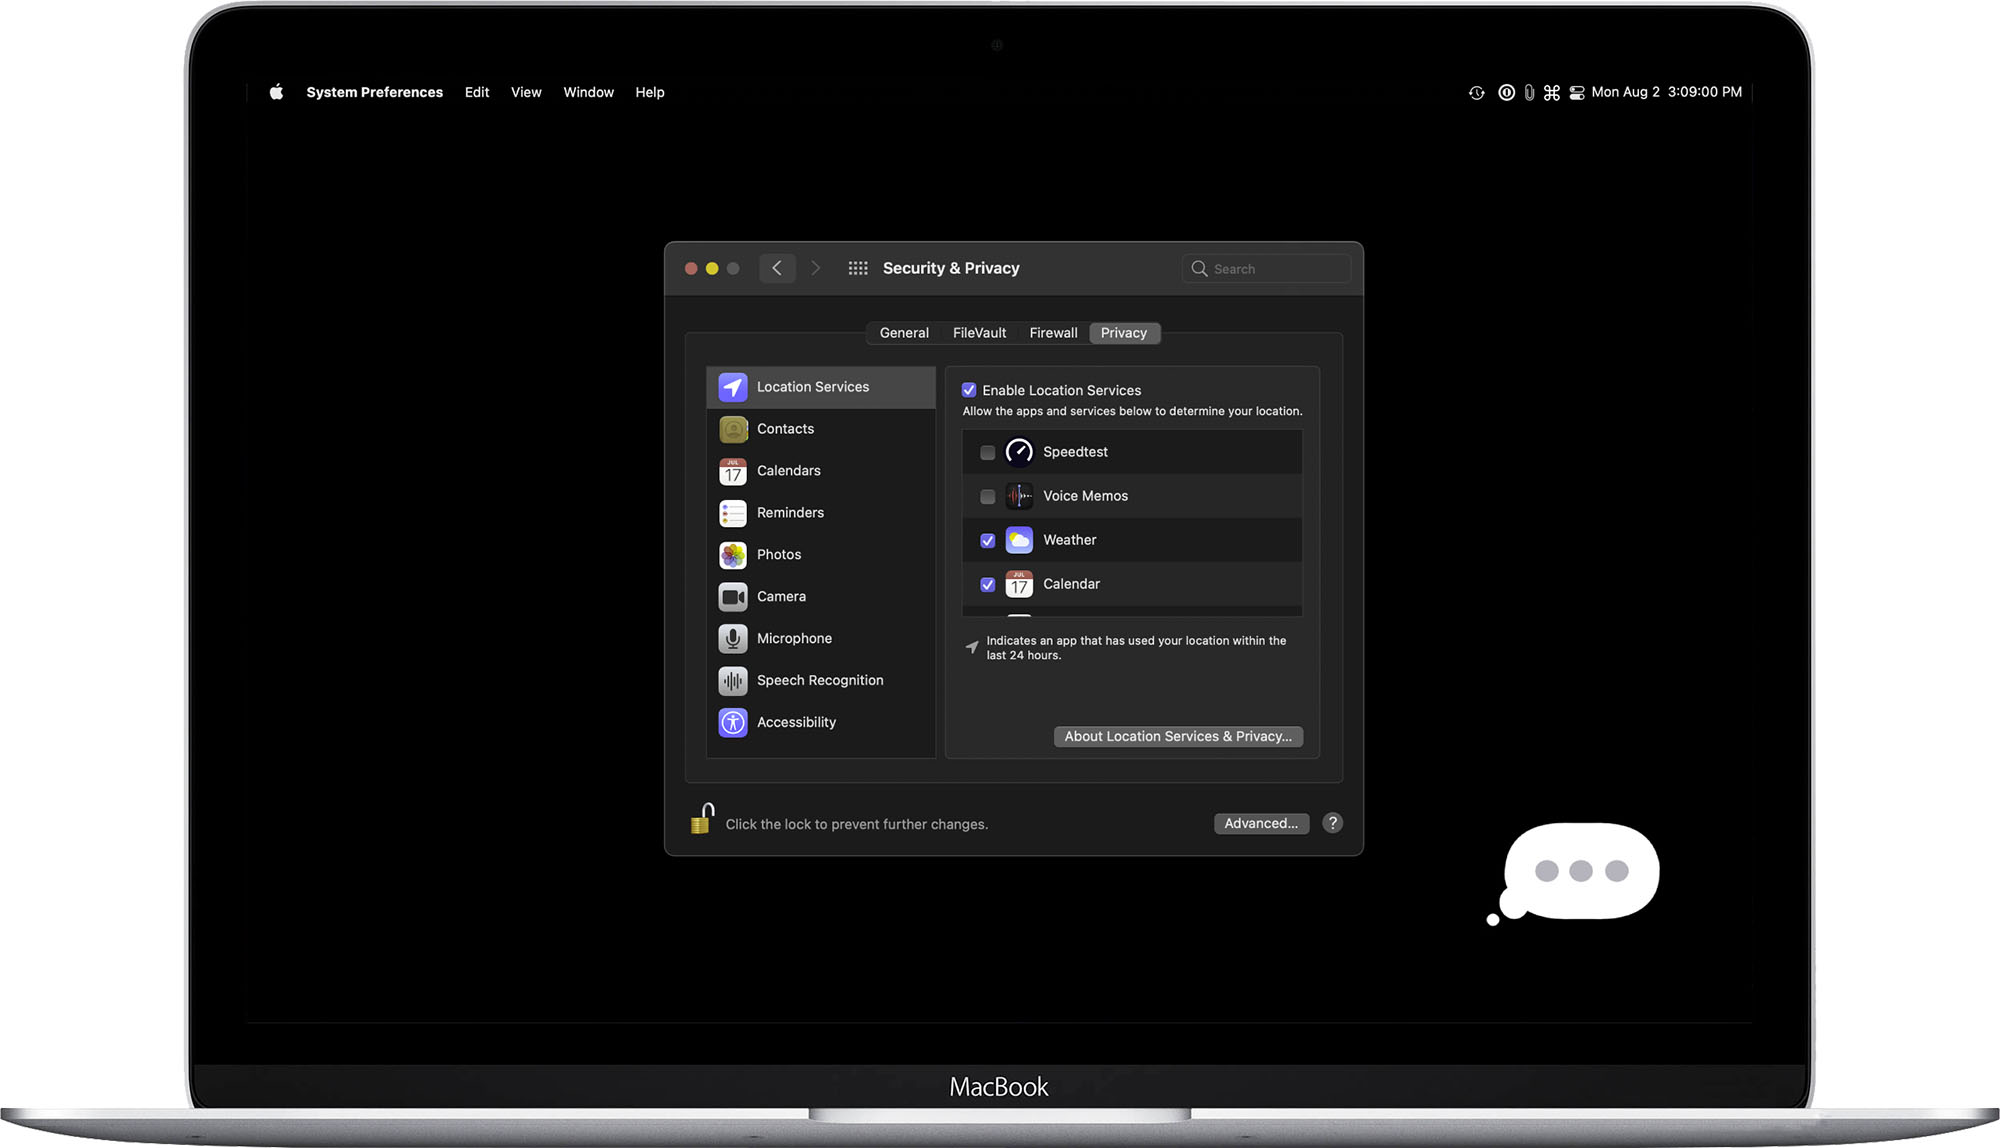
Over the past few years, Apple has made a big push to require user consent for an app to access any sensitive personal data on an Apple device. Access to your location, drive, microphone, camera, contacts, photos, and Bluetooth are examples of this. Therefore, I recommend auditing your privacy settings every now and then and asking if an app really needs access to that privacy preference.
To audit your privacy settings:
- 1. Launch System Preferences
2. Click Security & Privacy
3. Click the Privacy tab
4. Click the lock icon in the lower left-hand corner
5. Enter your password
6. Click Unlock
7. Click on any privacy preferences in the left-hand column
8. Uncheck any app that you think shouldn’t have access to that privacy preference in the right-hand column
11: Automatic Software & App Updates

Ensuring your operating system and apps are running their latest version is the best way to fight against malware and vulnerabilities. If Apple or a developer finds a bug or vulnerability, they will patch it in a future version. However, often we will forget to do these updates manually, so Apple has integrated automatic updates into macOS to make it easier for us to stay secure.
To enable Automatic Software Updates:
- 1. Launch System Preferences
2. Click Software Update
3. Click Advanced…
4. Check off Check for updates, Download new updates when available, Install macOS updates, Install app updates from the App Store, and Install system data files and security updates
5. Click OK
To enable Automatic App Updates:
- 1. Launch the App Store
2. Click App Store in the top left corner of the menu bar
3. Click Preferences
4. Check Automatic Updates
12. Full Security Policy (M1 Only)
This tip is exclusive to Apple’s M1 Macs, while the following three tips are exclusive to Intel Macs. With macOS Big Sur and M1, Apple has removed kernel extensions from macOS and replaced them with system extensions. Kernel extensions were a way for an app to get system-level access.
They posed a serious security vulnerability to macOS. Apple replaced kernel extensions with system extensions to give developers the same access while being more secure. If you did need to permit kernel extensions, Apple has buried this feature in macOS Recovery. Of course, to maximize security, you’ll want to make sure kernel extensions can’t run.
To enable the Full Security Policy on an M1 Mac:
- 1. Turn off your M1 Mac
2. Hold down the TouchID button
3. Continue to hold until you see “startup options are loading” on the screen
4. Click Options
5. Click Continue
6. macOS Recovery will load
7. If prompted, select your preferred language and click Continue
8. Click on your user icon
9. Click Next
10. Enter your password
11. Click Continue
12. Click Utilities in the top-left corner
13. Click Startup Security Utility from the drop-down menu
14. Click Unlock
15. Enter your password
16. Click Unlock
17. Click Security Policy…
18. Select Full Security
19. Click OK
20. Reboot your Mac to return to your user
13. Secure Boot (Intel Only)
Secure Boot is Apple’s security feature on an Intel Mac to ensure that it runs a verified authentic version of macOS. M1 Macs don’t have this because they can only run macOS Big Sur or macOS Monterey. There are three levels; full, medium, and no security.
Full security ensures that only a current version of macOS or another trusted OS can run on your Mac. This is the most secure and what I recommend. Medium security will allow any trusted OS signed by Apple to run. Finally, no security will allow any bootable OS to run on your Mac.
To ensure Full Security Secure Boot is enabled:
- 1. Turn off your Intel Mac
2. Hold down command+R on your keyboard until your Mac boots into recovery mode
3. If prompted, select your preferred language and click Continue
4. Click on your user icon
5. Click Next
6. Enter your password
7. Click Continue
8. Click Utilities in the top left corner
9. Click Startup Security Utility from the drop-down menu
10. Click Enter macOS Password…
11. Enter your password
12. Click OK
13. Select Full Security
14. Reboot your Mac to return to your user
14. Disallow Boot Media (Intel Only)
Intel Macs can boot from external drives when permitted. However, by default, Apple disables this feature on T2 Macs as an added security precaution.
To disable boot media on your Intel Mac:
- 1. Turn off your Intel Mac
2. Hold down command+R on your keyboard until your Mac boots into recovery mode
3. If prompted, select your preferred language and click Continue
4. Click on your user icon
5. Click Next
6. Enter your password
7. Click Continue
8. Click Utilities in the top-left corner
9. Click Startup Security Utility from the drop-down menu
10. Click Enter macOS Password…
11. Enter your password
12. Click OK
13. Select Disallow booting from external or removable media
14. Reboot your Mac to return to your user
15. Set a firmware password (Intel Only)
A firmware password is a powerful tool in your security toolbox. When a firmware password is enabled, you will be required to enter it anytime you want to boot to an external drive or into Boot Camp. A firmware password also prevents the ability to perform an SMC or NVRAM reset. If you enable a firmware password, make the password different than your macOS password.
Ensure to store it in a password manager or a safe place since you may not use it often. If you ever forget your firmware password, you’ll need to visit an Apple Store with a valid ID and proof of purchase to have it reset.
To set a firmware password:
- 1. Turn off your Intel Mac
2. Hold down command+R on your keyboard until your Mac boots into recovery mode
3. If prompted, select your preferred language and click Continue
4. Click on your user icon
5. Click Next
6. Enter your password
7. Click Continue
8. Click Utilities in the top left corner
9. Click Startup Security Utility from the drop-down menu
10. Click Enter macOS Password…
11. Enter your password
12. Click OK
13. Click Turn on Firmware Password…
14. Enter the password you’d like to use
15. Re-enter the password you’d like to use under Verify
16. Click Set Password
17. Reboot your Mac to return to your user
Bonus: Create a Lock Screen message
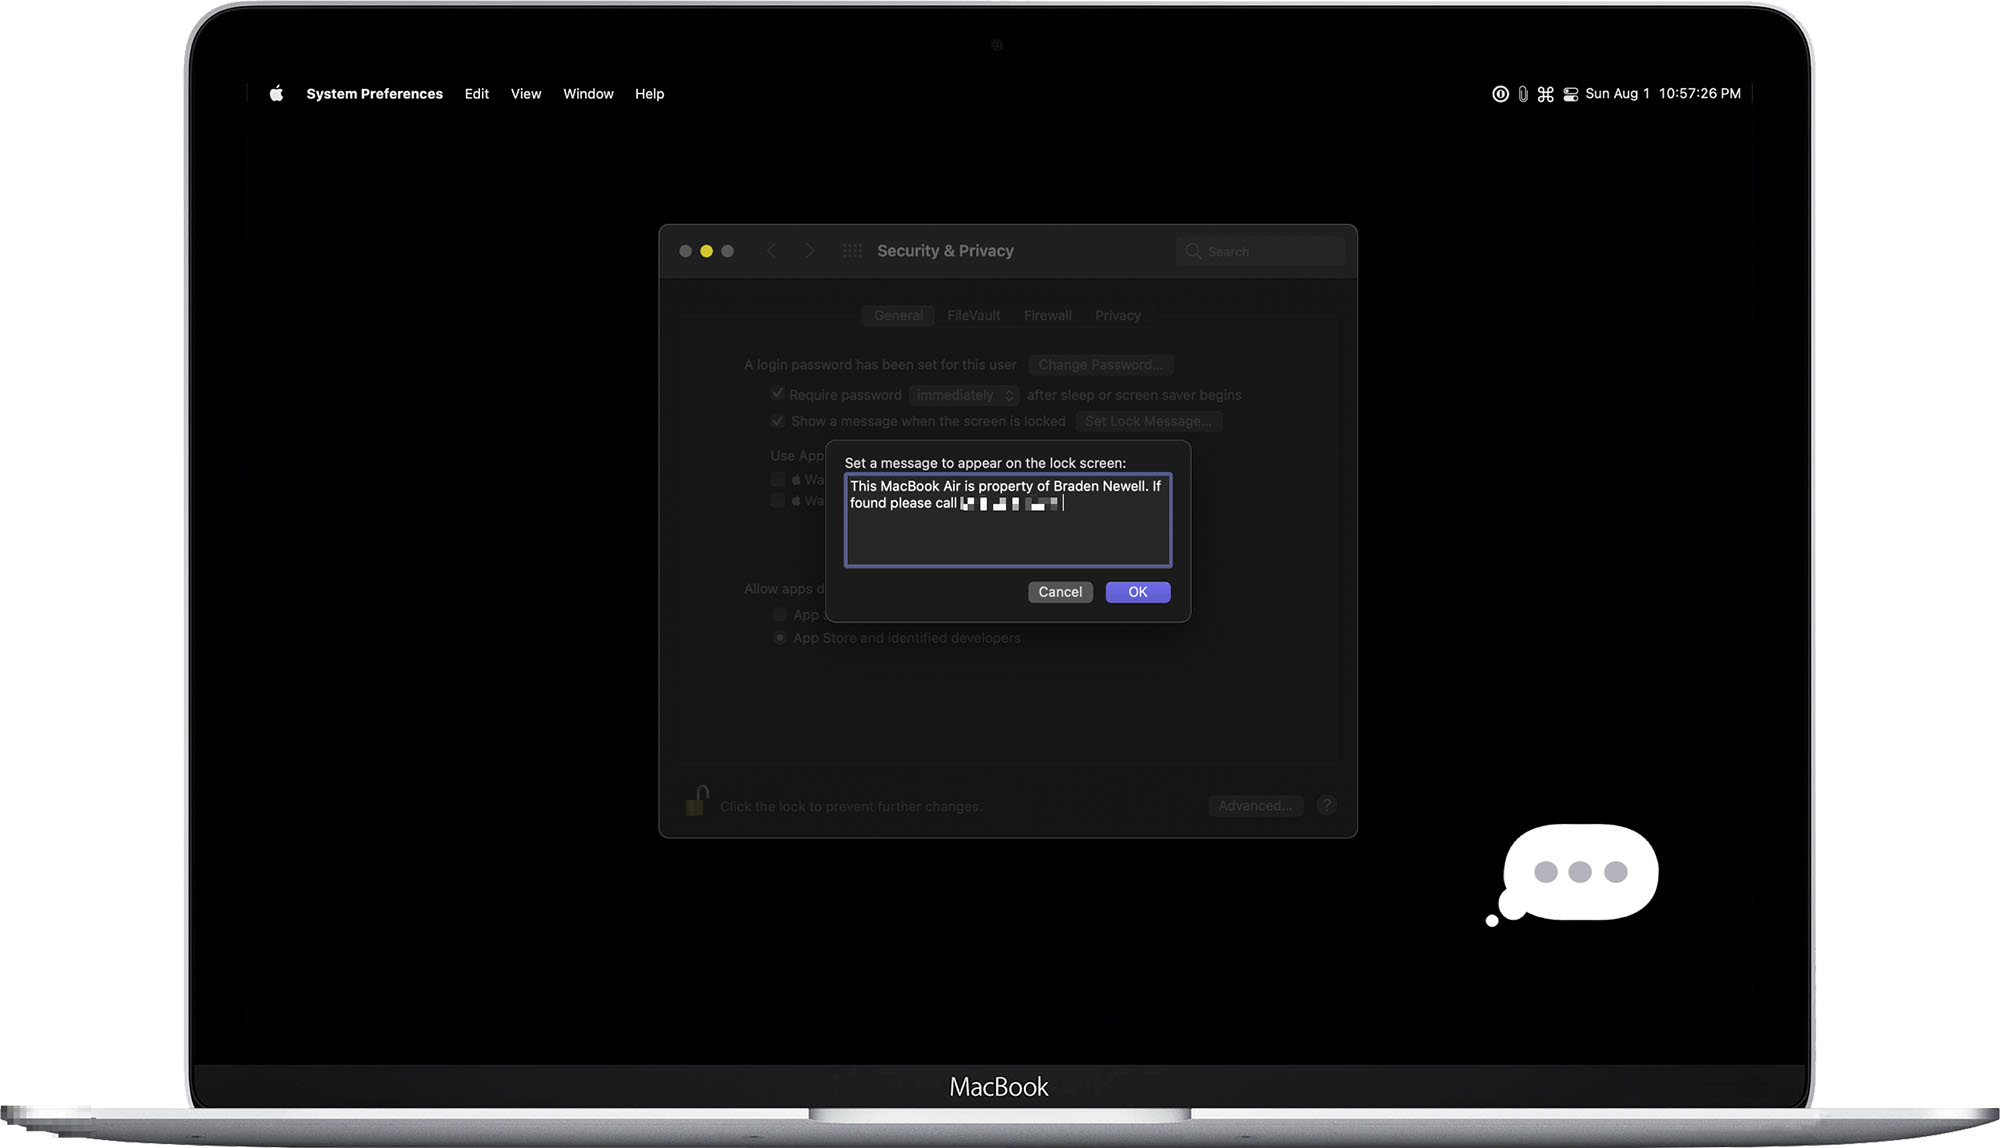
This tip won’t make your Mac more secure, but it can make it easier to recover if your Mac ever goes missing. You can set a message on your Lock Screen to appear below your user profile icons. For example, my Lock Screen message says, “This MacBook is property of Braden Newell. Please call XXX-XXX-XXXX to return it.”
To set a Lock Screen Message:
- 1. Launch System Preferences
2. Click Security & Privacy
3. Click the General tab
4. Click on the lock icon in the lower left-hand corner
5. Enter in your Mac’s password
6. Click Unlock
7. Click Set Lock Message…
8. Enter in your message
9. Click OK
MobileSyrup may earn a commission from purchases made via our links, which helps fund the journalism we provide free on our website. These links do not influence our editorial content. Support us here.
