
Canadian carriers hiking prices aren’t anything new, but telcos have been in the news lately for increases to already pricey roaming rates. Thankfully, there might be a solution for Canadians willing to jump through a few hoops — eSIMs.
Bell and Telus both upped the cost of their roaming plans by a dollar or two, which might not sound like much, but the companies charge daily for roaming. Telus and its flanker brand Koodo charge (at least, at the time of writing — it might have gone up again) $14/day for U.S. roaming and $16/day for international roaming. Bell and its flanker brand Virgin charge $13/day for the U.S. and $16/day for international. Rogers and Fido didn’t participate in this round of increases but still charge $12/day for U.S. and $15/day for international roaming.
These daily rates add up fast, though the carriers generously cap you at several hundred dollars per billing cycle (Rogers, the cheapest of the three, will charge for a maximum of 20 days per billing cycle, or $240 per bill for U.S. roaming and $300 per bill for international roaming). And it’s clear these roaming rates are good business for Canadian telcos, with Rogers reporting Q1 2023 revenues were up in part due to increased travel, boosting roaming use. Even the CRTC is investigating (though I don’t hold hope it’ll do much).
Canadian eSIM companies might have a solution
During the roaming price hikes, two Canadian companies that offer travel data packages over eSIM reached out to me, pitching their products as the solution to ridiculous roaming rates. Airalo, whose founders are based in Toronto, and Ottawa-based AloSIM both offer the ability for people to purchase data packages to use in a variety of countries. The data packages are delivered via eSIM, which means they should work in the smartphone you already have.
Of course, Airalo and AloSIM aren’t the only companies out there offering eSIM travel packages like this. KnowRoaming lives on with an eSIM option, and there are others like Truphone, Nomad eSIM, YeSIM and more. But much of what I address below will apply to other services as well.
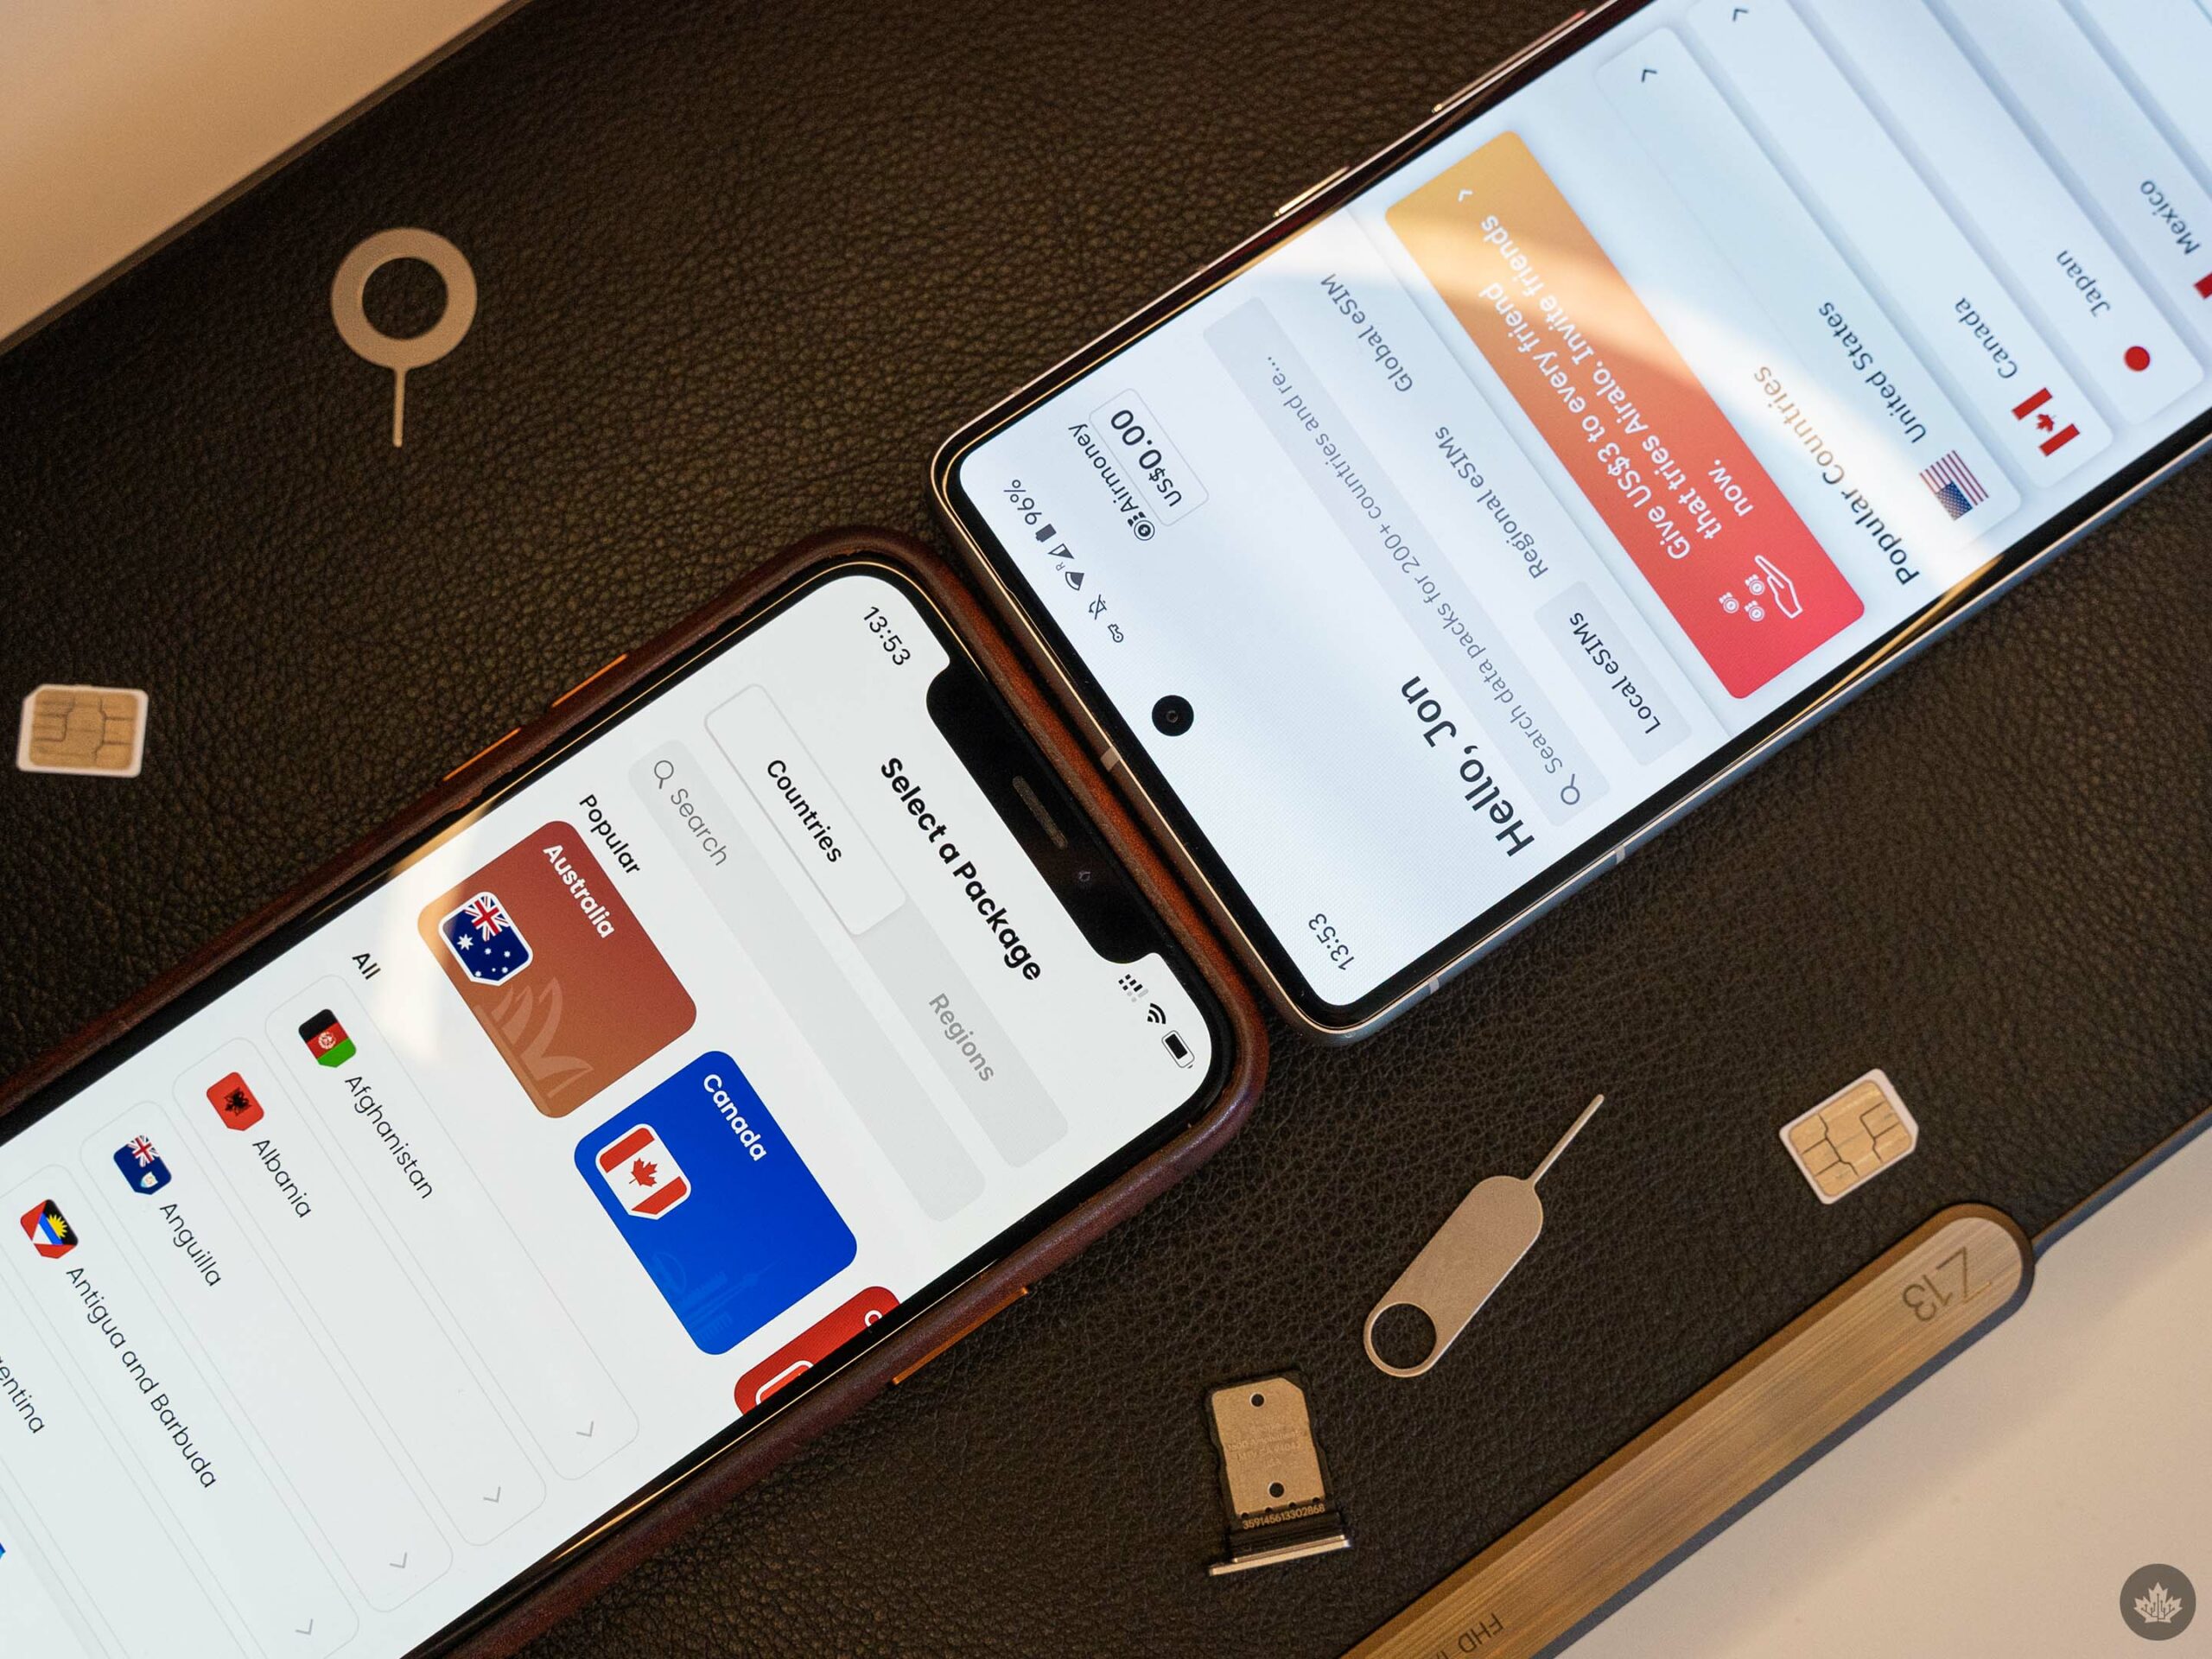
I ended up testing eSIMs from Airalo and AloSIM in my Pixel 7 and iPhone XS, respectively, with the aim of getting a feel for how the eSIM setup process works on both Android and iOS. You can use these services with any unlocked device that supports eSIM — on the iPhone side, that should be everything including the iPhone XS and newer. On the Android side, it will vary by manufacturer, but most smartphones released in the last few years should have it. If you’re not sure, just Google your phone model and “eSIM” to see. Per CRTC rules, smartphones sold since 2017 should be unlocked, but in the event that you have a locked phone, your carrier has to unlock it for free.
With all that out of the way, let’s dive into how it all works and how well it works, followed by a cost analysis.
How to set up an eSIM on your phone
Before you can get started loading an eSIM, you’ll need to make an account with Airalo or AloSIM and buy a package. You can browse prices at both before getting an account, so I’d recommend shopping around for the best price and then going from there. Also, somewhat frustratingly for Canadian companies, both charge in USD, so keep that in mind when looking at the prices.
There are a ton of supported countries and several packages available with a range of data options. Depending on the country and carrier the package works on, you can get 4G, LTE or even 5G data, though speeds will vary based on location and other factors (as they do anywhere). One major caveat is you need an internet connection to set up the eSIM. Because the packages have expiries — usually 7, 15 or 30 days — you’ll want to do the setup either right before leaving Canada or immediately after arriving at your destination (if you can find free Wi-Fi to do it).
It’s also handy to keep the apps on your device since you can use them to monitor how much of your data you’ve used and to top up your eSIM if you need it.
iOS
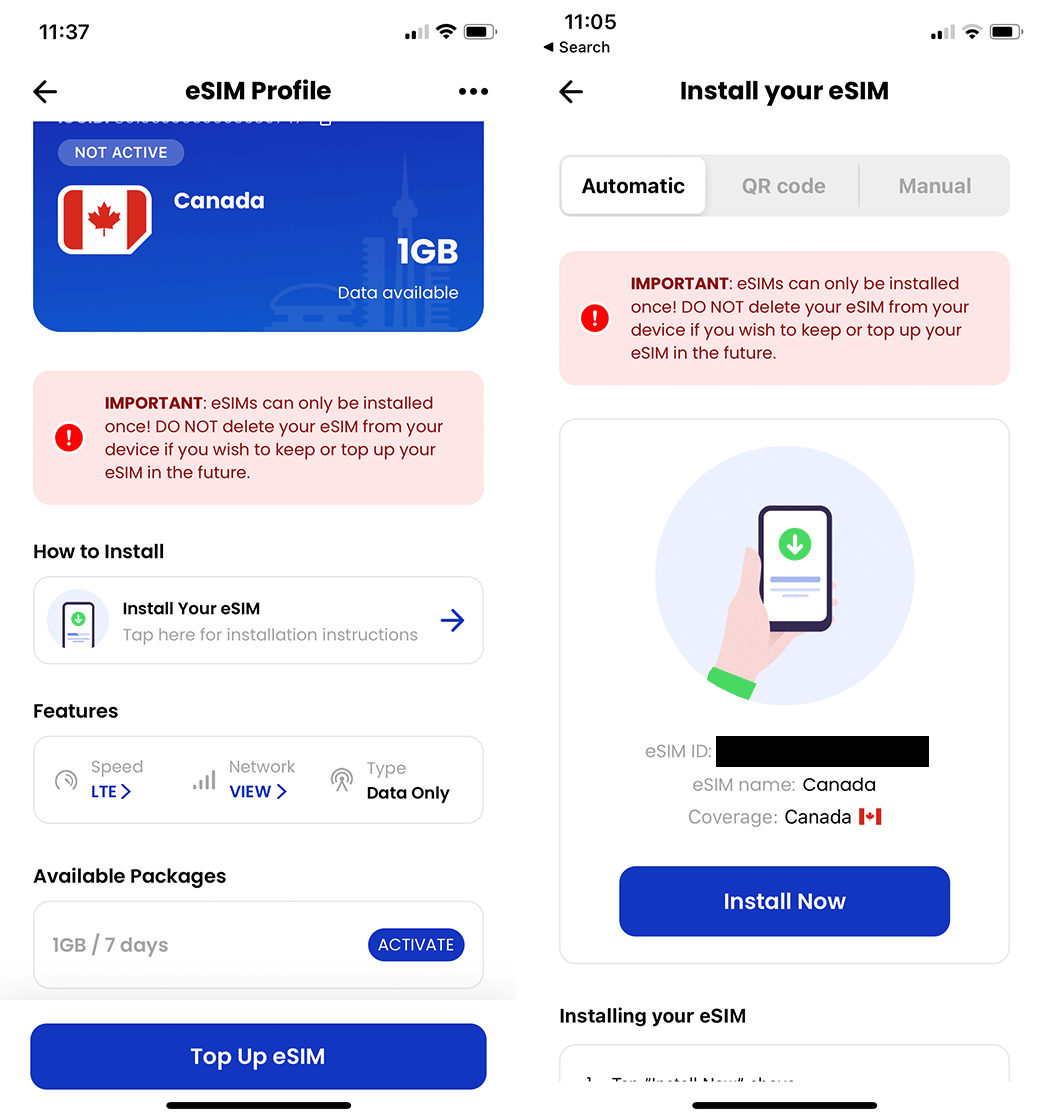
On iOS, it’s as simple as tapping ‘Install now’ with AloSIM and Airalo.
Both Airalo and AloSIM offer detailed setup instructions for loading the eSIM onto your device once you’ve purchased it. For iPhone owners, the process is incredibly simple and can be done from each company’s respective app. All you need to do is tap the button to install the eSIM in the app and then tap through the iOS dialogues and wait for your iPhone to finish installing the eSIM.
Don’t forget to turn on roaming for your eSIM.
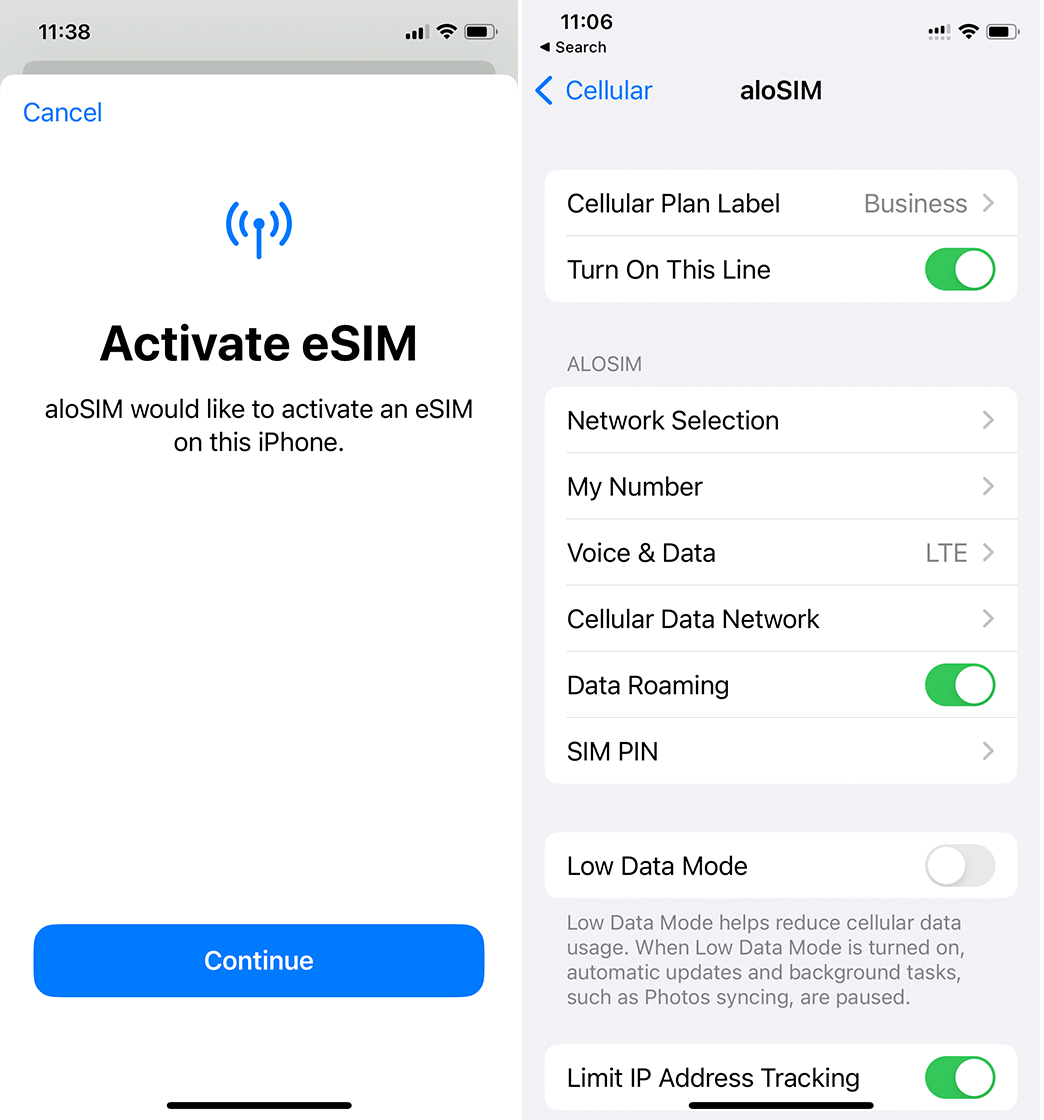
Once it’s done, iOS will ask you to pick which SIM to use for calls, texts, iMessage and data. Per the instructions, you’ll want to pick the new eSIM as your default for data use and leave calls and texts for your primary SIM — this is because the plans on offer only have data and no calling or texting. You’ll also need to make sure roaming is turned on for the eSIM to work properly.
Android
Unfortunately, you can’t add eSIMs with a tap on Android.
On the Android side, things are a bit more complicated. Unfortunately, there’s no option to directly install an eSIM from the Airalo or AloSIM app. Instead, you’ll have to either scan a QR code with your phone or manually enter the information. Of the two, the QR code is easier if you’ve got a second screen around, like a laptop or tablet. Simply open up the Airalo or AloSIM website, scan the QR code for that eSIM, and follow the steps on your device to install it. To scan it, you’ll need to head into the ‘Network & Internet’ menu, tap ‘SIMs’ and then add a SIM. From there, follow the steps to scan the QR code.
![]()
I ran into a handful of issues when setting up an Airalo eSIM on my Pixel 7, though part of it was related to me running the Android 14 beta. Still, it was a more confusing process than on iPhone. Airalo, thankfully, has detailed setup instructions, and I was able to resolve my issues and get connected, but I can see the process being stressful if you’re trying to get it done on top of travelling.
I ended up needing to add access point name (APN) details and then reboot my Pixel 7 to get data working over the Airalo SIM, though the latter part was related to Android 14 beta issues. If you’re running stable Android, you likely won’t run into as many issues. Either way, it might be worth reading through the setup instructions first to make sure it’s something you’re comfortable (and capable of) doing — you can find Airalo instructions here and AloSIM instructions here.
How well do eSIMs work?
The short answer is pretty well, but there are a variety of factors at play. The eSIM process itself works fine and should be more or less the same in terms of setting it up and accessing the network.
As for how well the service works, it depends on the country, network, phone and more. I did my testing in Canada, in part because I’m not travelling anywhere anytime soon and because performance will vary based on which carrier your eSIM connects to.
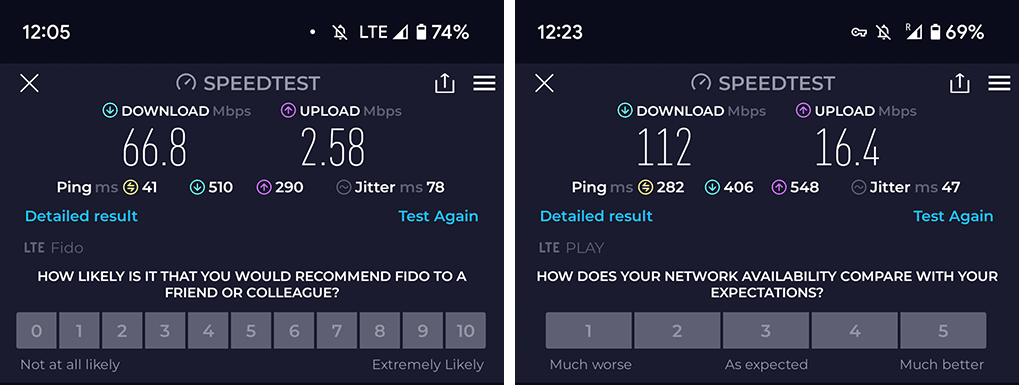
Fido LTE speeds (left) versus Airalo speeds (right).
My Airalo eSIM says it connects to Bell, Telus and SaskTel networks and uses LTE data. Before swapping over, I ran a speed test on my physical Fido SIM in my Pixel 7 just to see what it was like — Fido scored 66.8Mbps down and 2.58Mbps up, while Airalo running on the Telus network scored 112Mbps down and 16.4Mbps up. Not bad!
I did the same test on my iPhone with the physical Fido SIM and then the AloSIM running on Rogers. Fido scored 39.5Mbps down and 4.09Mbps up, while the Rogers-based AloSIM hit 71.3Mbps down and 6.64Mbps up.
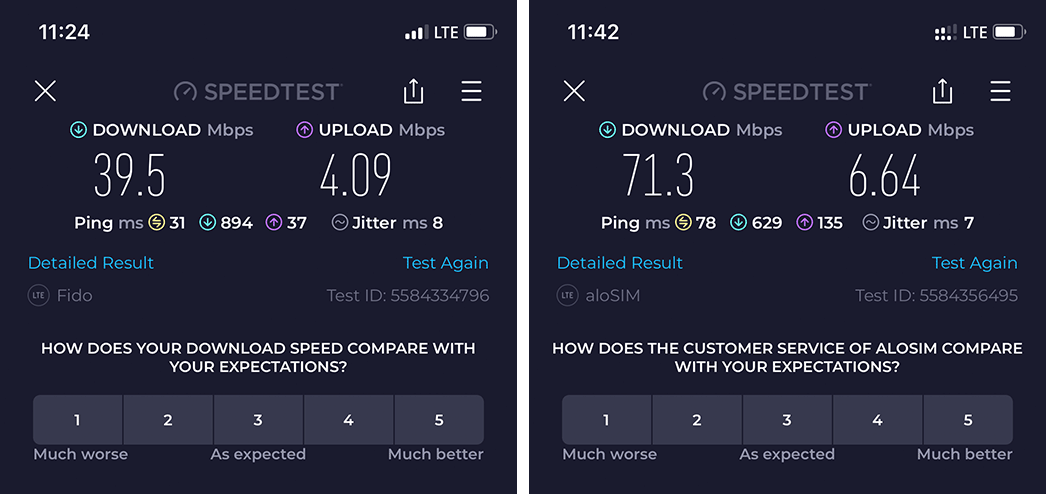
Fido LTE speeds (left) versus AloSIM speeds (right)
Again, it’s important to remember that actual network performance will vary based on a variety of factors. The main takeaway here is that you’re not getting cut-rate service from Airalo or AloSIM.
Beyond straight speed tests, I spent some time doing basic tasks while running on the eSIMs. That included scrolling social media, messaging, and watching some videos and TikToks. Everything went smoothly and worked well. I briefly encountered some connectivity issues on my iPhone with the AloSIM, but it was because I forgot to turn on roaming for the eSIM — once it was on, it worked fine for the rest of my testing.
Are eSIMs worth it?
Ultimately, the crux of all this is whether it’s worthwhile to rock an eSIM over using your carrier’s roaming package. To figure that out, there are a few things to consider.
The first is cost. As mentioned up top, you’re looking at $12 or $14/day in the U.S., and $15 or $16/day internationally, depending on your Canadian carrier. Since costs vary from country to country with the eSIM options, we’ll focus on the U.S. to make the comparison easier.
For the U.S., Airalo and AloSIM both offer a range of plans from $4.50 USD (about $6.12 CAD) for 1GB up to $42 USD (roughly $57.13 CAD) for 20GB.
-
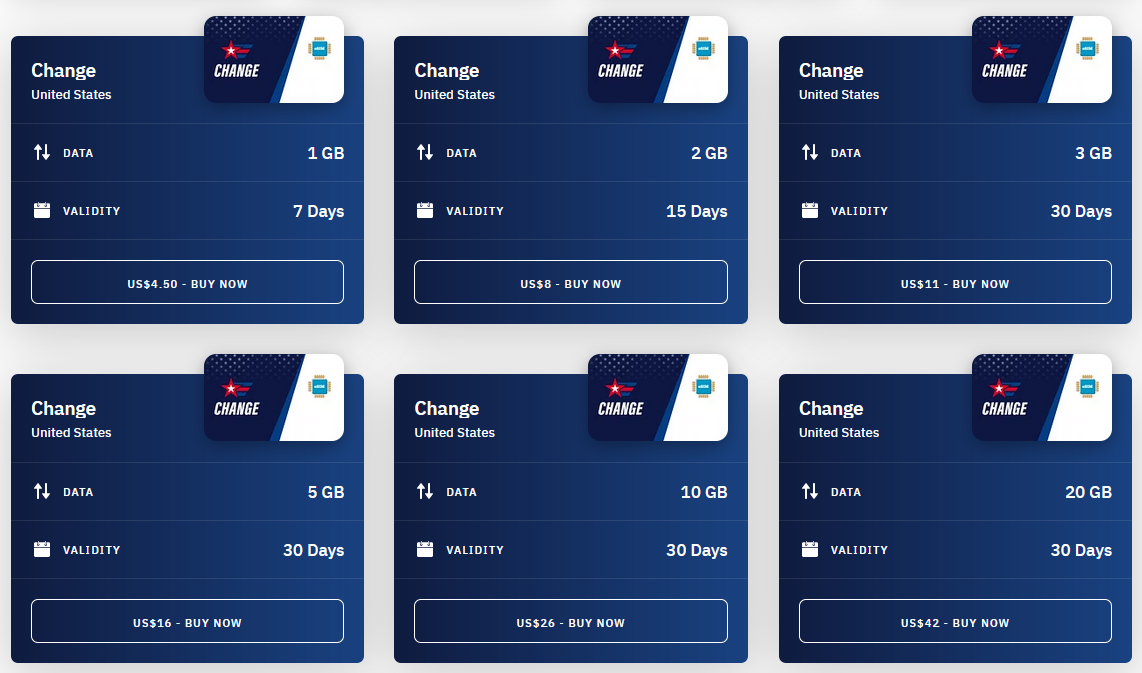
- Airalo U.S. plans.
-
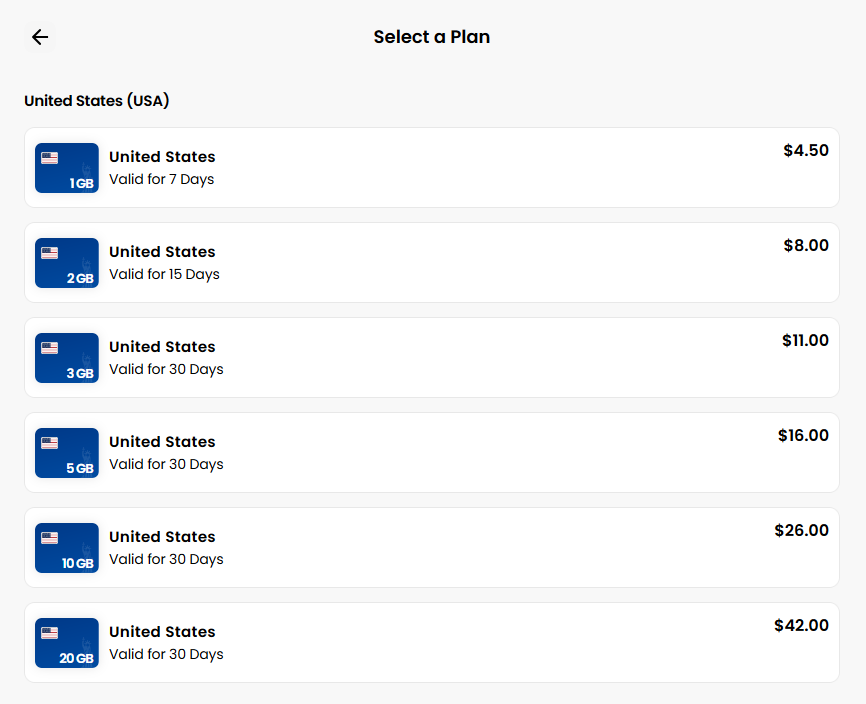
- AloSIM U.S. plans.
Depending on how long you’ll be visiting the U.S. and how much data you use, you could potentially cover the cost of roaming for your entire trip with an eSIM for less than it would cost for one day with a Canadian carrier.
However, this brings us to the next question — what is your usage like? If you only need a few gigabytes of data, then the eSIMs definitely offer a more affordable option. But heavy data users, or people who do a lot of calling or texting, have more to consider.
Canadian carriers’ roaming options include calls and texts with the daily rate, and data use is capped at whatever allotment you have in Canada — i.e. if you have 15GB of data per month in Canada, your usage while roaming counts against that monthly cap. Ultimately, it’s still cheaper to go with eSIMs — $57 CAD will get you 20GB for 30 days in the U.S., way less than $240 for access to the data in your Canadian plan (probably around 20GB anyway) for 20 days — usage beyond the 20th day is free until your bill resets.
Calling and texting will be the main hitch for most. You can get around it with internet-based messaging and calling platforms like WhatsApp, but not having a phone number to make calls is a major drawback.
Ultimately, Airalo and AloSIM both seem like great options I’ll be considering next time I travel outside Canada. While not perfect, the lower cost makes both options appealing. You can learn more about Airalo here and about AloSIM here.
MobileSyrup may earn a commission from purchases made via our links, which helps fund the journalism we provide free on our website. These links do not influence our editorial content. Support us here.
