Another year, another iOS update.
This year, Apple unveiled iOS 17 at its World Wide Developer Conference (WWDC) and followed up with the announcement of the update’s public release during the company’s September iPhone 15 event.
Messages is one of the most used apps for many iPhone users, myself included. iOS 16 brought with it some long-awaited improvements to Messages, such as ‘mark as unread,’ ‘edit a message,’ and ‘undo send.’ Message effects are still one of my favourite features to add some energy to an outgoing iMessage.
To celebrate my love for the Messages app, here is MobileSyrup’s iOS 17 Messages Roundup:
The new plus button
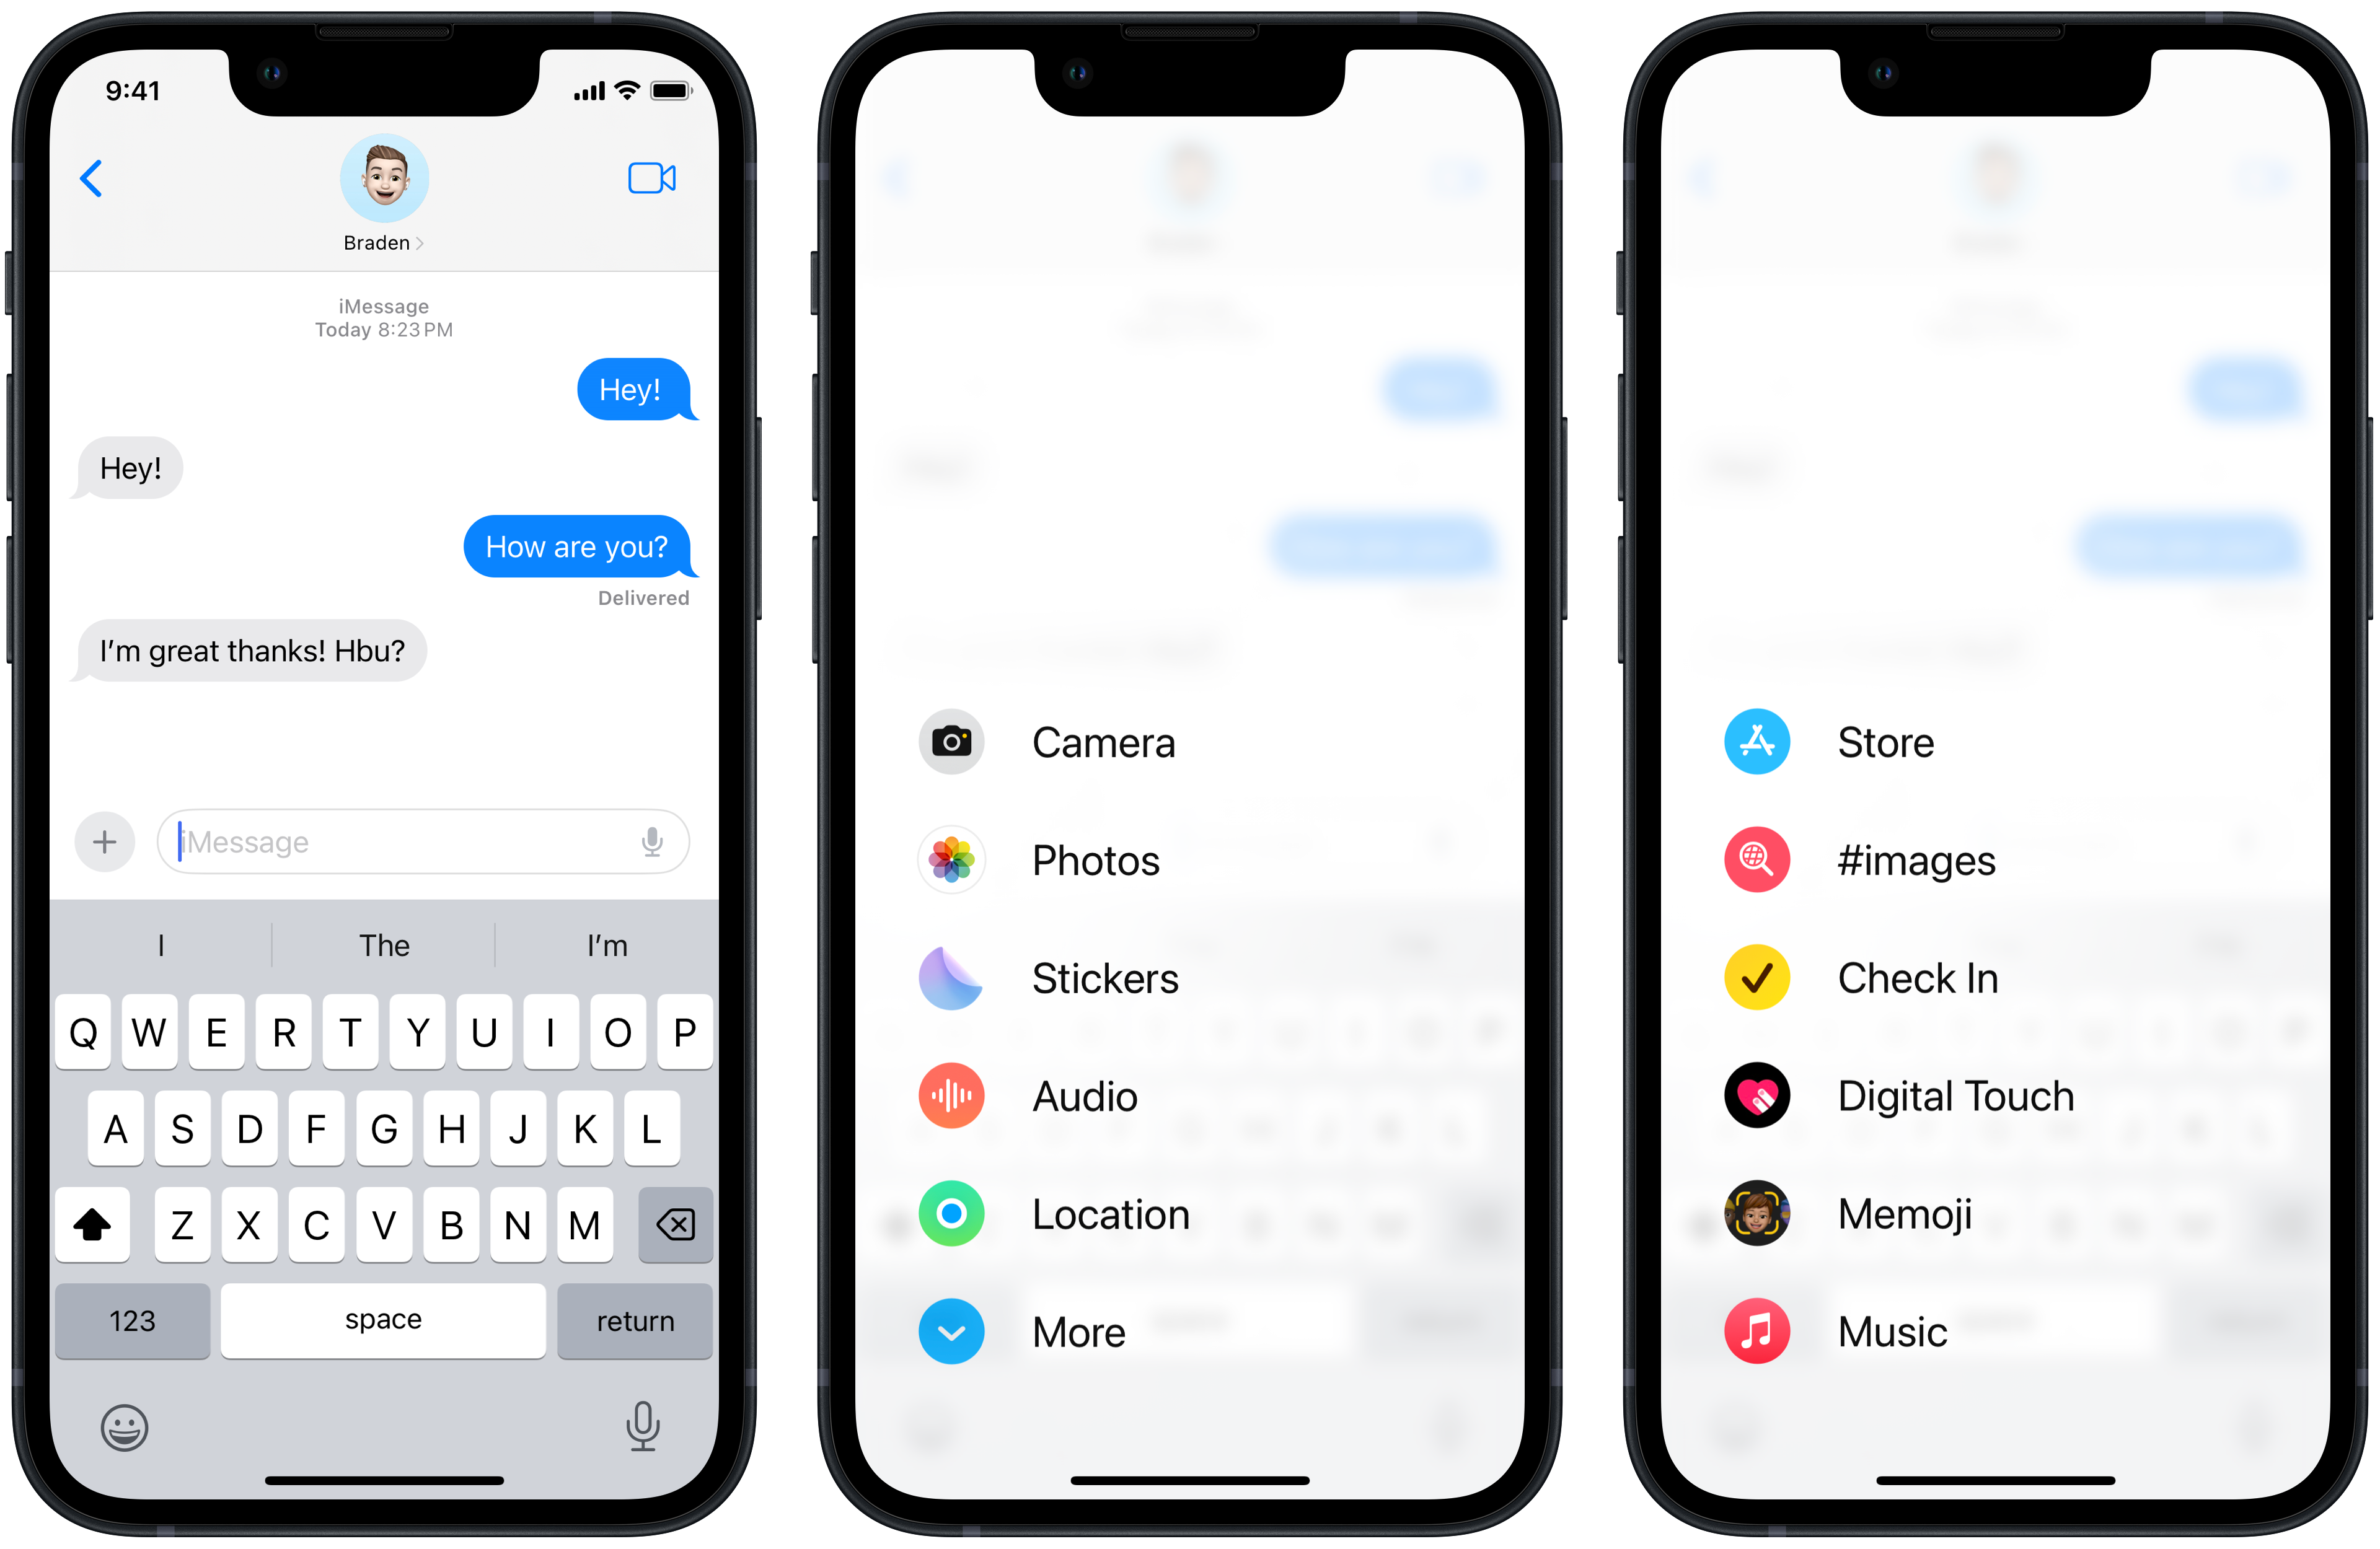 This year, the Messages app received a bit of a user-interface simplification by rethinking how users interact with their iMessage apps. In iOS 16, you may notice how iMessage apps like photos, the iMessage App Store, voice messages, and Memojis all appear in a row of rounded rectangles below the text input field.
Now, in iOS 17, all of those iMessage apps have been moved. To discover them, tap the plus icon to the left of the text input field. When you do, you’ll see Camera, Photos, Stickers, Audio (voice messages), Location and More. Tapping on More or swiping up presents you with Store (the iMessage App Store), #images (GIFs), Check In, Digital Touch and Music. Your other iMessage apps will appear here, too.
Suppose you’d like to rearrange your iMessage apps. No problem! Hold down on your iMessage app and drag it to whichever place you’d prefer it in the order.
Sticker Drawer
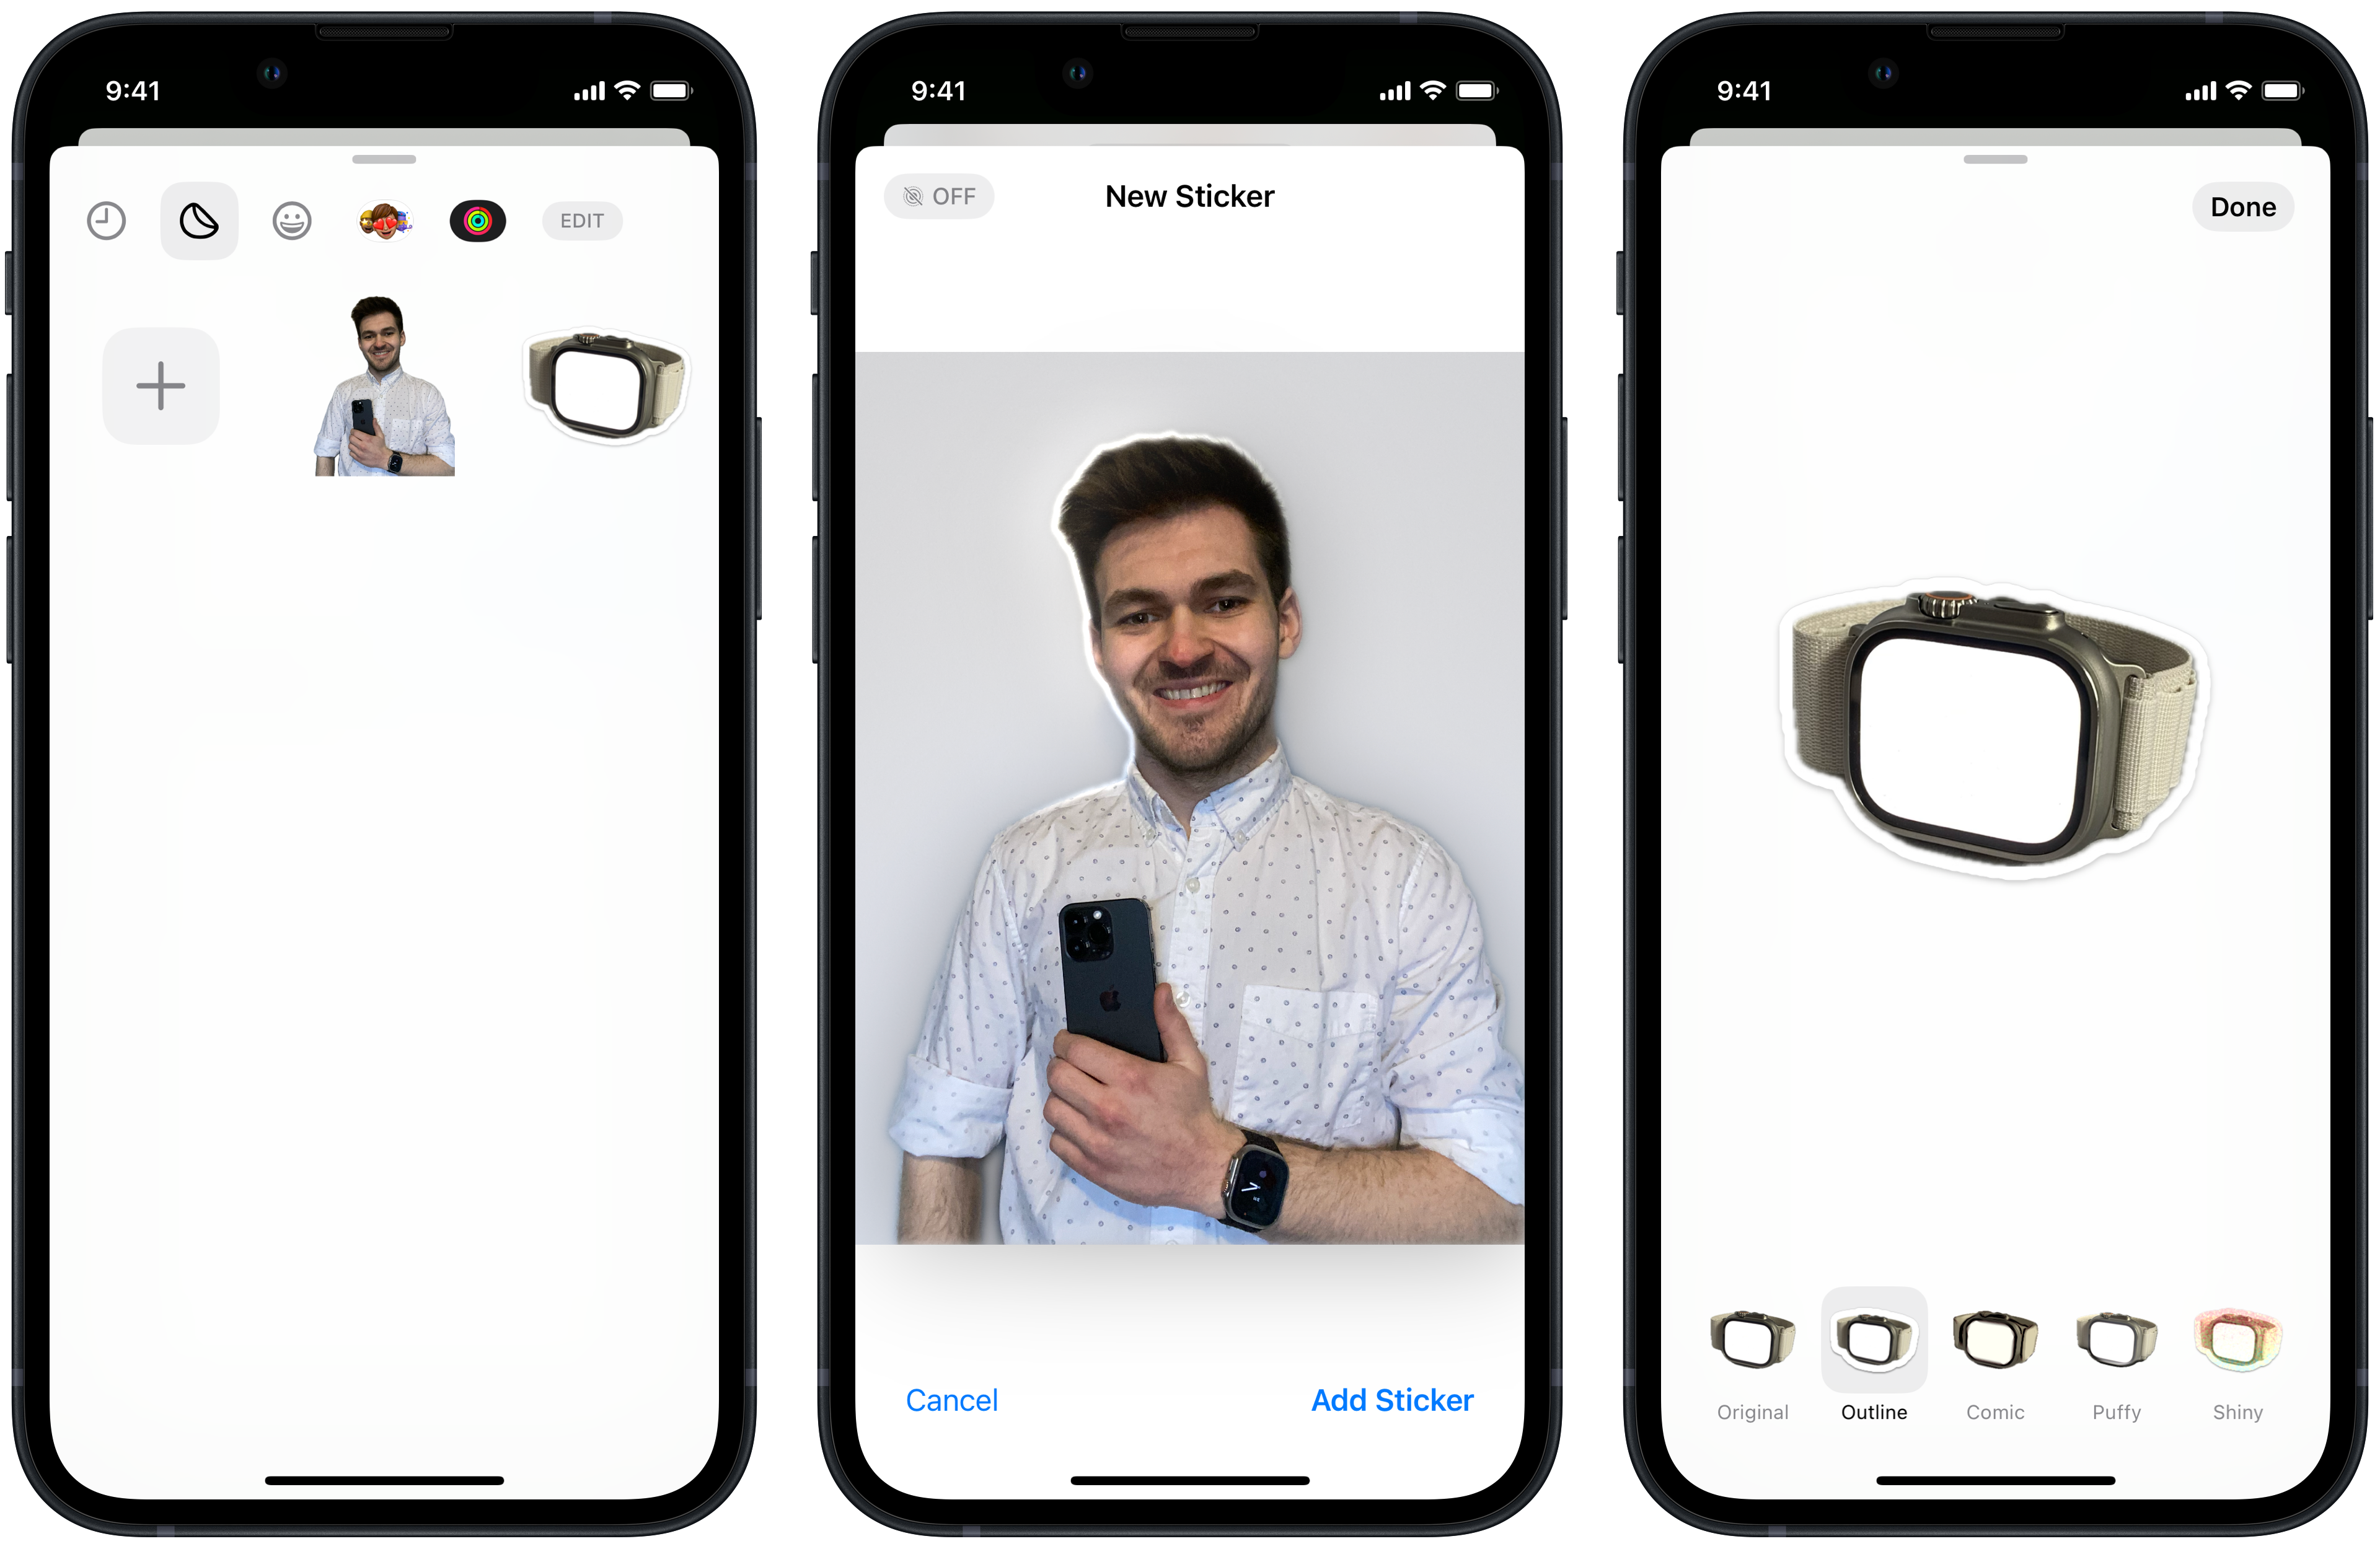 Speaking of Stickers, there’s an exciting update with them, too. Sticker Drawer is Apple’s reimagining of what someone can do with iMessage Stickers. Users can now turn their Live Photos into animated Stickers and turn people, pets, and objects into Stickers by removing the background of an image.
The new Sticker Drawer is accessible by tapping the plus icon and then Stickers. In a row from left to right, the Sticker Drawer has recent, custom, emoji, and Memoji stickers. Any additionally added packs will appear after the Memoji tab.
To add a custom Sticker:
1. Open Messages
2. Select a conversation
3. Tap the plus icon
4. Tap Stickers
5. Select the custom sticker tab (the second tab after recent)
6. Tap the plus icon
7. Select an image from your photo library
If the image is a Live Photo, it can be added as an animated sticker. Alternatively, you can turn the image into a regular sticker with the background removed by tapping LIVE in the top left corner.
8. Tap Add Sticker
To delete, rearrange, or add an effect to your sticker, tap and hold on the custom sticker until a menu appears above it. Tap Delete to remove the sticker. Tap Add Effect to add an outline or one of three unique filters called comic, puffy, or shiny. Lastly, tap Rearrange to reorganize your custom stickers.
In classic Apple fashion, all of your custom stickers sync to your other devices via iCloud.
Emoji Stickers and new Memojis
 In addition to the Sticker Drawer, iOS 17 has brought the ability to use any emoji as a Sticker! Simply tap and hold your emoji of choice, drag it onto a conversation bubble, and let it go. You’ve now added an emoji as a Sticker!
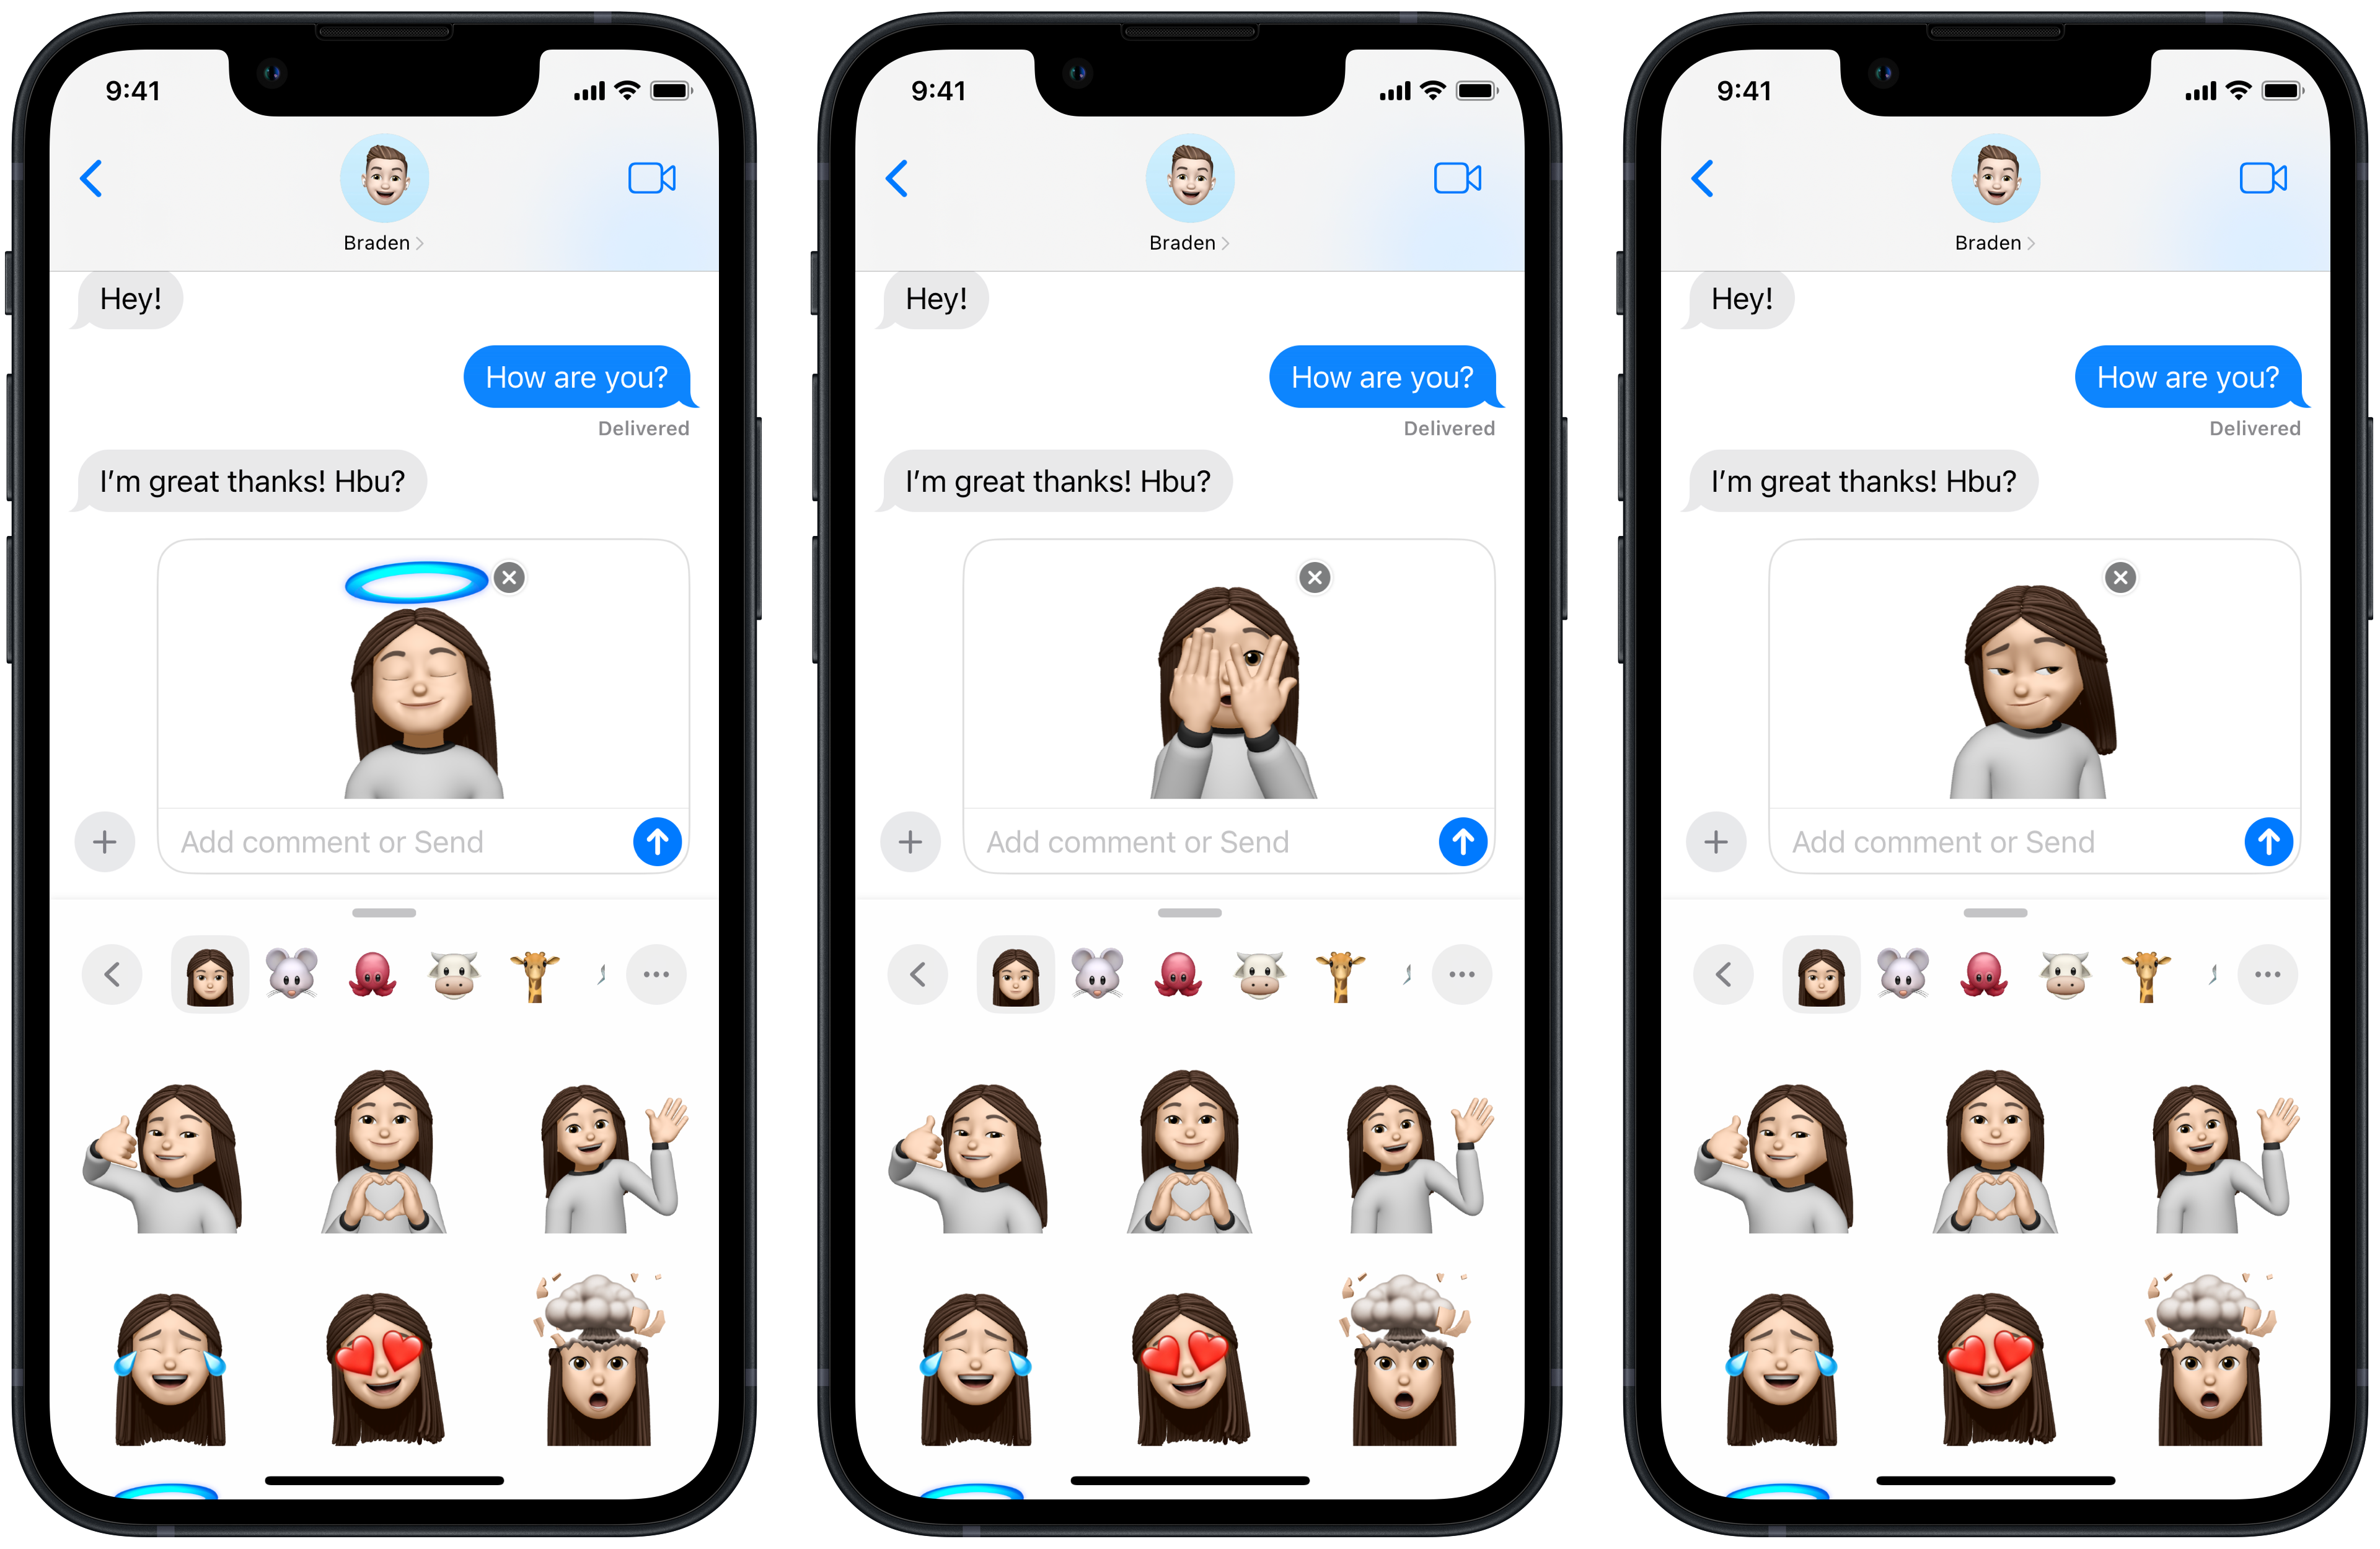
Memojis also received a minor update with the addition of three new Memoji reactions: halo, smirk and peekaboo!
In conversation location sharing
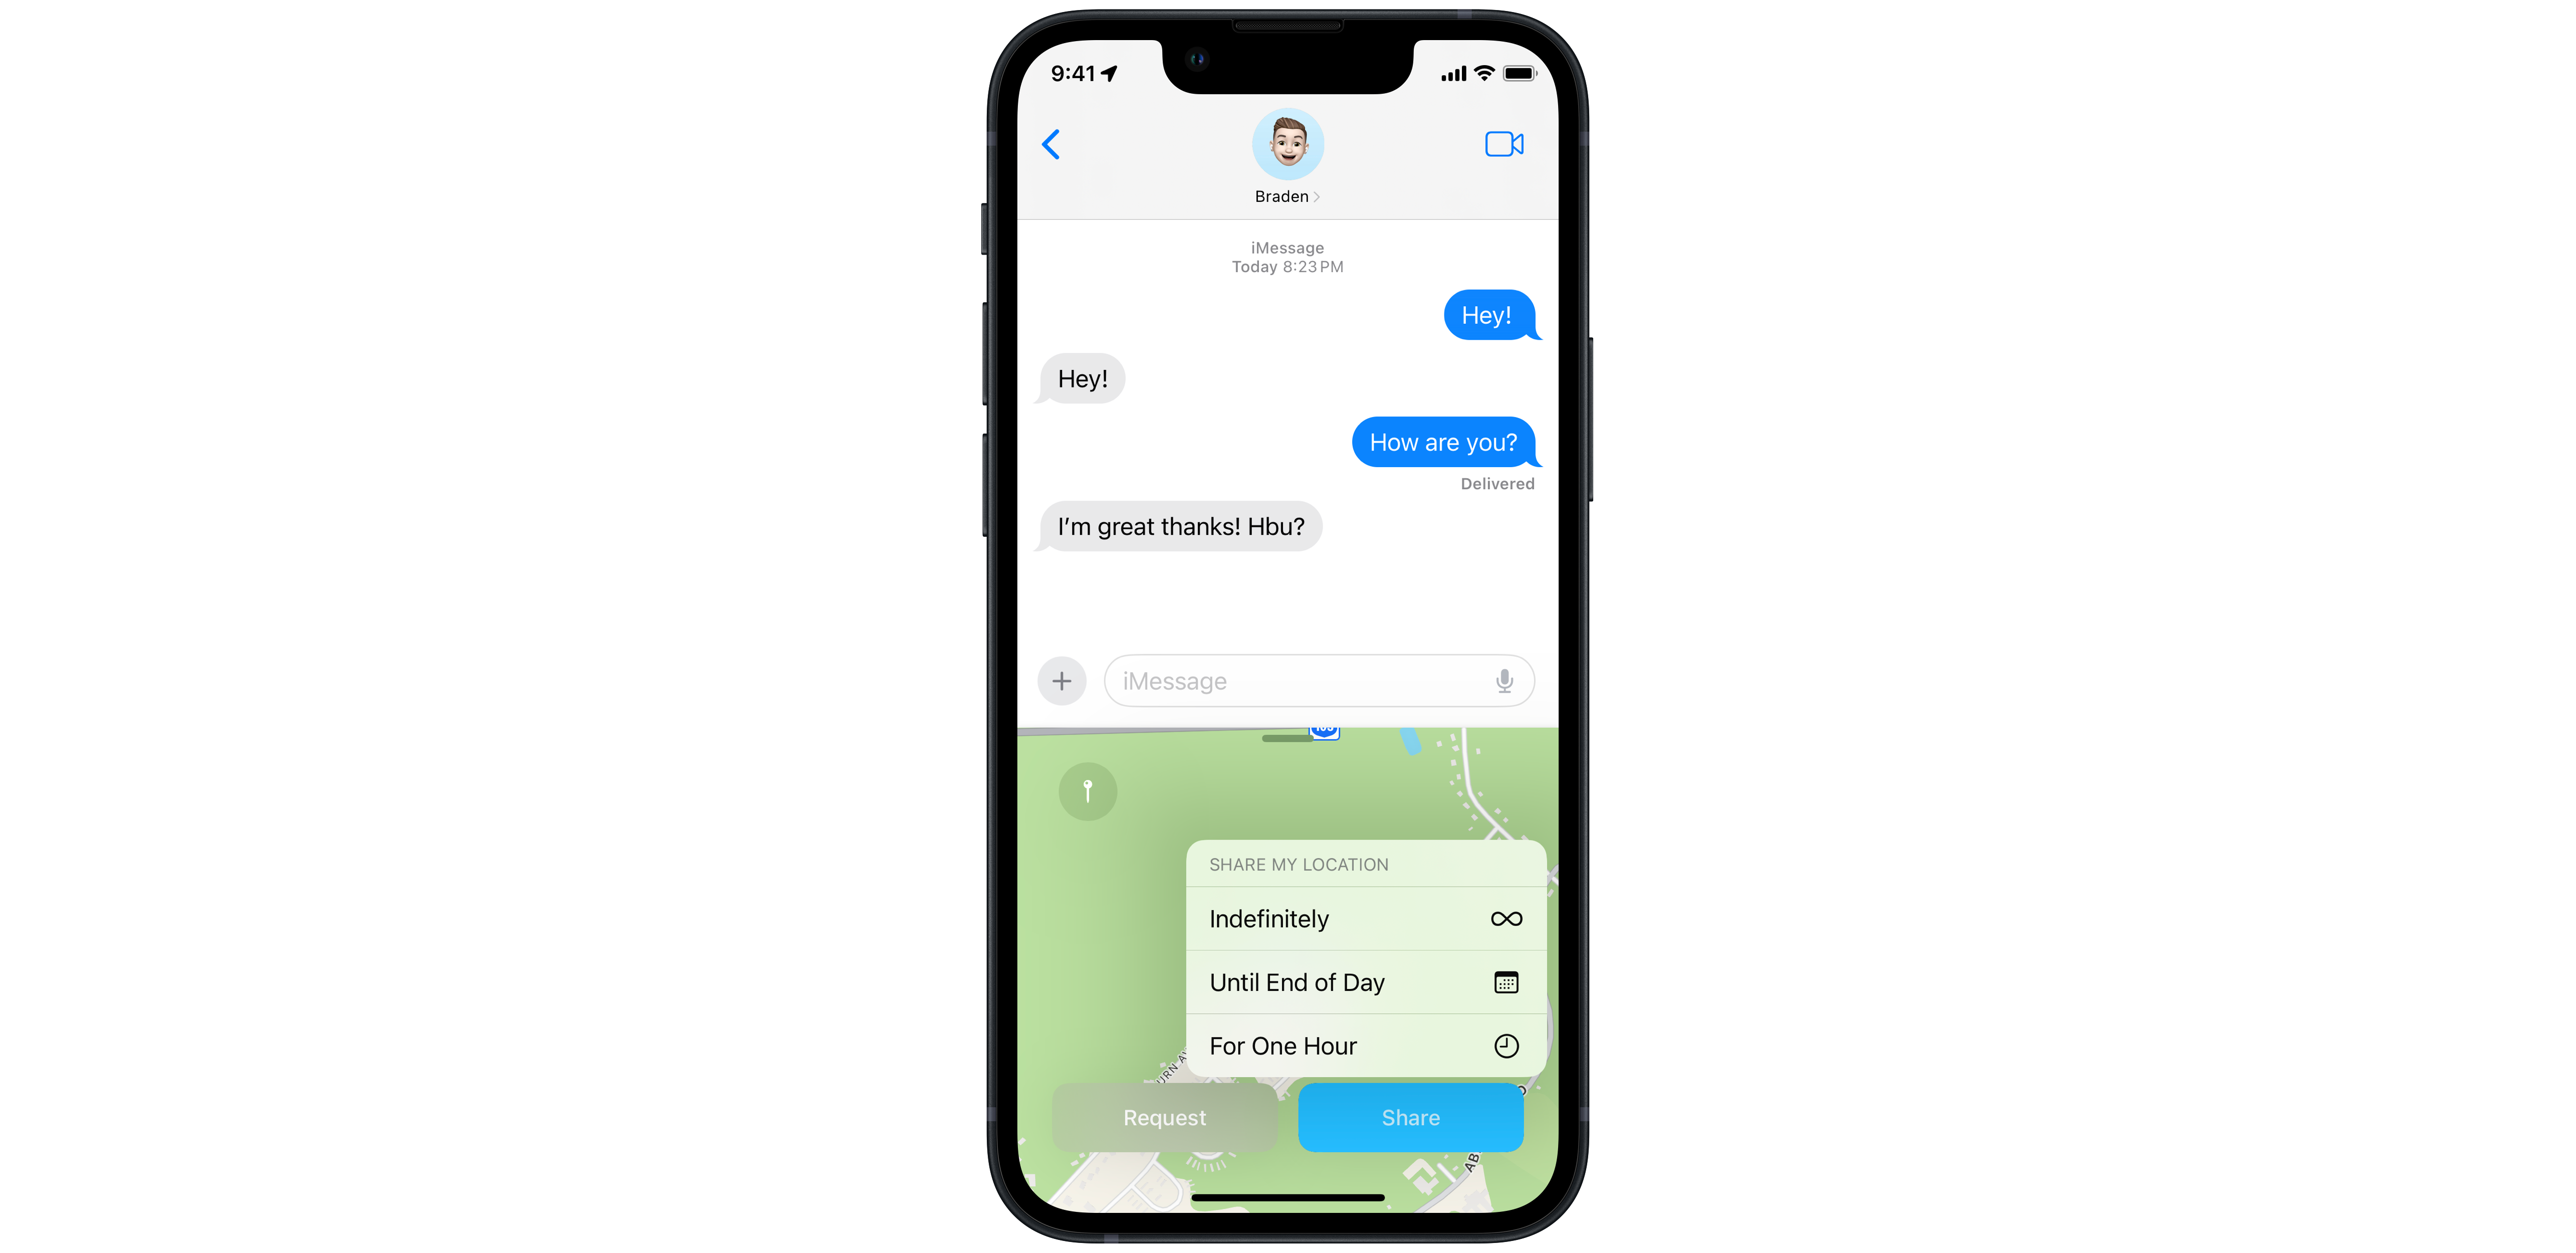 In ‘The New Plus Button’ section, you may have picked up on the addition of Location. In iOS 16, you can share your location from a contact card. However, iOS 17 brings with it the ability to easily share your location or request another person’s within the conversation. Being able to share your location easily is an excellent feature if you’re spending the day with friends or family or running late. Equally so, being able to request a person’s location if they’re running behind or meeting you somewhere can be very handy.
To share your location or request another’s in a conversation:
- Open Messages
- Tap on the conversation you’d like to share or request a location
- Tap on the plus button to the left of the text input field
- Tap Location
- Tap Request or Share
- If you tapped Share, tap ‘Indefinitely,’ ‘Until End of Day,’ or ‘For One Hour,’ depending on how long you’d like to share your location
- Tap the blue send arrow
Catch Up button
Have you ever been a part of a group chat where you miss dozens of messages and have to frantically scroll up to find where you last left the conversation? I have. Many times. New to iOS 17 is a Catch Up button. When you fall behind in a group conversation, a new arrow button will appear in the top right corner. Tapping on it will take you to where you last were in the discussion, quickly allowing you to catch up on the conversation.
Conversation improvements
 To improve the core messaging experience, that being text-based conversations, Apple has added a few handy improvements here, too.
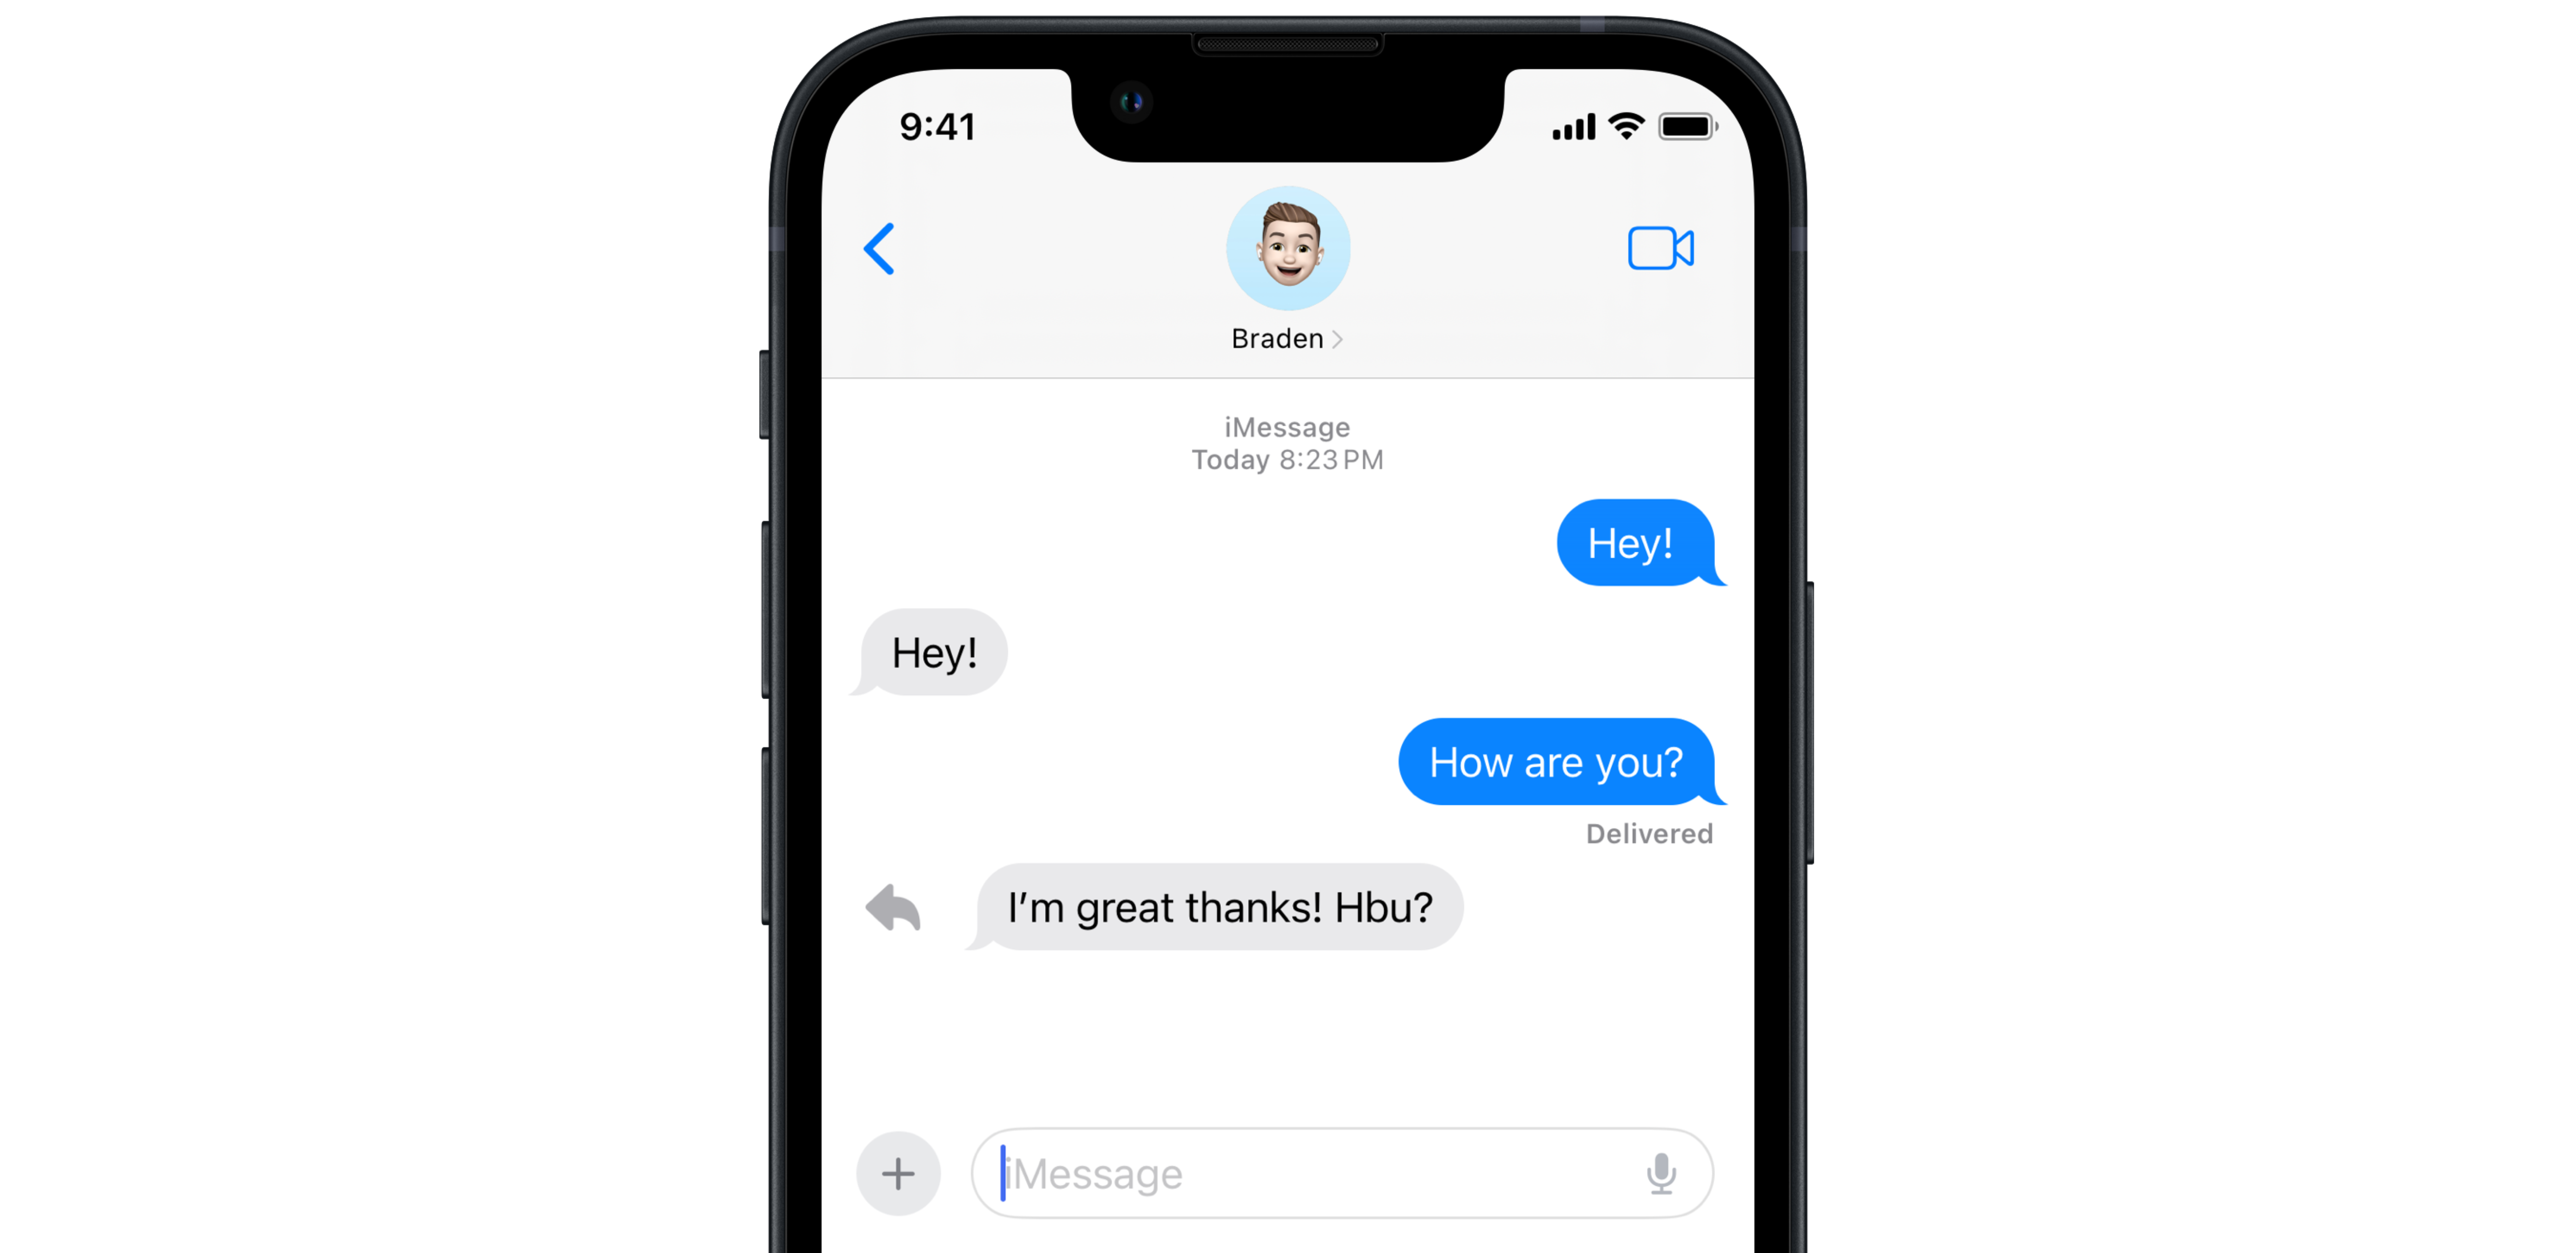
First, in iOS 17, users can now swipe right on a message bubble to create an in-thread reply! Give it a try!
Second, if you’re like me and hate listening to audio messages, you’ll rejoice that iOS 17 automatically provides a transcribed version of the audio message sent to you.
Third, if you’re a CarPlay user, you might also appreciate how the Messages app has been redesigned there. The redesigned app features a new interface that makes it quicker and easier to reply to and re-read messages.
Improved autocorrect
 iOS 17 features a new autocorrect system leveraging the powers of machine learning and Apple Silicon. This feature runs on-device and should become customized to the individual user over time, providing an enhanced autocorrect experience while typing. The new autocorrect isn’t exclusive to the Messages app, though. It’s an awesome new system-wide feature.
Sensitive Content Warning
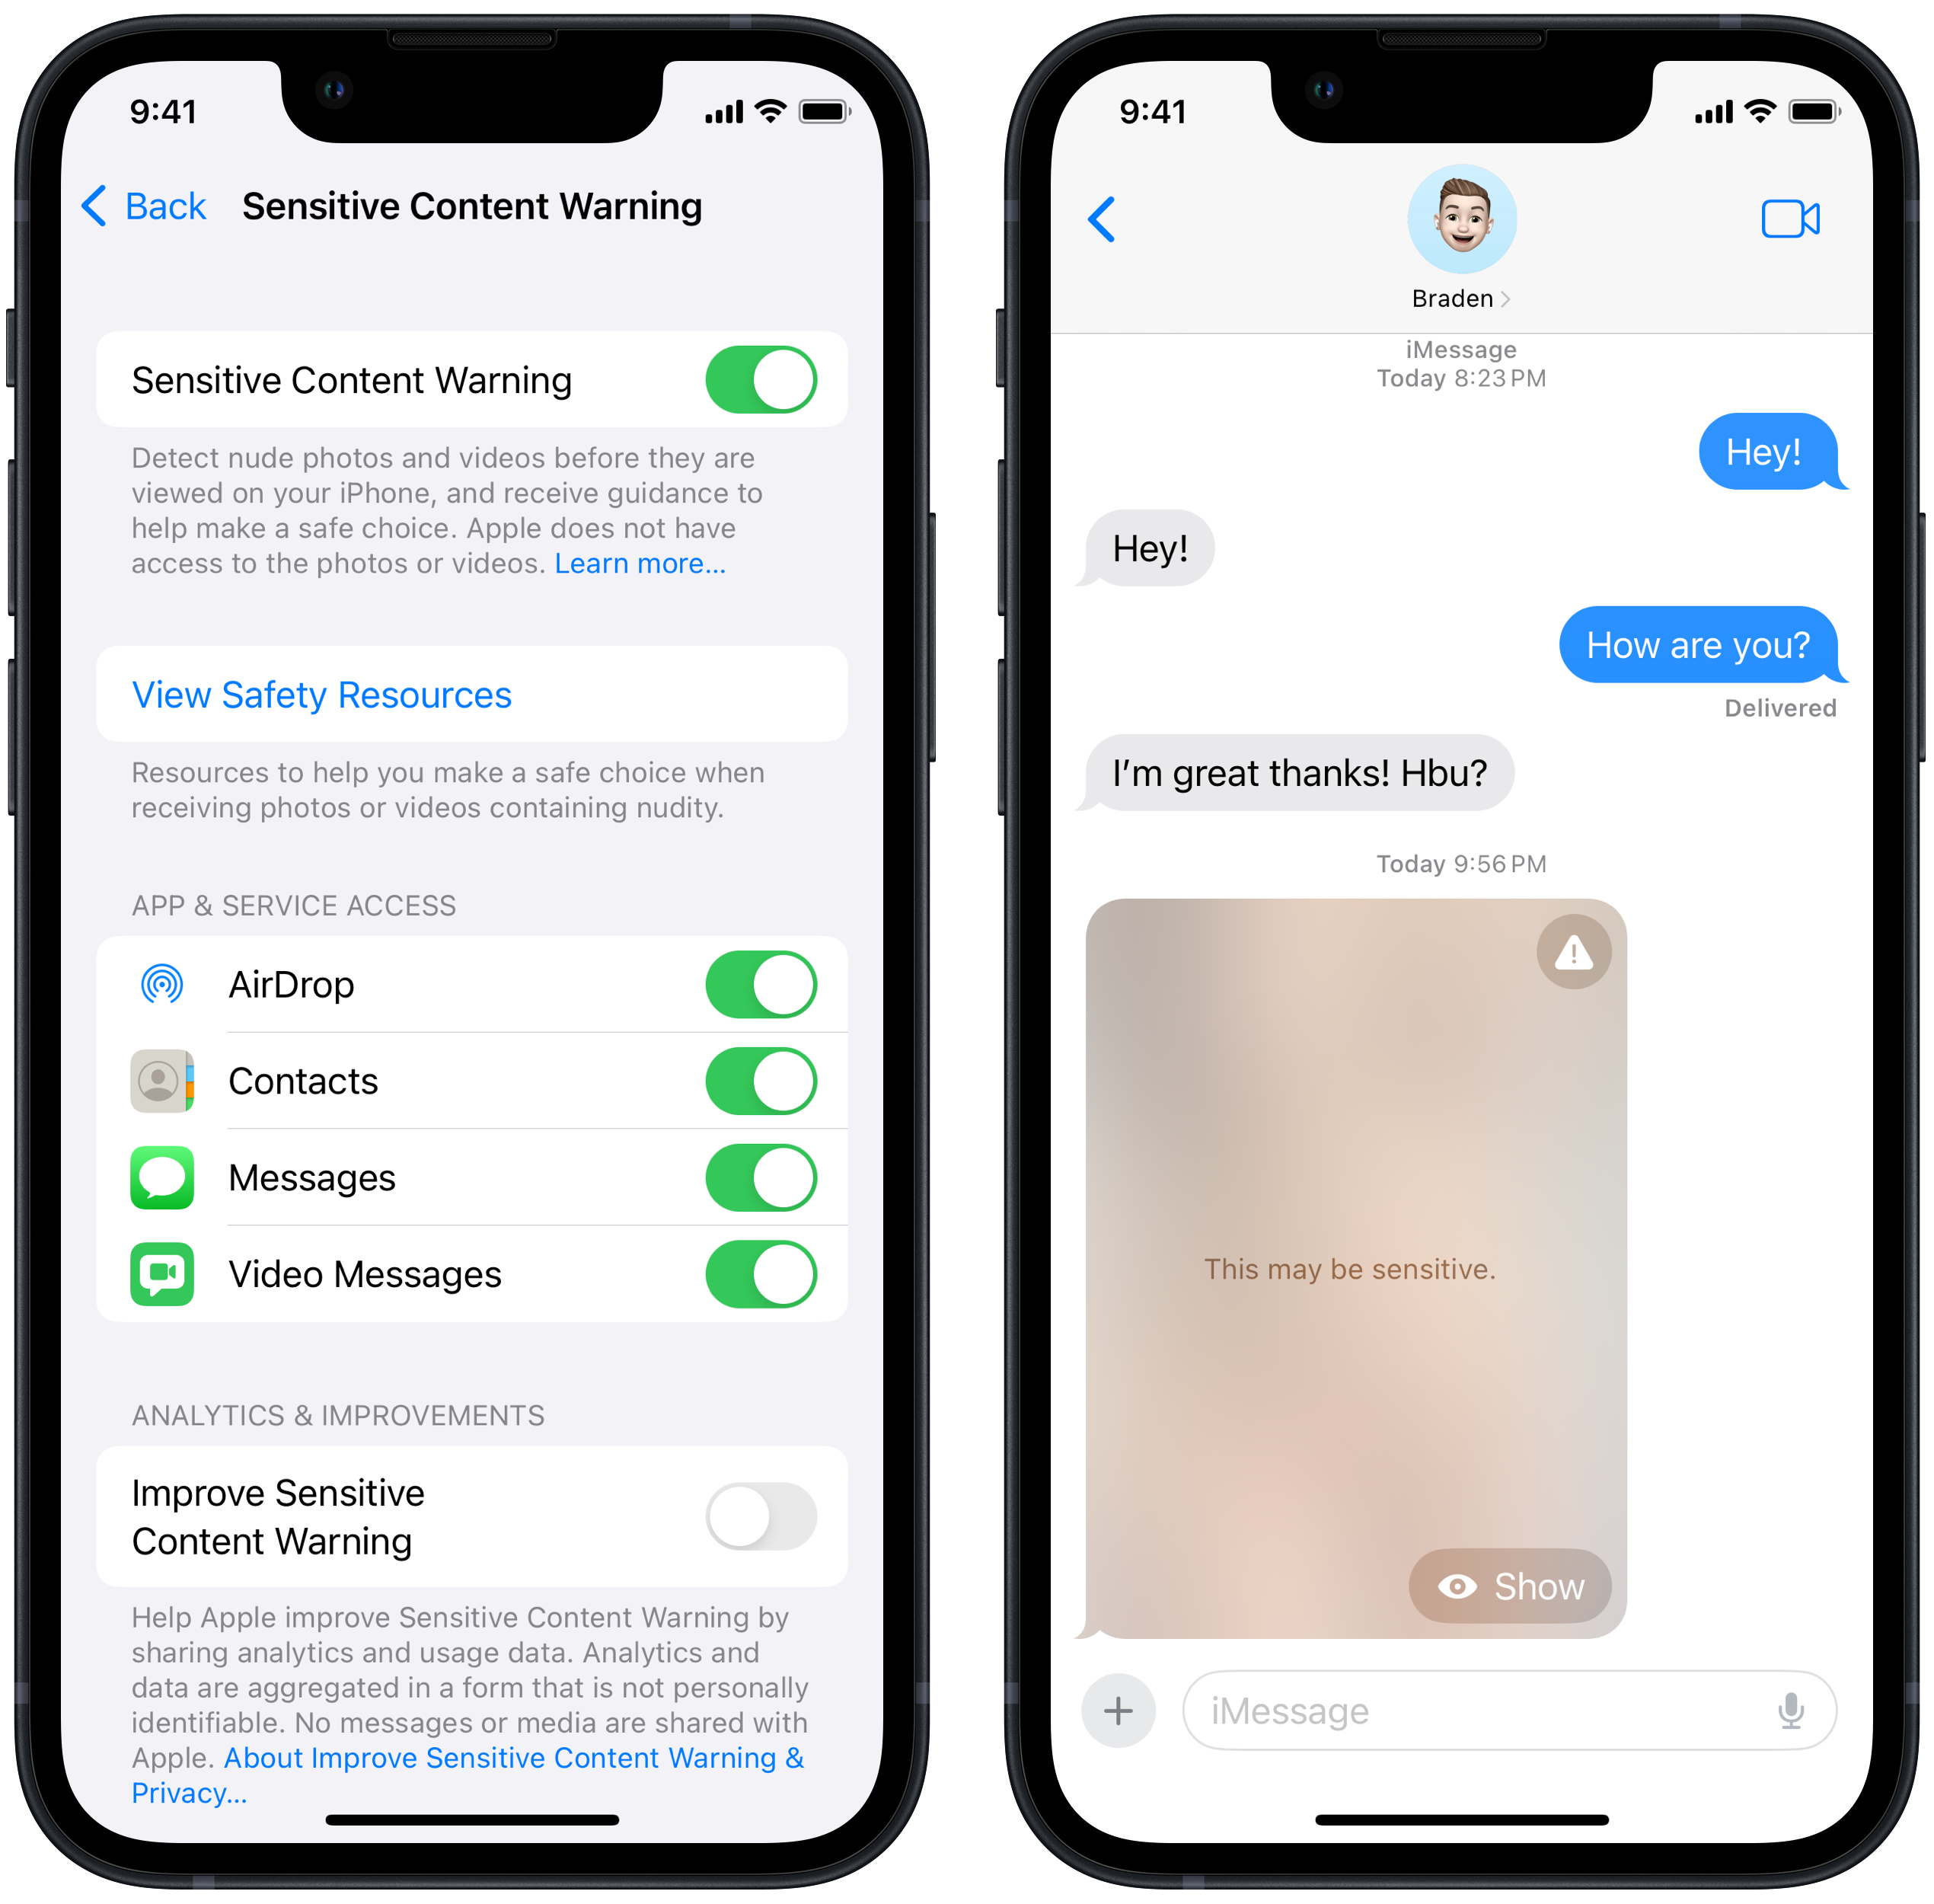 Whether you’re an adult or minor, unwanted nude images or videos can be disturbing, embarrassing, and even traumatic. One way Apple is helping iPhone users combat seeing this unwanted content is through Sensitive Content Warning. New to iOS 17, Sensitive Content Warning blurs images and videos which contain nudity sent via AirDrop or Messages.
While this feature is turned off by default, you can easily enable it in Settings. Once enabled, images containing nudity are blurred, and the receiver can tap Show to un-blur the content or tap a warning symbol for options to block the contact or access help resources.
To turn on Sensitive Content Warning:
- Open Settings
- Tap Privacy & Security
- Tap Sensitive Content Warning
- Toggle Sensitive Content Warning on (green)
- Optional: Toggle AirDrop, Messages, or video messages off (grey) if you’d prefer to disable Sensitive Content Warning for that particular service.
Automatically delete used SMS verification codes
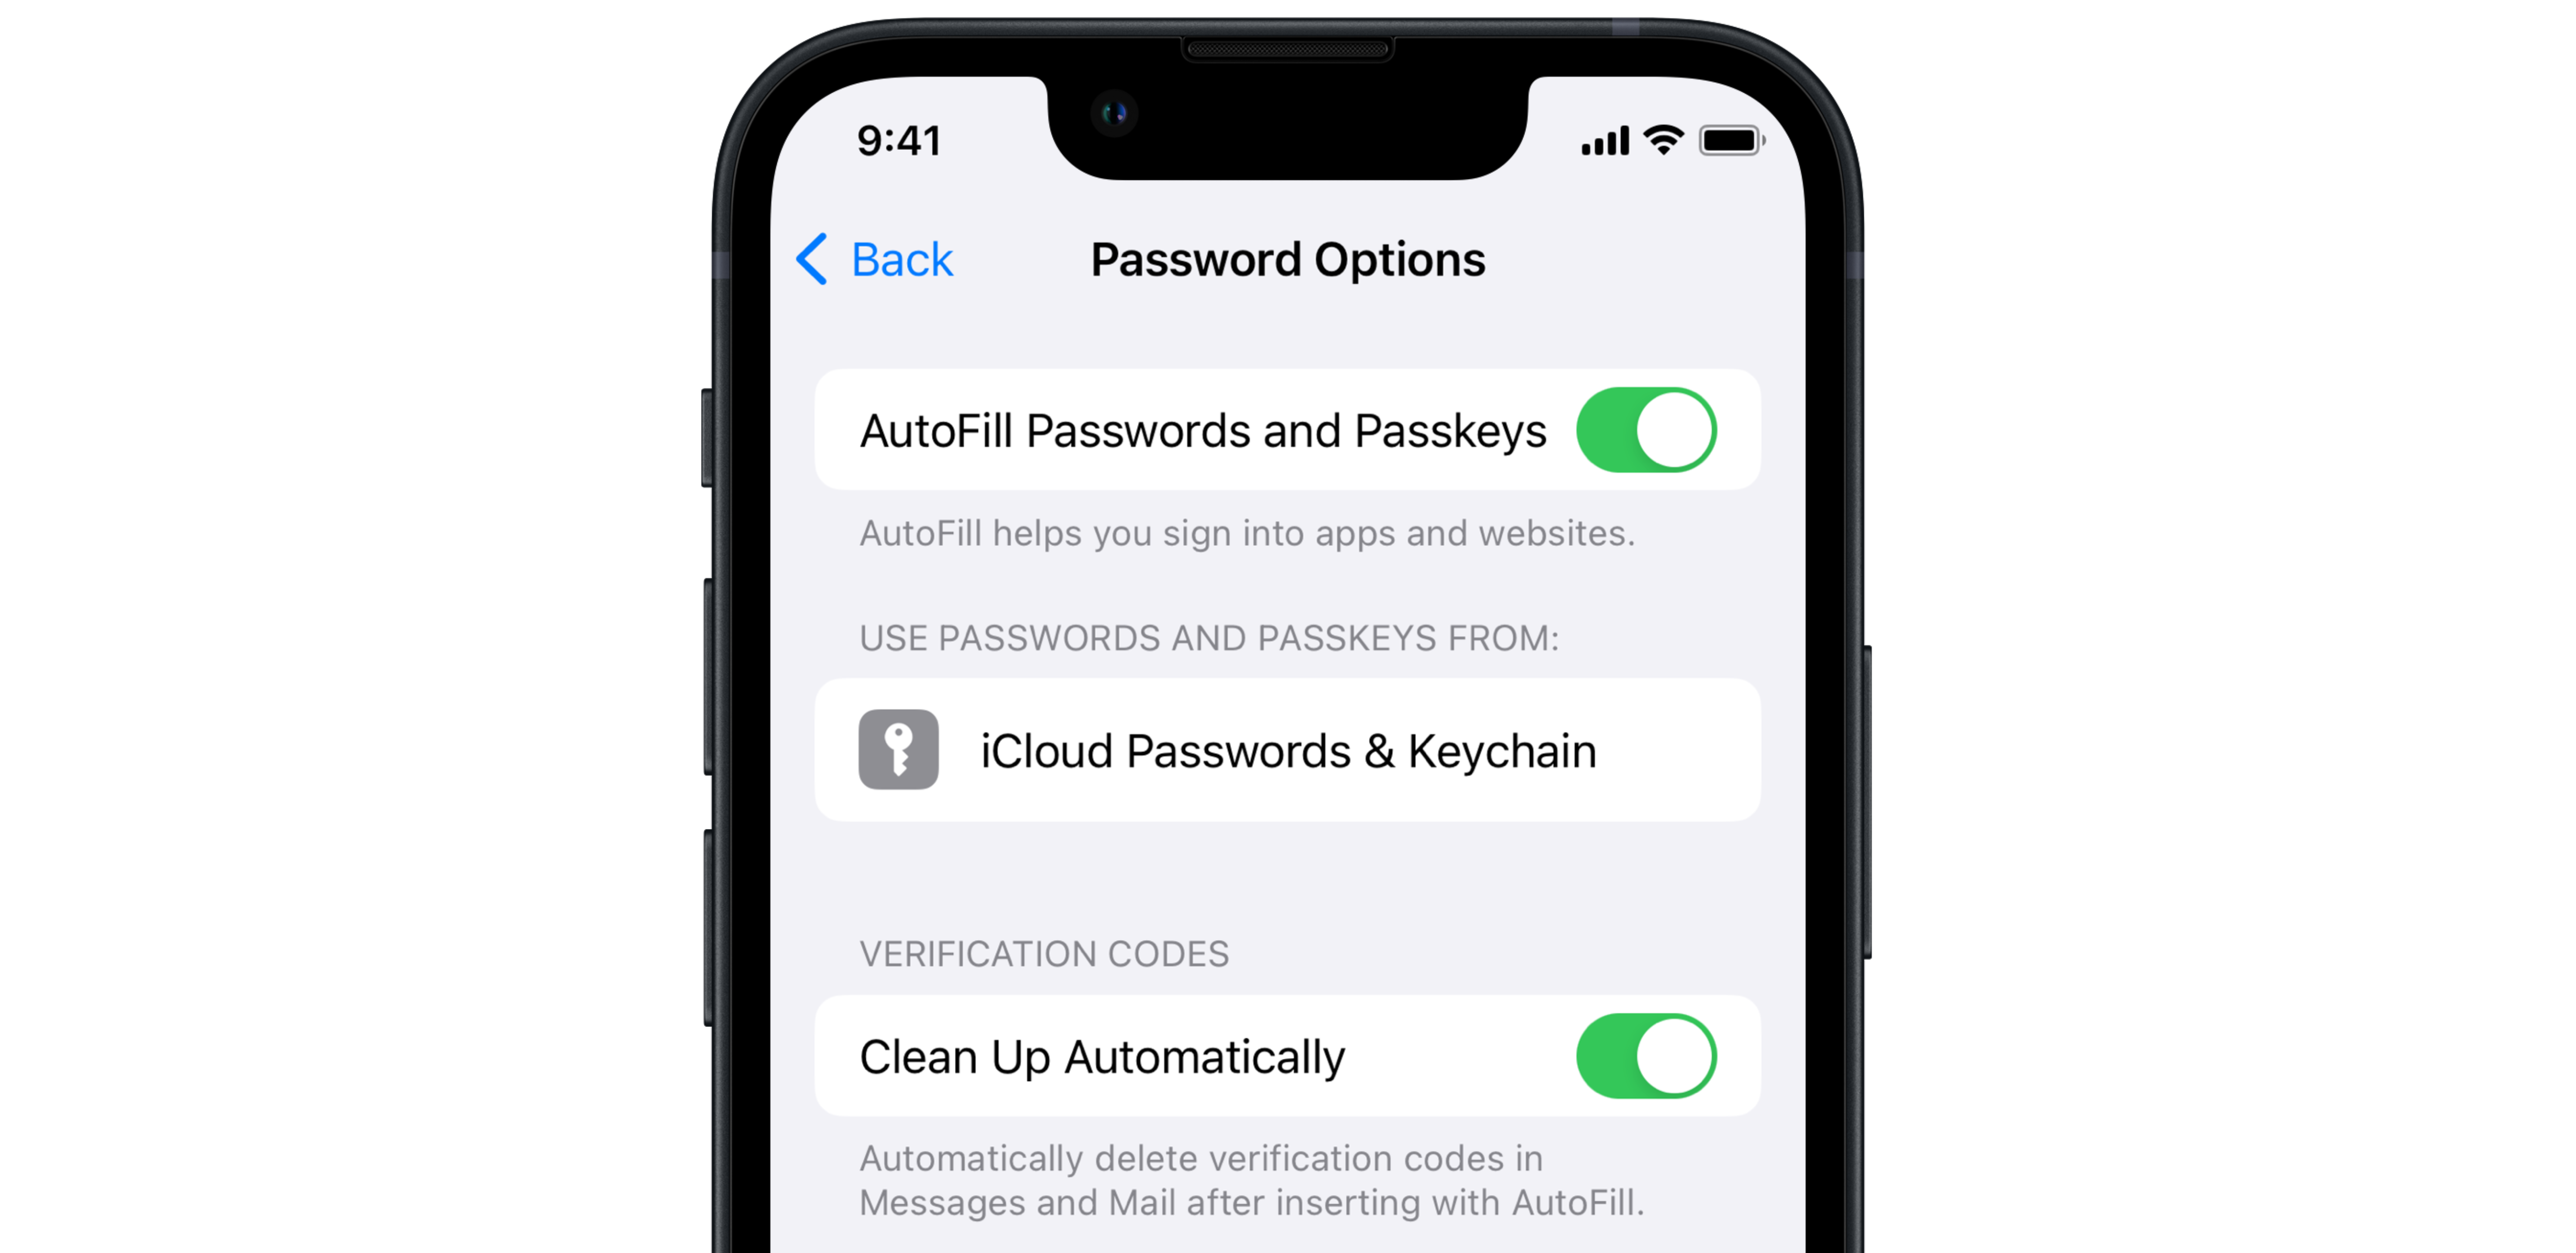
While multi-factor verification is an incredibly valuable tool for account security, it becomes annoying to have to delete used verification codes texted to you. Apple aims to automate that process by automatically deleting multi-factor authentication codes texted to you once auto-filled. Apple is calling this feature Clean Up Automatically.
To turn on Clean Up Automatically:
- Open Settings
- Tap Passwords
- Verify with Face ID or your device passcode
- Toggle Clean Up Automatically on (green)
Search filters
 Have you ever tried searching the Messages app for a specific link or photo yet were unable to find what you were looking for? iOS 17 brings greatly improved search functionality to your conversations in Messages. In iOS 16, the search functionality in the Messages app was limited to specific words. For example, searching for the word “link” would yield conversations where that word was used.
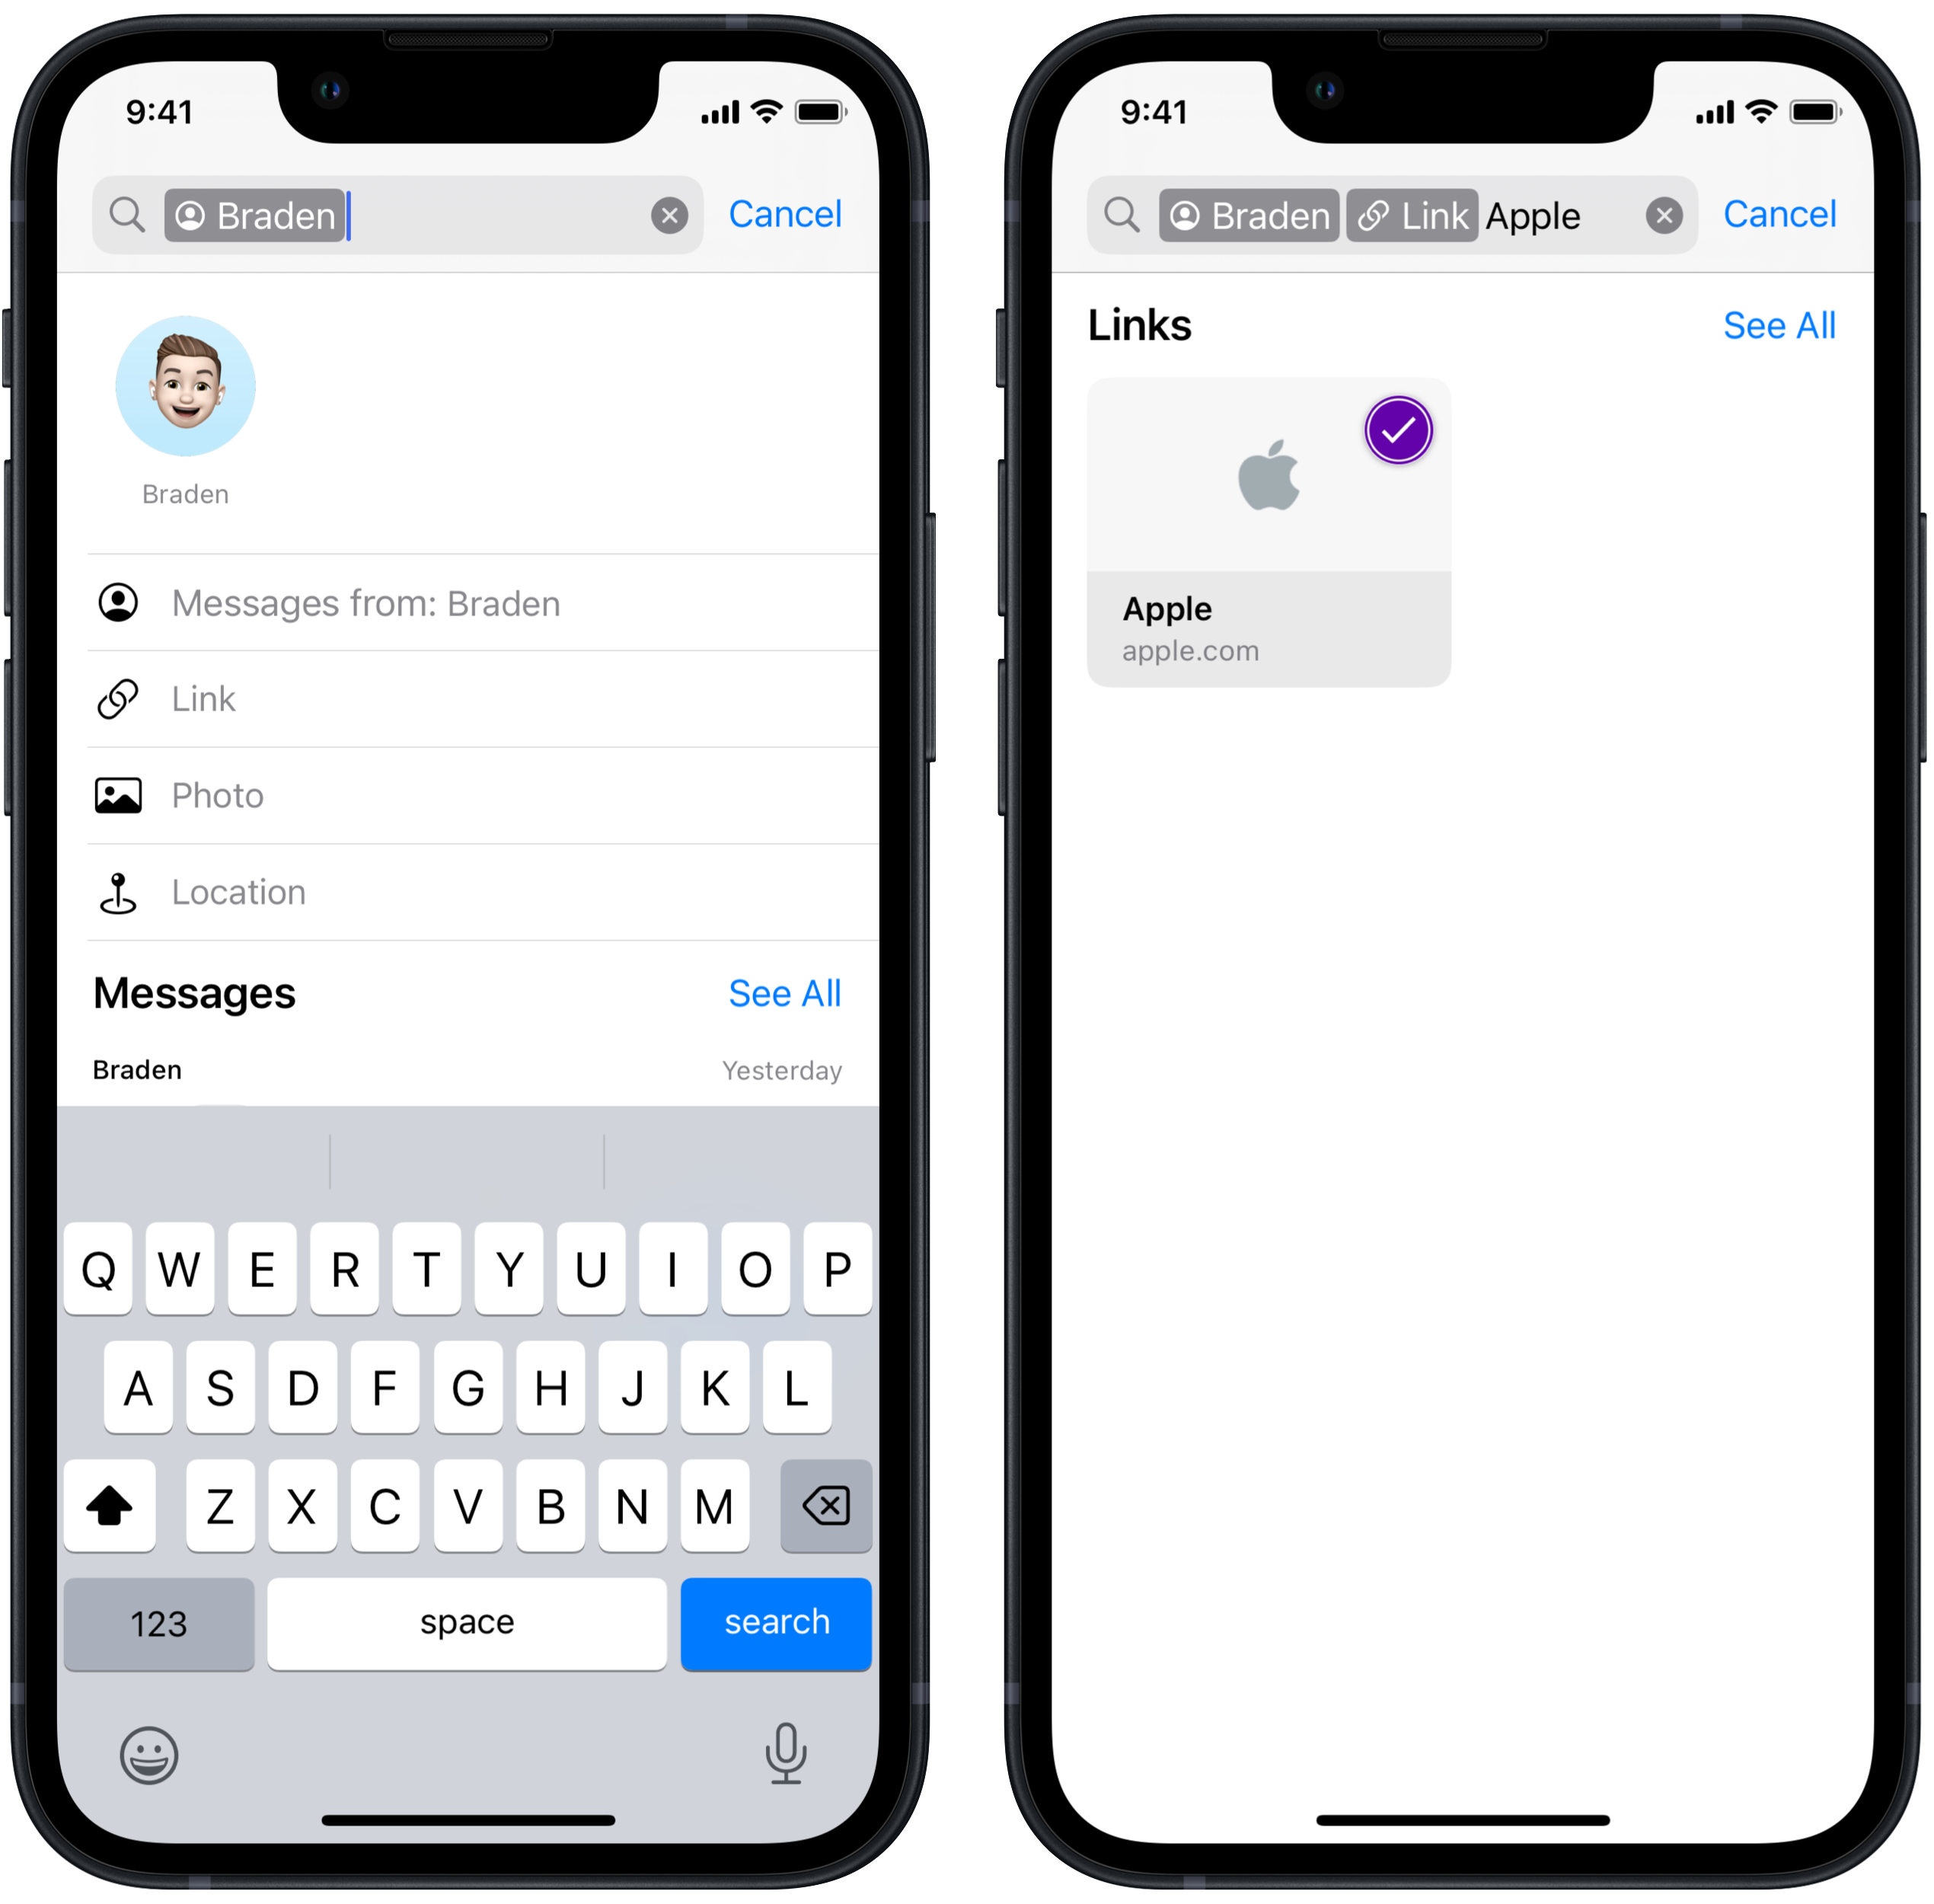
Now, in iOS 17, we can refine our searches with filters. For starters, you can enter the name of a contact to search within a specific conversation. From there, if you’d like to refine your search further, you can use filters such as Messages from, Link, Photo, Location, and Document. Once you add an additional filter, you can write a word to complete your search’s parameters.
To use Search Filters in Messages:
-
- Open messages
- Tap Search
- Type in a contact’s name
- Tap Messages with: contact’s name
- Optionally, add an additional filter by typing Link, Photo, Location, or Document
- Tap on the filter once it appears
- Type in the word you’d like to search
- Tap on the found result
Check In
 Check In is iOS 17’s headlining safety feature. Whether you or a friend are travelling alone, maybe late at night, and you want to keep someone trusted to know when you’ve made it to your destination safely, Check In is Apple’s new messaging feature to communicate your safe arrival.
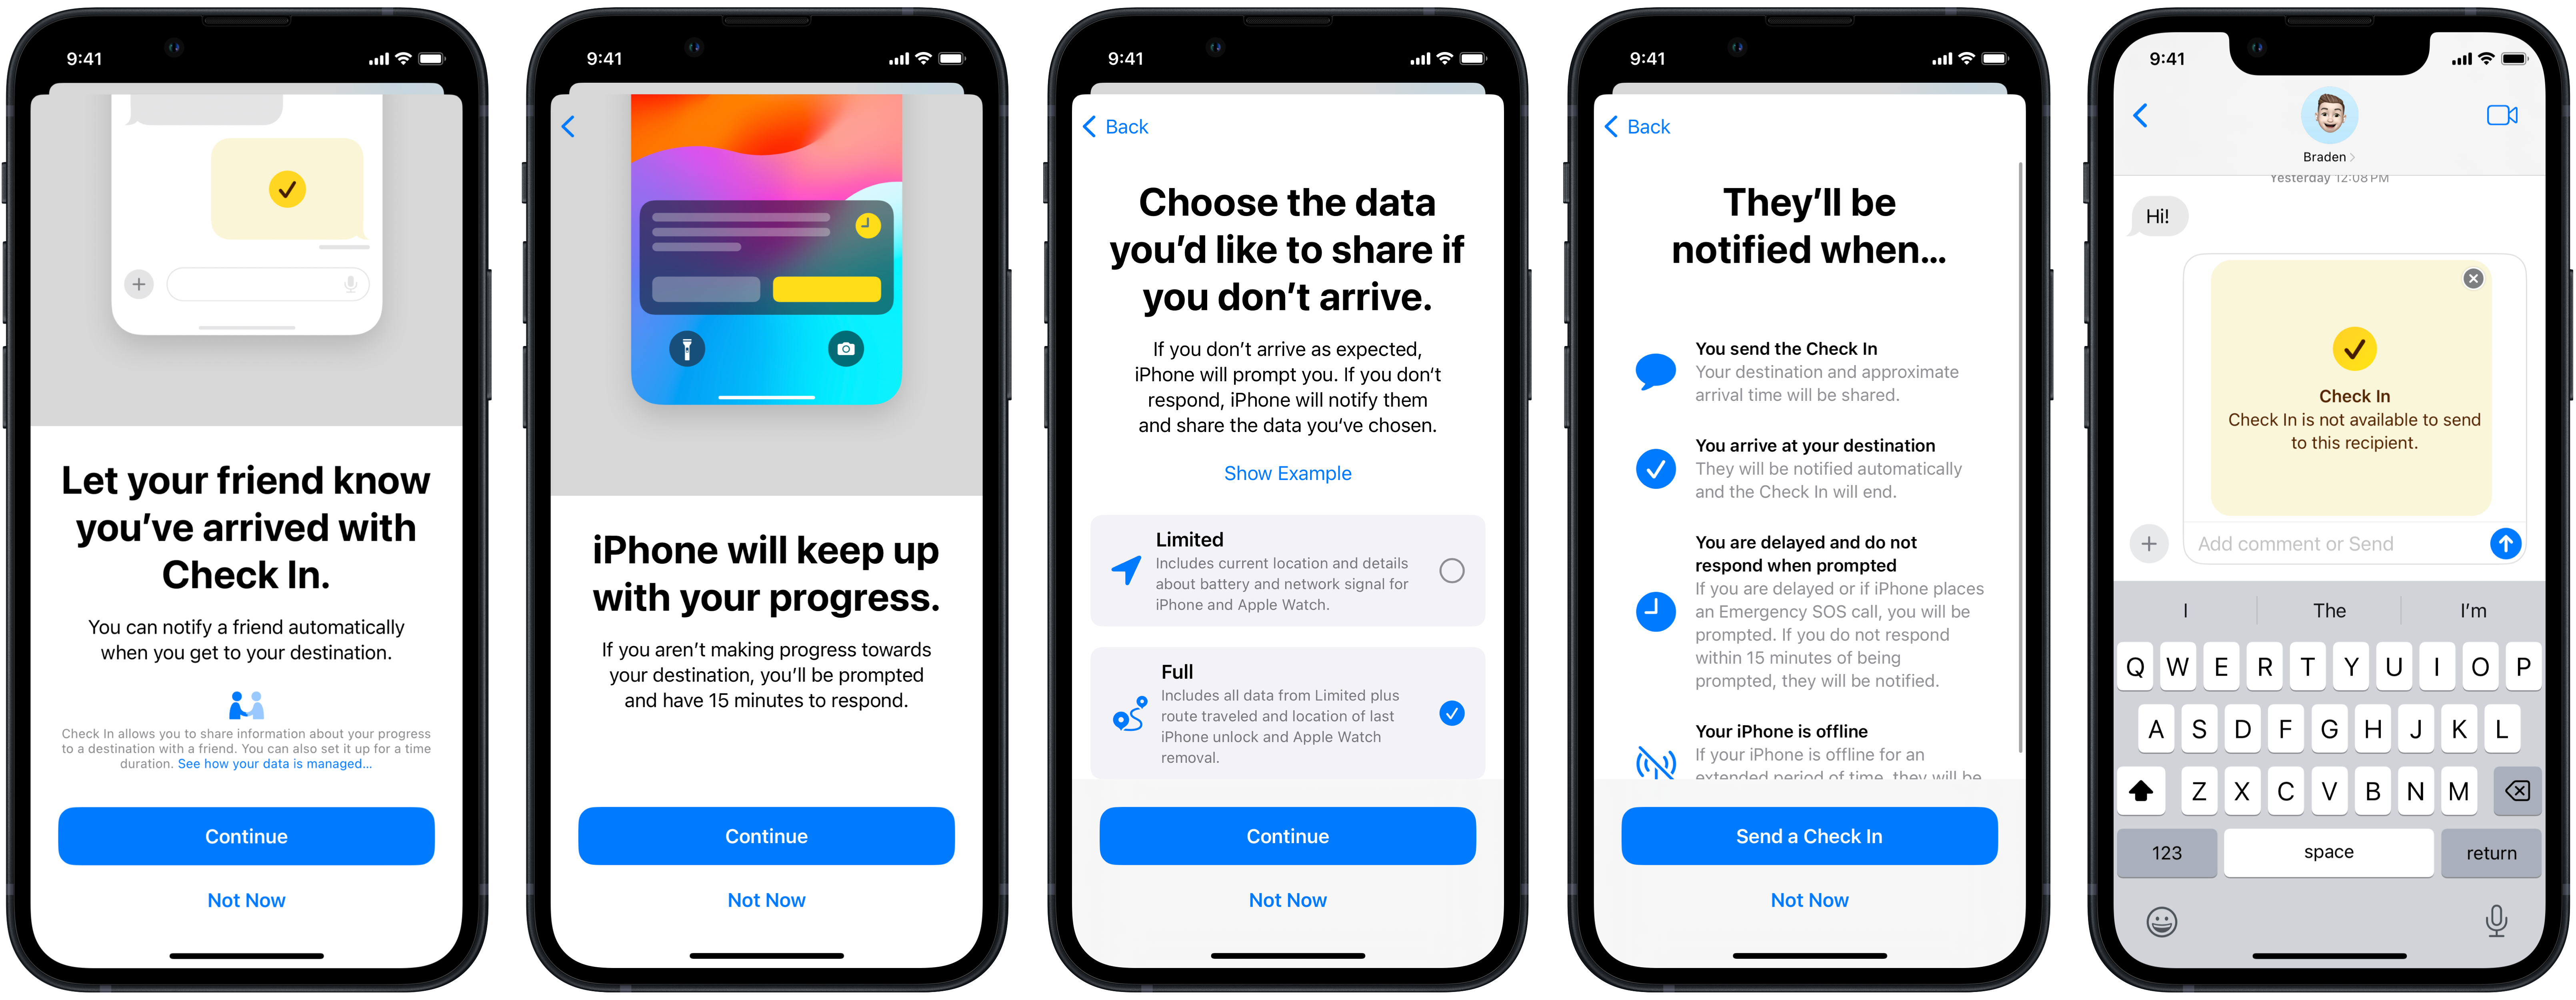
When setting up Check In for the first time, you’re prompted to select ‘Full’ or ‘Limited’ access. Limited access can grant the recipient your device’s location, battery life, and cellular signal levels. Meanwhile, Full access provides the same as Limited with the addition of seeing your entire route, when you last unlocked your iPhone, and last removed your Apple Watch. You can adjust these settings by tapping Edit before sending a Check In.
Before sending a Check In, you’ll set your trusted location if different from your default, like your home. Assuming you arrive home within the predicted time, your Check In contact will be notified of such. However, you’ll be prompted with a safety check if you do not get home within the predicted time. Your safety contact will be notified if you fail to check in within 15 minutes.
To set up Check In:
-
-
- Open Messages
- Tap on the conversation with the person you’d like to share your Check In with
- Tap the plus button to the left of the input text field
- Swipe up
- Tap Check In
- Tap Continue
- Tap Continue
- Select either ‘Limited’ or ‘Full’
- Tap Continue
- Tap Send a Check In
- Tap the blue send arrow to send your Check In
-
Privacy & Accessibility
Of course, Apple would not be Apple if they didn’t add new privacy and accessibility features.
For privacy, the tracking parameters stored in URLs are now automatically stripped out when shared in Messages, as well as in Safari and Mail. Removing the tracking parameters from URLs helps to limit cross-website tracking.
For accessibility, users sensitive to rapid animations can pause images with moving elements like GIFs in Messages, Safari, and other apps like browsers.
To turn off Auto-Play Animated Images:
-
-
-
- Open Settings
- Tap Accessibility
- Tap Motion
- Toggle Auto-Play Animated Images to off (grey)
-
-
MobileSyrup may earn a commission from purchases made via our links, which helps fund the journalism we provide free on our website. These links do not influence our editorial content. Support us here.
