“It’s all in the cloud, isn’t it?” and “I don’t want to pay for the iCloud.” Among others, these were two of the most common lines I hear whenever I mention iCloud. But I absolutely love iCloud, and I believe it’s a service that every Apple user can benefit from.
Whenever someone asks me why I love using Apple devices so much, iCloud is one of my top reasons. Every year, Android and PC manufacturers launch new high-tech and innovative products. Even Windows 11 is skinned like macOS. Yet, no cloud-syncing service works across my computer, phone, tablet and even TV quite like iCloud.
iCloud was released in 2011 to replace the now long discontinued MobileMe service. While iCloud isn’t perfect, it’s leaps and bounds better than its predecessor. Let’s do a deep dive into how iCloud works, how much it costs and everything the service can do for you.
iCloud: The best place for all your photos, files and more
iCloud is a cloud syncing and backup solution released by Apple on June 6th, 2011. iCloud+ is the premium paid tier of iCloud, offering extra storage and additional features. iCloud provides four categories of functionality: file syncing, iOS device backup, email hosting and a small handful of miscellaneous iCloud+ exclusive features.
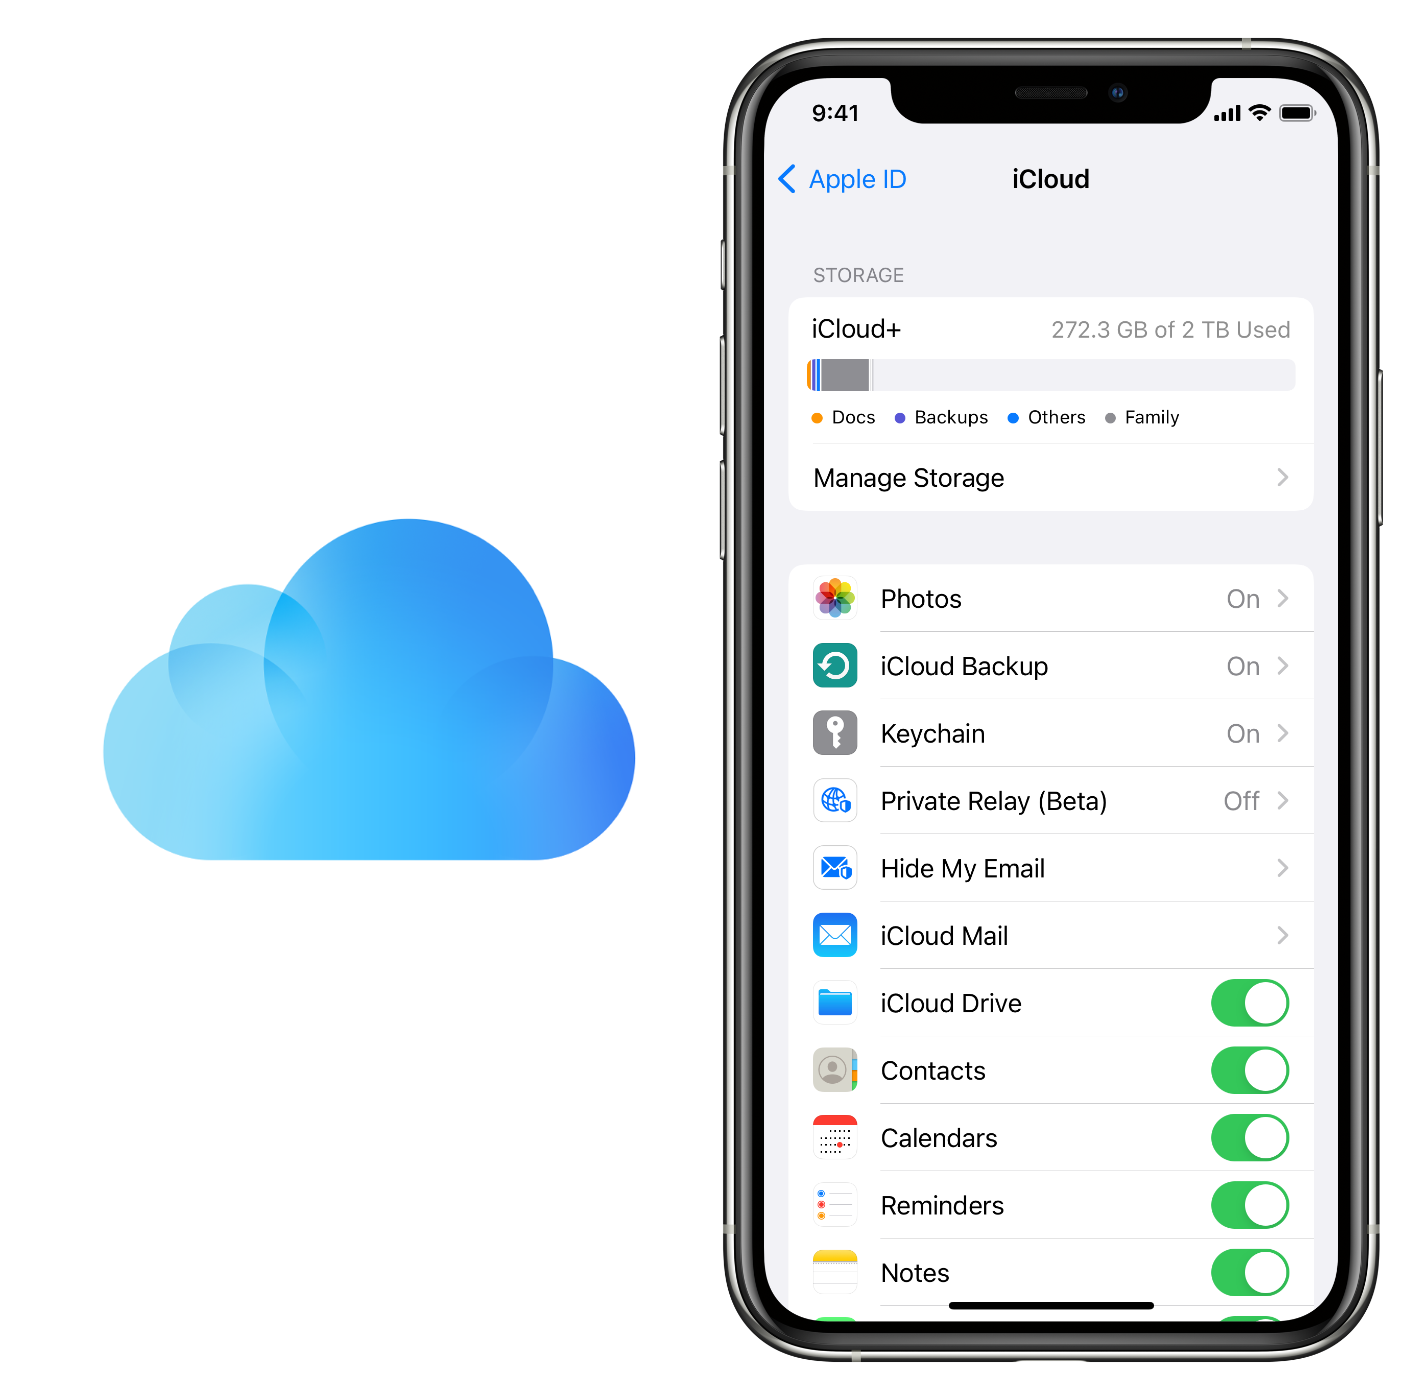
Every user gets 5GB of cloud storage for free, allowing for iCloud Drive, iCloud Photos, iCloud Backup, and iCloud Mail. However, 5GB is more of an unlimited free trial. Very few people (if anyone) can actually stay within that 5GB storage limit. Most of us will find ourselves upgrading to an iCloud+ tier for the additional storage.
To my surprise, many people work exhaustingly hard to keep their devices within the 5GB free storage limit. While it’s not fun to pay for another subscription service, iCloud+ offers a lot of useful functionality, ensuring your data is synced and backed up. I’ve seen many people turn off features in iCloud that they don’t use. But if you don’t use it, it’s not taking up any storage. So, leave even the features you don’t use enabled because if you ever start using them and something happens to your data, you’ll be thankful iCloud has your back.
iCloud Drive: Any type of File. All in one place
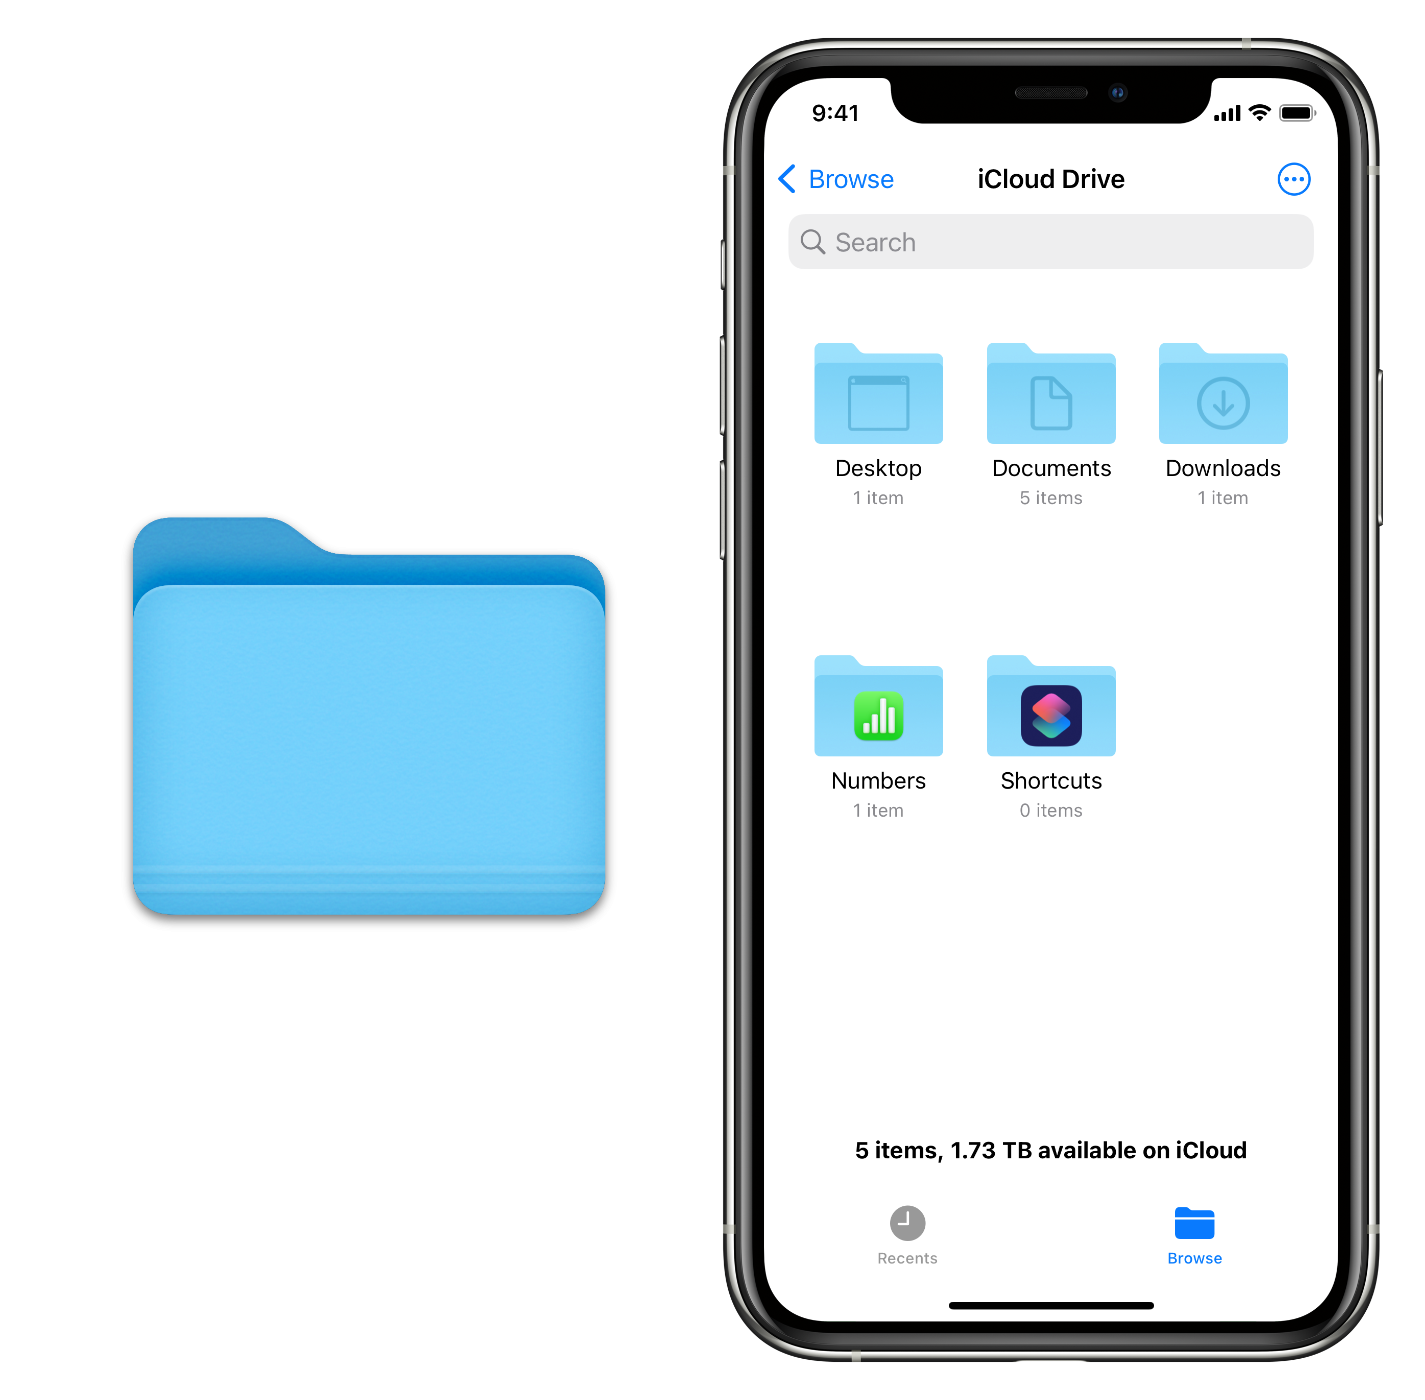
iCloud Drive is by far my favourite iCloud feature. It’s a solid competitive edge that Apple’s ecosystem has over competitors. iCloud Drive syncs files between your Mac, iPad, iPhone, and even Windows PC. By extension, Apps for iCloud is the syncing feature that allows individual apps like contacts, calendar, TweetBot, and many others to keep the information the same between all your devices.
iCloud Drive and Apps for iCloud are functionally both syncing features that do the same thing — they keep your information available and up to date on all your devices. There’s something magical about being able to start writing this article on my Mac while in my office, then continue it on my iPhone while walking my dog, and finish it on my iPad while at a coffee shop.
Additionally, iCloud Drive and Apps for iCloud keep your data in iCloud and locally on your device. Suppose your Mac gets water damage, and you don’t have a backup. In that case, all of your files can be downloaded from iCloud. Additionally, suppose you begin to run out of storage on a device. In that case, you can remove the local copy from your device but keep it available in iCloud for a future download if needed.
To enable iCloud Drive and Apps for iCloud on iOS/iPadOS:
1. Launch ‘Settings’
2. Tap your name at the top
3. Tap ‘iCloud’
4. Toggle any of the apps you see listed on (green) such as iCloud Drive, Contacts, Calendars, Reminders, Notes, Messages, etc.
To set up iCloud Drive and Apps for iCloud on macOS:
1. Launch ‘System Preferences’
2. Click ‘Apple ID’
3. Click ‘iCloud’
4. Check off any of the apps you see listed such as iCloud Drive, Contacts, Calendars, Reminders, Notes, Messages, etc.
iCloud Photos: All your photos and videos — always available

iCloud Photos is very similar to iCloud Drive and Apps for iCloud. Photos are some of the most sentimental data we will ever keep on our devices. iCloud Photos helps to keep your photos available everywhere.
iCloud Photos does offer a feature called ‘Optimize iPhone Storage,’ which allows you to save space on your device when it begins to run low on storage. Your iPhone takes much larger and better quality images than what can be shown on it. When you have lots of on-device storage, the photo size doesn’t matter. However, once you begin to run out, Optimize iPhone Storage can automatically upload the larger-sized photo to iCloud to be retrieved if ever needed and keep a smaller device-sized image left on the device for viewing. Optimize iPhone Storage only kicks in when a device has less than ten percent free storage. Alternatively, users can select the ‘Download and Keep Originals’ option to ensure the full resolution copy of their photo remains local on their device.
iCloud Photos also offers Shared Albums which are iCloud photo albums that people can share with their friends and family. All parties can contribute photos and access these albums at any time. Shared Albums don’t count towards your iCloud storage. Still, they store a lower resolution photo than if you send the image via another means.
To enable iCloud Photos on iOS/iPadOS:
1. Launch ‘Settings’
2. Tap your name at the top
3. Tap ‘iCloud’
4. Tap ‘Photos’
5. Toggle ‘iCloud Photos’ on (green)
6. Select ‘Optimize iPhone Storage’ or ‘Download and Keep Originals’
7. Toggle ‘Shared Albums’ on (green)
To set up iCloud Photos on macOS:
1. Launch ‘System Preferences’
2. Click ‘Apple ID’
3. Click ‘iCloud’
4. Check off ‘Photos’
iCloud Backup and Restore: All the things that matter. Safe and secure
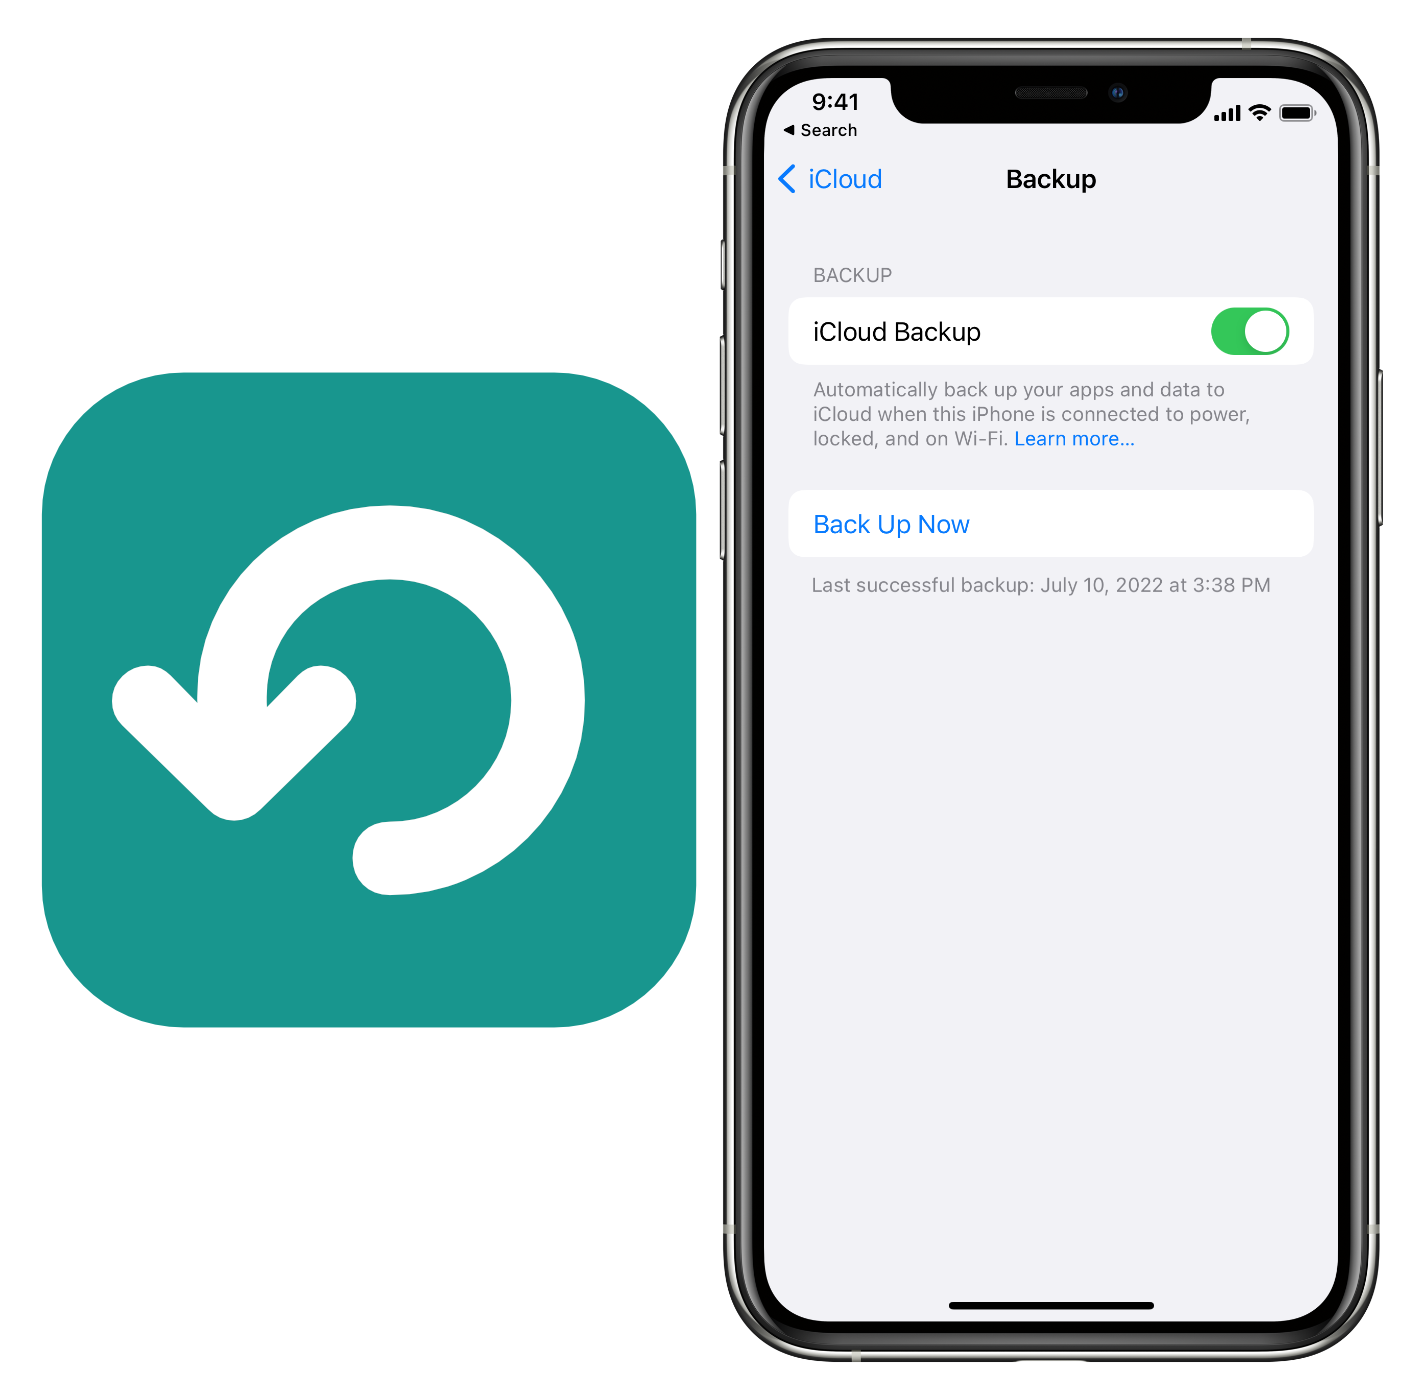
iCloud Backup is the feature that comes to most people’s minds when they think about iCloud. iCloud Backup creates a full copy of all the data on an iOS device (iPhone, iPad, or iPod touch). It moves the backup to iCloud to be stored in the event it needs to be downloaded for when you get a new device or need to restore your current one. iCloud Backups are not currently available for macOS.
iCloud Backups are your tried and true safety net if anything happens to your iOS device. When your iPhone goes for a swim, your child smashes their iPad, or you go to replace that iPod touch, an iCloud Backup makes setting up the new device much easier by bringing over all of your data.
Once enabled, iCloud Backups will backup every night while connected to Wi-Fi and power. We may all think that we will plug our device into a computer to manually backup our iOS device to save ourselves a few dollars a month. But let’s be honest, we’ll forget, and when the time comes, we won’t have a backup. So, do yourself a favour and ensure iCloud Backup is enabled on your device.
To turn on iCloud backup on iOS/iPadOS:
1. Launch ‘Settings’
2. Tap your name at the top
3. Tap ‘iCloud’
4. Tap ‘iCloud Backup’
5. Toggle ‘iCloud Backup’ on (green)
iCloud Mail: The one without a tagline
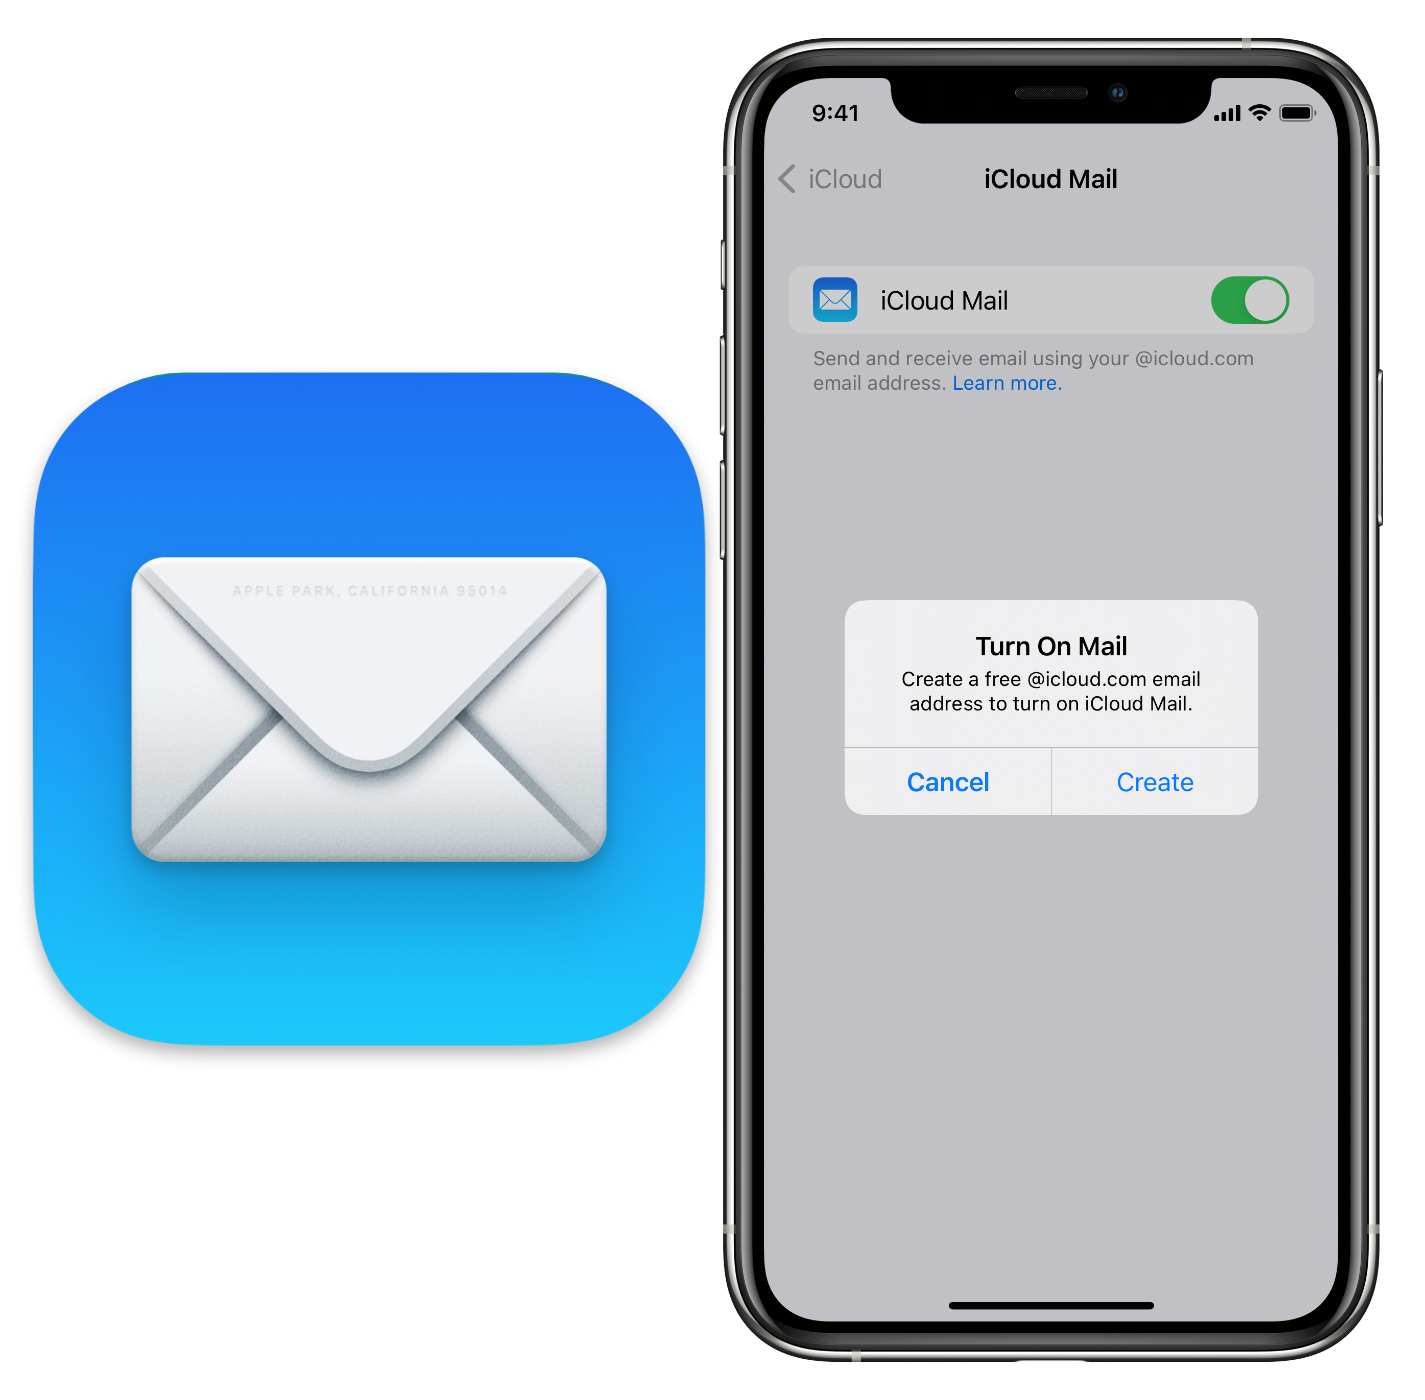
Unlike the other features offered as part of iCloud, iCloud Mail seems pretty underappreciated. So much so that it doesn’t even have a fancy marketing tagline. Not surprising since iCloud Mail is really just another email service. I’ve been using iCloud Mail for years because I prefer Apple’s privacy policy over other email providers. When creating a new iCloud email, you get to have an @iCloud.com domain. iCloud Mail is included with the free iCloud 5GB tier but received mail does count against your storage. If you run out of storage, you’ll need to upgrade to an iCloud+ plan to continue receiving mail.
To set up iCloud Mail on iOS/iPadOS:
1. Launch ‘Settings’
2. Tap your name at the top
3. Tap ‘iCloud’
4. Tap ‘iCloud Mail’
5. Toggle ‘iCloud Mail’ on (green)
6. Tap ‘Create’
7. Type in an email
8. Tap ‘Next’
9. Tap ‘Done’
To set up iCloud Mail on macOS:
1. Launch ‘System Preferences’
2. Click ‘Apple ID’
3. Click ‘iCloud’
4. Check off ‘iCloud Mail’
5. Type in an email
6. Click ‘OK’
7. Click ‘Create’
iCloud+: Powerful new features. Plenty of storage.
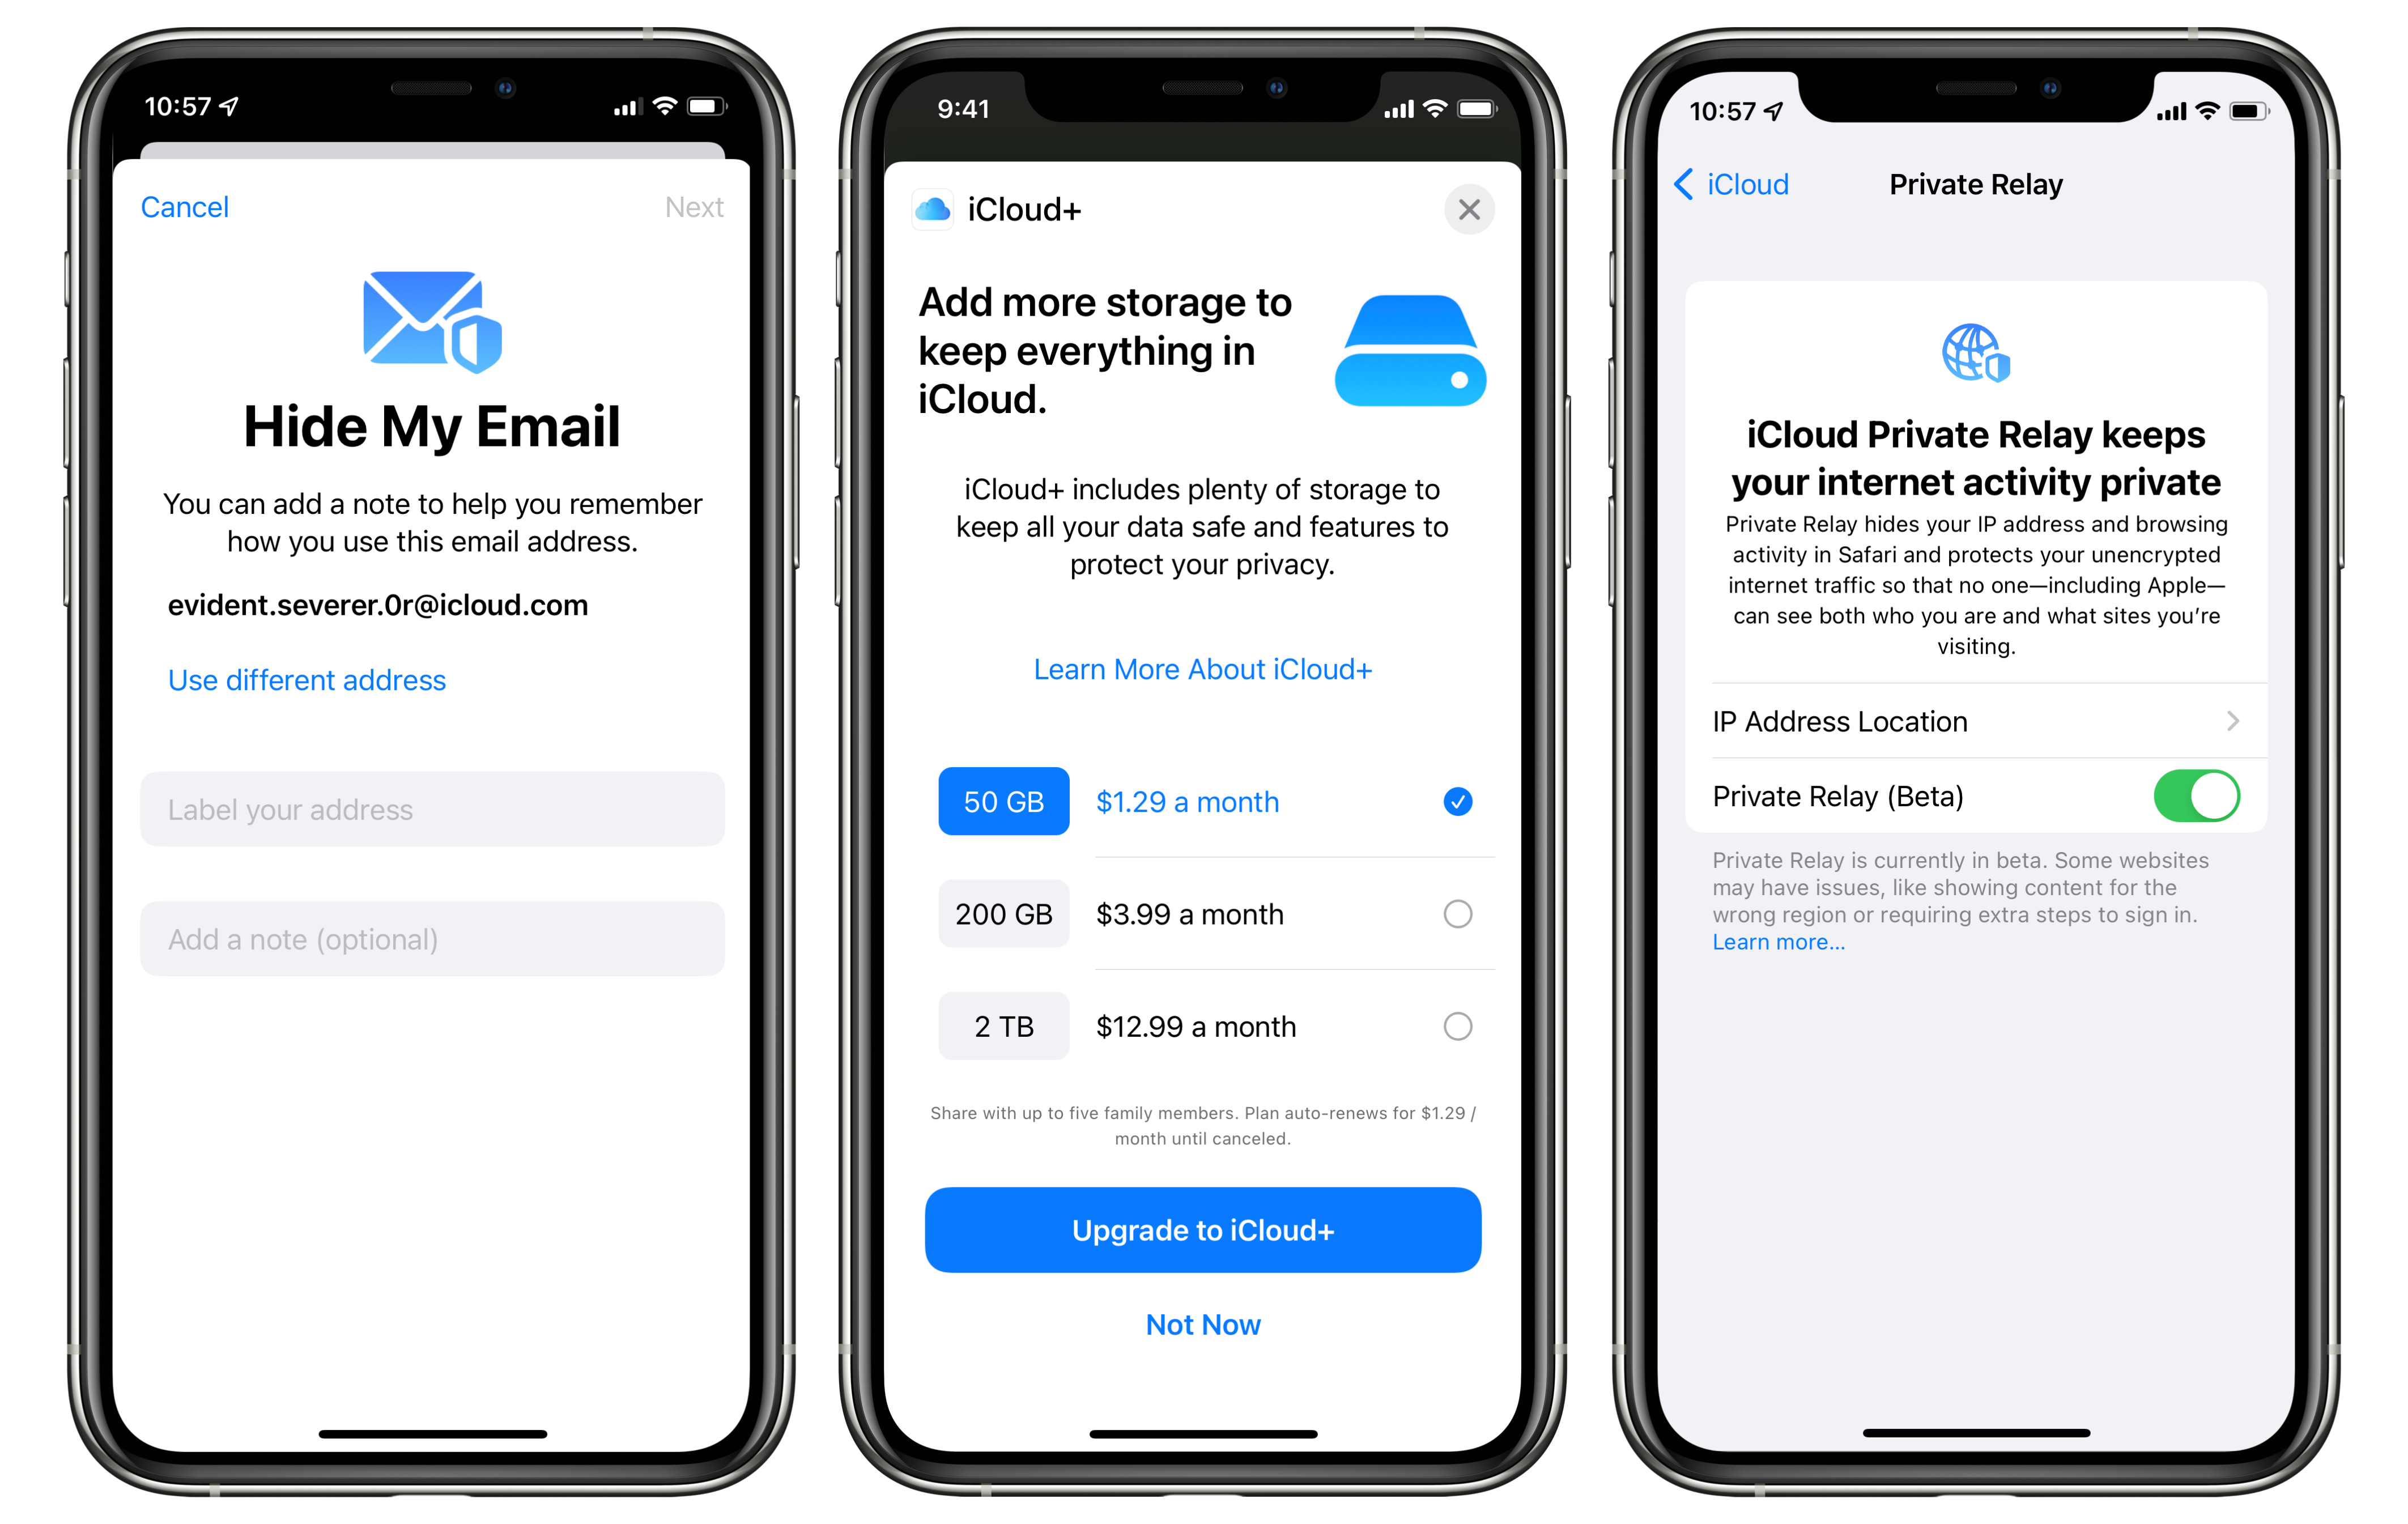
There are three options when subscribing to an iCloud+ tier: 50GB for $1.29, 200GB for $3.99, and 2TB for $12.99. All plans are per month and are included in Apple One bundles. You can also share all three iCloud+ plans as part of Apple’s Family Sharing feature. Included with iCloud+ are some neat miscellaneous features that may interest you and your family.
Private Relay is a VPN-like service that works exclusively in Safari to improve your digital privacy. When you browse the internet, data like your IP address and DNS records are sent unencrypted, making it possible for marketers to track you across the internet. Private Relay encrypts your Safari browser traffic and sends it through two separate, secure internet relays. No one can see your Safari browser traffic, including Apple and your Internet Service Provider (ISP). Private Relay is currently available only as a beta feature, so your performance may vary.
To enable Private Relay on iOS/iPadOS:
1. Launch ‘Settings’
2. Tap your name at the top
3. Tap ‘iCloud’
4. Tap ‘Private Relay (Beta)’
5. Toggle ‘Private Relay (Beta)’ on (green)
To enable Private Relay on macOS:
1. Launch ‘System Preferences’
2. Click ‘Apple ID’
3. Click ‘iCloud’
4. Toggle ‘Private Relay (Beta)’ on (green)
Hide My Email is an iCloud+ feature that allows you to generate disposable emails that forward to your proper iCloud email. The idea is when you sign up for a newsletter or service, you can generate a fake email address that automatically forwards emails to your proper email. Suppose a company or service sells your email or spams your inbox.
In that case, simply delete the fake email. Additionally, Hide My Email helps your digital privacy by reducing the number of services using your actual email. This reduces the likelihood your email can be used to track you between online services.
To create a Hide My Email address on iOS/iPadOS:
1. Launch ‘Settings’
2. Tap your name at the top
3. Tap ‘iCloud’
4. Tap ‘Hide My Email’
5. Tap ‘Create new address’
6. Copy the generated email address
7. Tap ‘Continue’
8. Enter an identifying label (i.e. “Car Newsletter”)
9. Tap ‘Done’
To create a Hide My Email address on macOS:
1. Launch ‘System Preferences’
2. Click ‘Apple ID’
3. Click ‘iCloud’
4. Click ‘Options…’ to the right of ‘Hide My Email’
5. Click ‘+’
6. Enter an identifying label (i.e. “Car Newsletter”)
7. Click ‘Continue’
8. Click ‘Copy address’
9. Click ‘Done’
Support for a custom email domain is another iCloud+ feature. Freelancers, businesses, or people who just want their own family email address may purchase their own domain. For example, I own bradennewell.ca. A custom email domain would be me@bradennewell.ca. Before iCloud+, people who have to use services like Google Workspace and Microsoft Exchange to host custom email domains. These could be pretty expensive. When already paying for iCloud+ for the storage or as part of an Apple One bundle, it’s a nice bonus not to have to pay for a separate email domain hosting service. Plus, you still get all the privacy protections of iCloud mail.
Follow this support article from Apple to set up a custom email domain.
Lastly, we have HomeKit Secure Video. HomeKit Secure Video is a feature where all of a video camera’s feed is encrypted by your Home Hub (HomePod, Apple TV, or iPad) and then securely sent to iCloud for storage. Because all the encryption is done on your local network before going to iCloud, no one, not even Apple, can see the recording data.
This is refreshing, considering we’re seeing stories of companies like Amazon’s Ring providing footage to law enforcement without the recording owner’s consent. HomeKit Secure Video does require a supported camera such as the Logitech Circle View. Additionally, it must be set up with Apple HomeKit. While HomeKit Secure Video footage doesn’t count against your iCloud storage, there are limits on the number of cameras on each iCloud+ tier. The 50GB tier supports one camera, the 200GB tier supports five, and the 2TB tier offers support for unlimited cameras.
You can learn about setting up HomeKit Secure Video with this support article from Apple.
MobileSyrup may earn a commission from purchases made via our links, which helps fund the journalism we provide free on our website. These links do not influence our editorial content. Support us here.
